Using Lightning Design System to improve your Salesforce1 Actions

With the launch of Lightning Experience, Salesforce also pushed heavily to produce some amazing new documentation on customizing inside of Lighting Experience.  If you haven’t heard of http://www.LightningDesignSystem.com, prepare to have your mind blown!  If you are not a developer you might think that it doesn’t have anything for you, but you’d be wrong.  Lets take a look at an overview of what you can find on the Lightning Design System site, and then how an Admin can make use of it!

Lightning Design

Design Principles

This is a nice overview of the concepts behind creating a beautiful finished product.  Think about these as you’re developing your App.  Even if you’re not building a Lightning Component this applies to creating a clean and readable Page Layout as an Admin.

Lightning Design2

Components

This is a great way for you to get some boilerplates for Lightning Components if you’re interested in going down that track.  This has all of the code you’ll need to get started with customizing the look and feel of any Lightning Components you are building.

Voice and Tone

This provides you with examples of how your communication to the End User should be written.  If you’re ever confused and want examples on how you might word a help bubble or something similar, take a look here for some great examples!

Native

As of this post, this is currently just iOS, but provides you information on how to integrate the Lightning Design system with your native iOS applications.

Resources

Here is where I live.  As someone who isn’t writing Lightning Components from scratch everyday, what am I doing on this site so often?  Its simple!  I’m looking at all the Icons… there are a TON!  They give me a good idea of what I might be able to use for my Clients custom Actions.

Lightning Design3

If you notice right above the Icons section is a Downloads section.  We’re able to install the Zip into our Org (as a Static Resource), which is great if you’re using Lightning Components.  However,  if we’re looking to use these for an Action we will have to create our own and import them as a Static Resource.  So lets walk through that!

Download the Icons

Lightning Design4

Open up the Zip file and find the Icon you want to use (notice the name on the site is the same as the file name).

Lightning Design5

Use an image editing software that has a paint bucket for you.  I personally use Photoshop, but really anything will do!  Customize the Icon to whatever crazy color scheme you want!

Lightning Design6

Lightning Design7

Now you just need to upload to Salesforce as a Static Resource.

New Static Resource

Make sure you mark it as Public if you want others to be able to see it.

Static Resource 1

And now you’re ready to put it in your Action!  Just like that you’ll be able to make your Org look extra slick!

Reassign Case using a Quick Action and Flow

I’ve lately been involved with quite a lot of Service Cloud implementations.  One thing that I’ve noticed almost all of them have in common is that their Cases never seem to always go to the right Department – or they need to be sent to another mid-Case.  The most common complaint usually has to deal with how many screens someone has to go through to successfully reassign the Case, especially if you’re in the Feed View and not the Detail View of the Service Console.  If you noticed, Owner isn’t an option for us in a Record Update on the Quick Action Page Layout.  So, that means we have to get creative to solve this business problem!

We need to make sure we have a few things built before we begin.  In this case, we need to add two fields to our Cases.

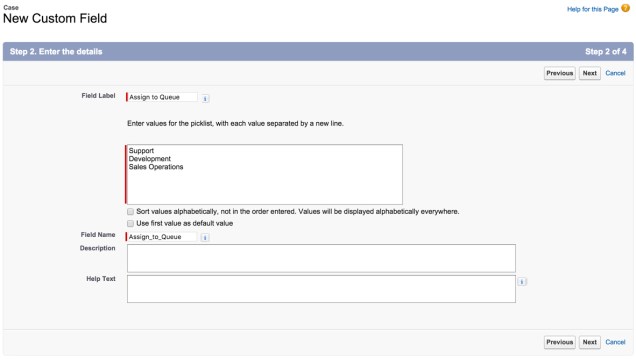
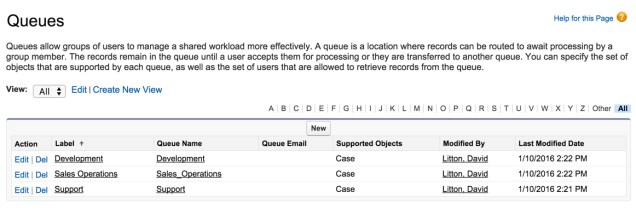
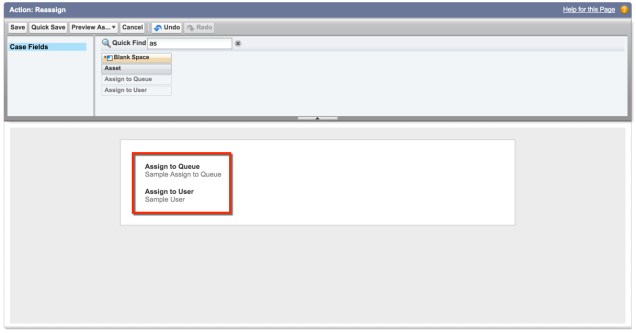
The first field is going to be a dropdown that will allow us to mirror the list of Queues available for Cases.  We will call this Assign to Queue.

Reassign to Queue

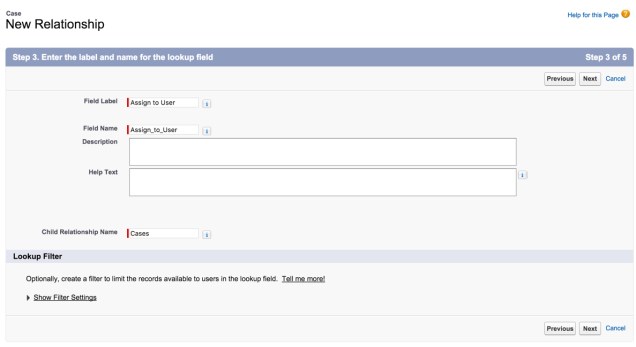
The next field we need to create is a User Lookup.  This we’re going to call Assign to User.  We are using this in place of the Owner field, because that isn’t allowed (at the time of this post). Note: this is a Lookup to the USER Object, not CASE.  The Child Relationship Name is referring to what this Lookup would be called in relationship to the User Object on a Page Layout (if that was visible), not that it is a Lookup to the User.

User Lookup

We could make a Validation Rule to only allow one of those fields to be filled out, but we’re just going to do a decision of ‘what matters’ in our Process Builder that will ignore that being needed.

Now that we have our Custom Fields built, lets make sure every value on the Reassign to Queue field has a match!

Queues.jpg

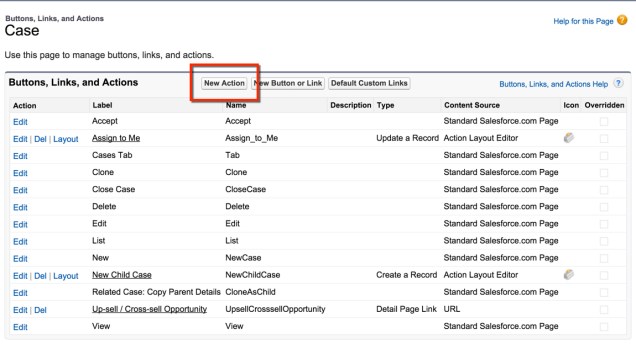
Now that we have that taken care of, lets build our Action!  Navigate to the Buttons, Links, and Actions section under Cases and then select New Action.

New Action boxFor this Action we are going to be doing a Record Update.  This is because we are going to be updating one of the Assign to fields we created at the beginning.

Action Update a Record

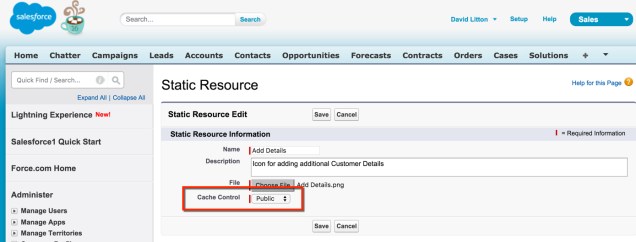
You have the option to insert your own Icon here.  I like to do this for my clients and even customize it to be one of the colors from their logo.  I’ve got a post coming shortly on how you would do this, but for the meantime you can go checkout http://www.lightningdesignsystem.com by yourself!

Action Change Icon

Now we need to clear out default layout our Action has.


Clear Layout

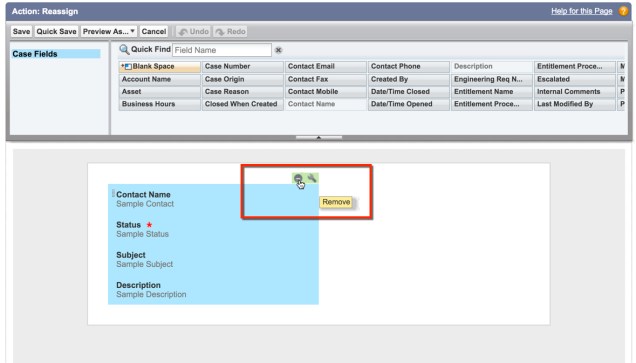
To finish our Action we just need to drag in our Queue and User fields.  Once you do this hit Save and you’re done with your Action!

Edit Action Layout

Now we need to go add it to our Case’s Page Layout.  We want to drag it down to the Quick Actions section.  If you haven’t customized your Salesforce1 Actions yet, they’ll just mirrors your Quick Actions layout.

Drag into Layout


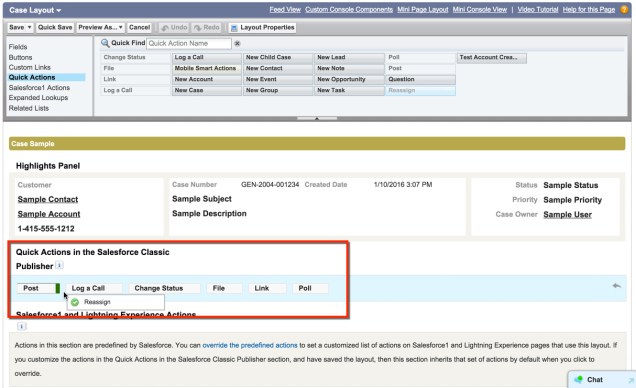
And this is what it looks like!

Finished Action


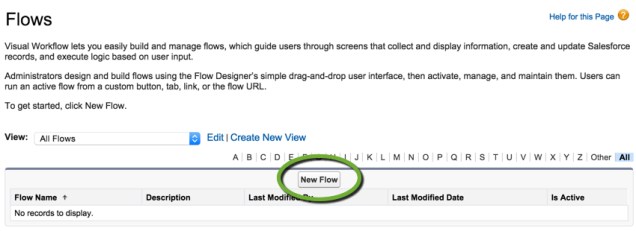
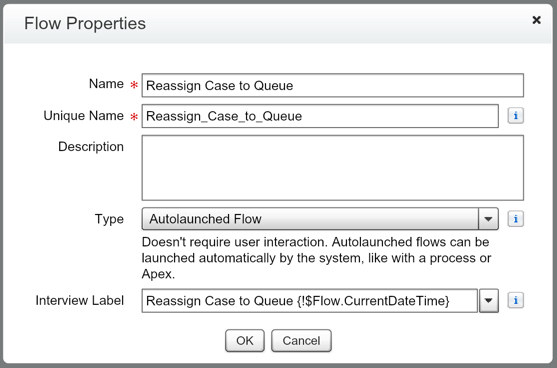
Now, lets jump over and build out our Flow!  (Setup | Create | Workflows & Approvals | Flows)

New Flow

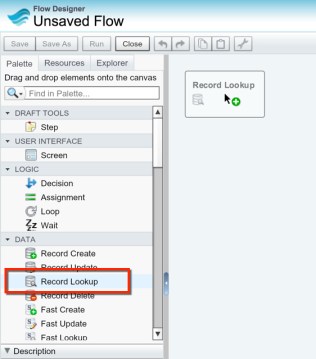
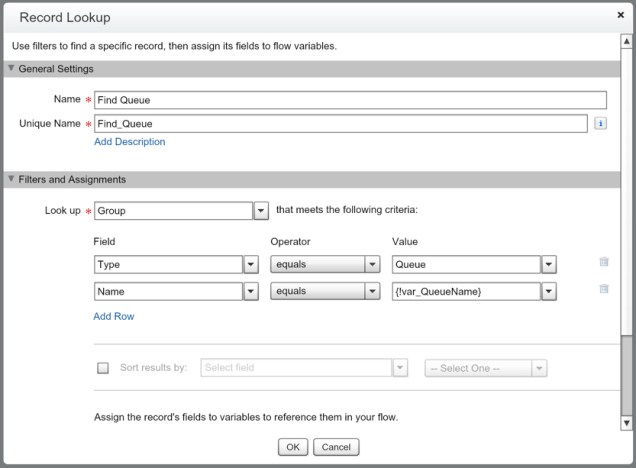
The first step is going to be grabbing our Record Lookup.

RecordLookup1

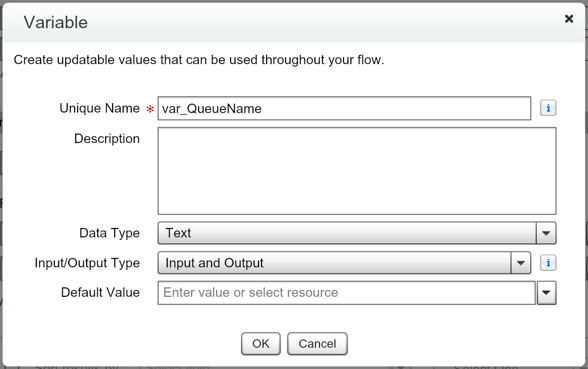
We’re going to be needing to create a variable to store our Queue Name, which we will pass in from our Process Builder.

var_QueueName

Notice, we are using a filter to make sure that Type = Queue.  This is because the Group Object houses more than just Queues.  It houses other types of Groups like Public Groups!  We just want to make sure we bring back the correct ID in case another type of Group has the same Name.

Find Queue

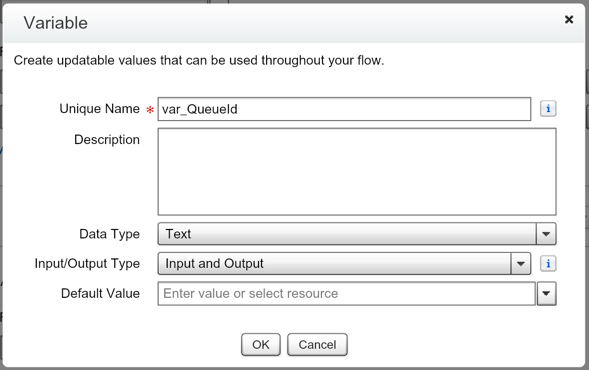
Now lets create a variable to store that ID that we are looking to get.

var_QueueId

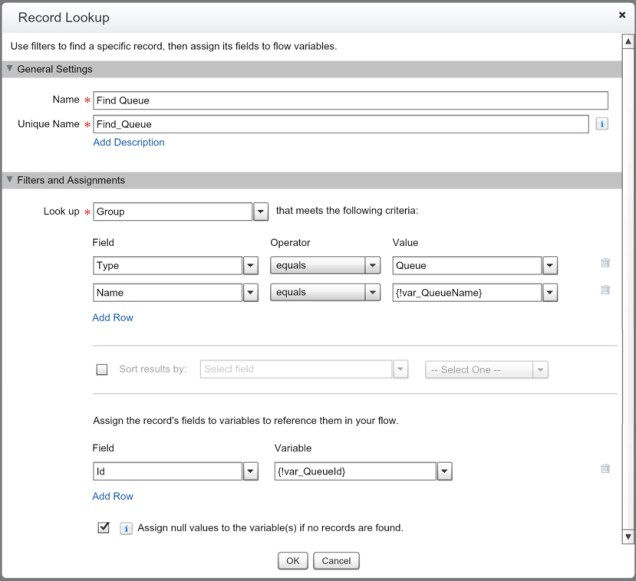
Our finished Record Lookup will look like this:

Find Queue 2

Lets set it as our starting element

SetStartElement.jpg

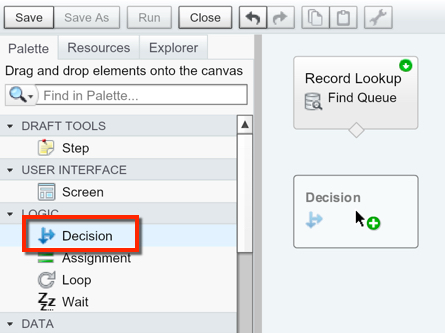
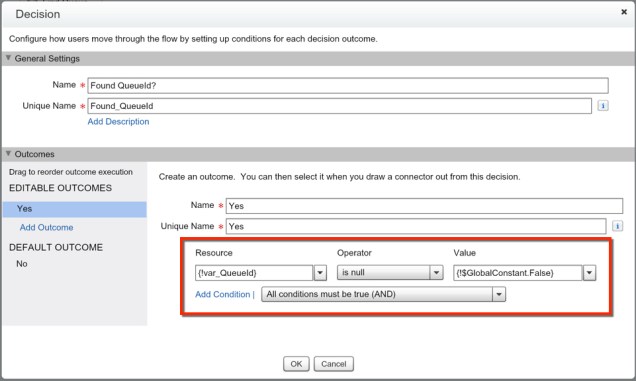
The next thing we are going to do is to use a Decision to validate that we found an Id.  You can read more about it in my post on using Decisions as your Test Coverage, so we won’t cover this step in detail here.

Add Decision.jpg

QueueDecision.jpg

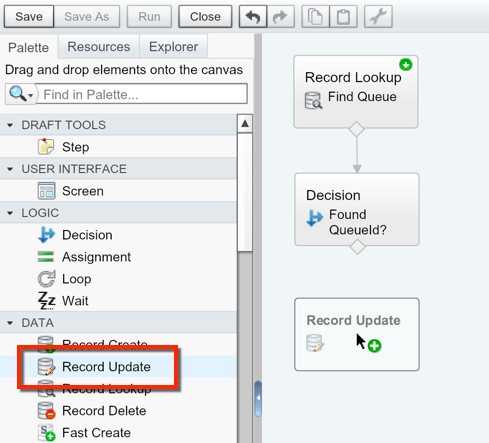
Now, lets drag in a Record Update element so that we can update our Case!

Drag Record Update

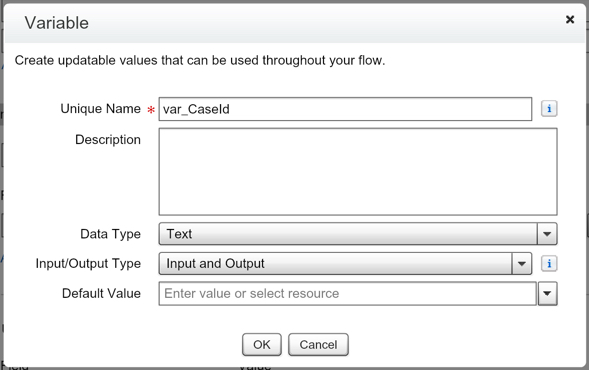
We want to create a variable to house our Case Id that we are going to pass in from our Process Builder.  This allows us to make sure we are updating the correct Case.

var_CaseId

We need to update the OwnerId with our  variable var_QueueId, and to update the Assign to Queue field with an empty string so that it can be used again.

UpdateCase

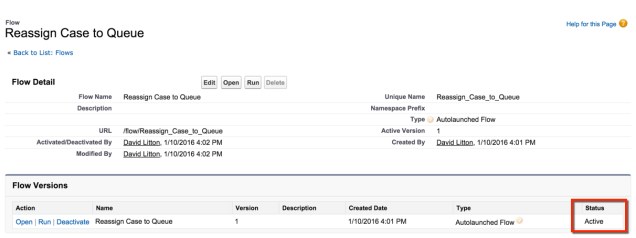
After saving our Record Update, we need to connect our elements together and then save our Flow.

FinishedFlowQueue.jpg

Save Queue Flow.jpg

Make sure you activate your Flow or it can’t be referenced in Process Builder!

ActiveFlowQueue.jpg

Now, our Flow is completed and activated, but right now its doing nothing!  So we need to have a Process Builder trigger it.  However, did you notice it seems like we’re missing something?  We also have the Assign to User field.  We didn’t put that in our Flow!  Well, turns out we don’t need to.  We can take care of that in our Process Builder!

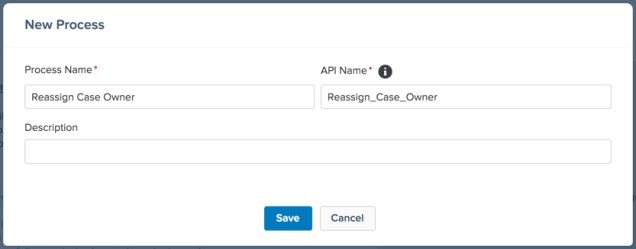
So lets go create a new Process Builder for this.  (Setup | Create | Workflows & Approvals | Process Builder)

NewProcessBuilderQueue

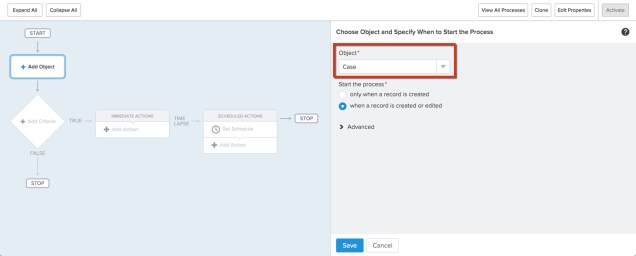
Set this to have the ability to fire from the Case Object on when a record is created or edited.

onCaseObject

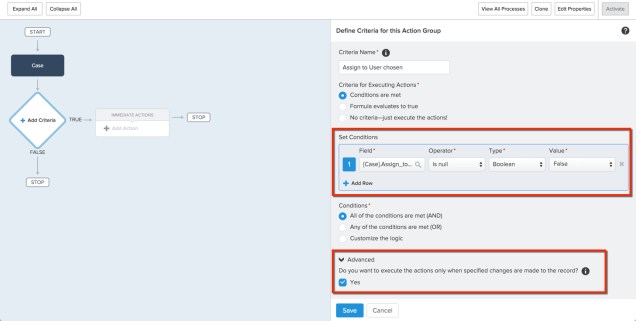
For our Criteria we need it to be whenever our Assign to User is filled out, which would be the equivalent of saying that it isn’t null.  So, lets use “is null” equals “false” as our conditions.

Criteria #1.jpg

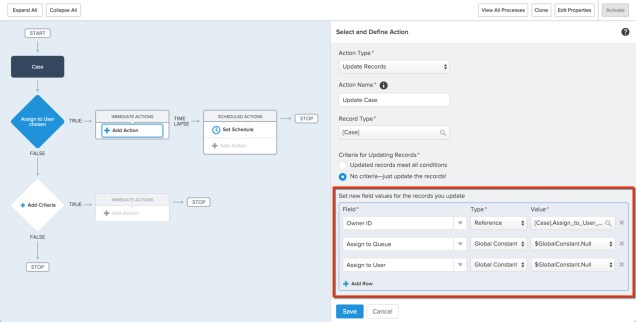
When this happens, we want to do a Record Update to change the OwnerId to the Assign to User Id, as well as we want to clear out any values in the Assign to User and Assign to Queue fields.

Record Update in Process Builder.jpg

Now that we’ve got our first situation complete (when the Assign to User is chosen), lets work on our second one (when Assign to Queue was chosen).

Criteria #2.jpg

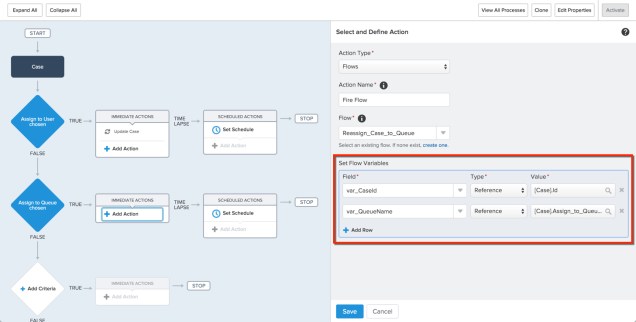
When we meet this criteria, we want to go to our Flow and do our query to see if we find a matching Queue.  So lets create our Flow Action and pass in our variables.

SetFlowVariables.jpg

Hit Save and then Activate your Process Builder and you’re done!  Go grab a nice drink and enjoy your accomplishment!

Hopefully the combination of Actions, Flow, and Process Builder has got your mind racing with cool automations you can make yourself!

Salesforce Admin vs Consultant, Whats the difference?

Before I took the plunge into the consulting world, I was an internal Salesforce Administrator and Developer working in Sales Operations.  I was in charge of a 200 user Salesforce org.  We used both Sales and Service Cloud, and we even had two Customer Communities.  Since my jump to become a Consultant I’ve noticed that some skills transferred over and others didn’t.  In this post I’ll make 5 comparisons between a Salesforce Admin/Dev to a Salesforce Consultant. Continue reading

Take your skills to the next level using the Developer’s Guide

Learning Flow in Salesforce for a non-developer can feel like an uphill battle sometimes.  While we are not actually writing code, everything in our Flow is theoretically designed and written similarly to how we would write that Flow as a Trigger.  Flow allows us to open the door to becoming a Developer without actually having to write code.  We’re now able to do a number of tasks that you would previously have had to call up a Developer for.  We typically have a great idea of our Standard Objects and Custom Objects we have created, but thats it when we start out onto our ‘developer’ path.  To truly be successful we need to understand even more! Continue reading

Decisions, your Flow’s Test Coverage

Anyone who deals with Flows on a regular basis dreads the Error Occurred During Flow  (Previously the Unhandled Fault) message that we get from Salesforce.  What we thought we built to perfection – isn’t.    This isn’t very different from what we experience with an Apex trigger.  Configuration changes can cause a previously well written Apex trigger to now not work as intended.  Part of this might be that our Flow got used in a different way than we intended it to be used in.  Now this becomes a real problem comes when we have an Autolaunched Flow and we hit an error.  This stops our End Users from being able to save their record.  So, how do we deal with that? Continue reading

Match Leads to an Account Automatically with an Account Number

Often times companies have external sources of data coming into their system.  The most common scenario I see deals with leads.  Leads often times come in from a Web-to-Lead form.  Sometimes these forms might have some sort of Account Number associated to it, but forcing your customers or prospects to use the correct Account Name in Salesforce is next to impossible.   Ideally we could automatically search through our Accounts to see if we have a match on the Account Number and update the Lead’s Company Name with the Account Name.  This would streamline our conversion process as our Account Name would be an exact match.  Well, that actually is something that we can do with an Autolaunched Flow!  Lets give it a shot! Continue reading

How to setup a recurring scheduled Process Builder and/or Flow

***UPDATE***

My recommendation is to use this solution by Doug instead of following the steps below: https://douglascayers.com/2016/04/18/salesforce-process-builder-scheduler/


In Apex you’re able to setup a recurring job that will fire whenever you’d like.  However, now that many of the solutions that we previously needed Apex for can be solved through Process Builder and Flow, it would be great if we could setup a schedule to do batch jobs without Apex.  I’ve recently come across more and more clients wanting something to run from every 15 minutes to every business day.  Unfortunately, I’m not savvy enough with Apex (yet!) to feel comfortable writing a trigger just to get this added functionality.  So, that is when I got creative.  With just three workflow rules we are able to setup our own scheduled Flow!  (So that means, we’re not actually going to be building a Flow in this post, sorry!) Continue reading

Visual Flow Resource Tutorial – Input & Output Type

When you are creating a Variable, you are given the option to choose what kind of access the Variable has to other areas of Salesforce.

  1. Private – only accessible to set and reference from within your Flow.
  2. Input – gives you access to pass values into the variable pre-Flow.  These methods are typically through a Flow’s URL (remember back to our Button URL post), through a Flow embedded in a Visualforce Page, or through a Process Builder triggered Flow.
  3. Output – gives you access to pass values at the end of your Flow to another source.  These sources are Sub Flows (yes, you can have Flowception) and Visualforce controllers (commonly used to help re-direct the finished Flow to a newly created record).

The Million Dollar Question – what does this mean to you? Continue reading

User Management – IP Address Validation and/or Restriction by User

If you read my post on Login Flow Default Variables, you might recall that I mentioned the ability to validate or restrict individual user’s IP Addresses. The two scenarios that I was referring to are:

  1. Restricting Users from logging in from an IP Address (or group of)
  2. Assigning IP Addresses like a Permission Set (User level, not Profile level)

Continue reading