Default Variables on Choices in Visual Flow

One of the pieces that can be a bit difficult in Visual Flow to work with is having the Default value in a dropdown.  There could be a number of different reasons you’d like to have a dropdown or other type of Choice field to reference existing values.  However, it’s not the most straightforward inside of Visual Flow.  Also, the User Experience isn’t perfect, but it is very functional.  This post is going to be more conceptual than walking through all of the parts of creating and connecting a Visual Flow.  With that in mind, I am making the assumption that we’ve already got our Record Lookup, Picklist Field Variable assigned, and the other basics setup.

First let’s drag on our Dropdown Field into our Screen Element.

DragDropdown

Now, let’s create our Choice that will be our “Default” value.

SelectNewChoice

As we create the Choice, notice the “T” on our Label so that we can use a Rich Text Editor on the Label.  Not something you typically think of with the Label of a Choice, but it’s there for you!

Label

When we’re in the Rich Text Editor for our Choice’s Label, we just need to drop in the Variable we used in our Lookup that has the Default value.  Note… you can get as creative as you want with the label here.

IndustryLabel

It might also be safe to put in a default value for the variable with something like “– Please Select –” in the scenario that the field is blank on the record.  Cause, if the Industry variable in the above example is empty, the API name of the Choice will be used instead.

Now, we need to set the Stored Value of this Choice to be the Variable as well.  This means, that if they don’t modify the selection in the Dropdown that the current value will be what is updated on the record … so don’t miss this and make the value get cleared out because the Stored Value is null.

StoredValue

Now, setup the other Choice value(s) that you want to use.  In this scenario, I’m just going to use the default Picklist field of Industry.

Choices

Now, when used in action, it looks like this:

DefaultValue1.jpg

DefaultValue2

And, just like that we’ve defaulted a Choice field in Visual Flow!  Simple to do, but easy to overlook.  This little trick came from the Salesforce Discord channel: https://discord.gg/D8YGZkN, so give that a look if you use Discord.


Keep your Automation Simple

I’ll start this off by saying I’m guilty of not always keeping it simple.  But, I strive for simplicity.  Just because you can build something in Salesforce 10 different ways, doesn’t mean all 10 of those ways are right.  The solutions we implement often have a great deal to do with the skills and budget your Org has available.  Back when I was a Solo Admin, I was very guilty of duct taping together solutions, because the alternative solution was to have nothing.  We didn’t have the budget to hire developers for all of our ideas.

The purpose of this post is to discuss how we can simplify our solutions to make them easier for us to comprehend and maintain.  We’re going to walk through this set of requirements our project champion gave us:

  1. On Closed Won Opportunities, Alert Accounting with an Email
  2. Automatically Create a new Project for our Account Manager to run.
  3. Update the Account Owner to be the Account Manager
  4. Alert the Account Manager of their new Project, with a link to take them straight to the project.

Let’s take a first pass at solving this…

kiss-option-1

This accomplishes everything that we were looking to do.  We can now send the project champion a note saying that it has been completed… right?  Hold on!

Looking at this solution from end-to-end, how easy is this going to be for me to maintain?  On the surface, it’s pretty basic, but would an outsider easily comprehend it?

Let’s take another pass at simplifying it…

kiss-option-1b

We were able to simplify our automation by putting the Email Alerts into the Process Builder and Flow.  This looks easier to maintain and understand than our first process.  I would be tempted to call it quits here, but I think we could simplify the process further.

So, let’s take one last pass at simplifying this…

kiss-option-2

I’m feeling pretty good about this now.  Everything is in one location, and I can see all of my automation around this scenario in one spot!  Personally, I would go with our third and final solution if I was going to implement this automation.  Don’t go crazy and (when possible) and have Workflow Rules, Process Builder, Flow, and APEX all working together for one piece of automation.

How to Optimize your Process Builder and Quick Action Speeds

Process Builder and Actions (Quick Actions) are two of my favorite declarative tools that Salesforce has.  I’ve had a few posts on Actions and how powerful they can be when you add in Process Builder and even sometimes Flow.  I’ve also specifically had a few posts on how to write your Process Builders so that you can optimize them for speed (read here).  Now, this idea on today’s post does go against the concept of having One Process Builder per Object, but I think it does pose a good argument against it.  That argument is SPEED!

I’ve seen scenarios where we want to use Actions to create record(s).  What if you want to create an Action that creates an Opportunity, which in affect you want to have the Opportunity Team dynamically updated, and maybe a few Tasks automatically assigned to the new Opportunity Owner?  This is all stuff that a simple Process on the Opportunity Object will run perfectly, right?  Yes.  However, that automation can bring your Action to a crawl.

The Influence

The inspiration for this post comes directly from some of my work in Apex.  I discovered what Future Methods were when writing some really fun code a while back.  In short, it just attempts to perform the action in the future, as opposed to during your current transaction (creating or updated a record).  This allows you to bypass some limits that you might have otherwise had.

The Solution

By moving our Actions from the Immediate Actions to Scheduled Actions and placing the Set Time to 0 Hours After [date field] to ensure that it fires almost instantly after the record creation or update.

Schedule 0 Hours.png

After setting the time, add in your Actions.

schedule0hours

Advantage

The real advantage here is speed.  By being able to delay certain actions from taking place in the transaction, you’re able to increase your save times.  The result is a faster experience for your End Users.  I don’t think I need to add anything to that 🙂

flash-2.png

Disadvantages & Considerations

I’m aware that the list of disadvantages for the one advantage might comes off like one of those drug commercials with 30 seconds full of side affects… but here we go 🙂

The biggest disadvantage to me is that the record(s) that you might be creating or updating won’t be “ready” instantly.  If the User using the Action is also the one whose expecting some of those Actions to happen automatically, then maybe it isn’t the best solution for them.

As I mentioned at the start of this post, this does go against the One Process Builder per Object design pattern.  If you have a scheduled action, you’re not able to do the “evaluate next” inside your Process.  That post, like this one, is not a mandate that you must follow.  As the Admin/Dev running your Org, you should be able to make an educated decision on what is best for your scenario.

The last consideration around implementing this is understanding its impact on testing.  It is much harder to test something that happens in the future.  This affects your manual testing and any Apex Test Classes.  I would be surprised if you didn’t have any scheduled actions in your Process Builders and Workflow Rules… so it isn’t like this type of action isn’t being used today by many of us.

Putting it all together

The goal of this post is to not say you must use delayed Process Builder actions.  It is simply to add one more tool to your tool belt for when you’re working with Process Builder and Flow.  These concepts are not one-size-fits-all… adjust the concepts to fit your Org.

Assigning Variables to Flows in Lightning Pages

As of Spring ’17, we will have a much easier User Experience for anyone attempting their first Flow in a Lightning Page.  You now are able to pick which variable you want to pass the Record ID into.  Sounds great, right?  Let’s dive right in!

Select the variable to pass the Record ID into

Now with the check of a box, you’re able to select which variable you want to pass the Record ID into.  You can name it whatever you’d like now!  Also, you can pass in a static value into any of the variables, so that you’re able to tell where your Flow might have been used (since you can have a different Lightning Page for different Record Types or Apps.

flowlightningpage

What if you already setup a Flow when this was launched in Winter ’17?  Don’t worry, Salesforce has you covered:

If you created a Text input variable called recordId for the flow component during Winter ’17, the checkbox is automatically selected when your org upgrades to Spring ’17. This default selection happens only when your org upgrades to Spring ’17. If you create a Text variable called recordId in Spring ’17 or later, the checkbox is not selected by default.

Things to consider

#1 – No Merge Fields (for now)

Many of you are probably thinking about passing in a merge field.  You’ll need to hold off on that for the time being.  My guess is it might come in the future, once this is Generally Available and out of BETA.  But, for now, if you try and get clever and use something like {!Record.Name} or {!Account.Name} you’re going to have a bad time!

lightningpageflowerror

#2 – Keep your Inputs Clean

I touched this on my Flowception post (essentially, making your Flows reusable), but you’ll want to make sure that you only make the variables you need to an Input Type.  If you have too many variables marked as Input or Input and Output, you’re going to have a long and cluttered list.  Be thoughtful and only make a variable an Input if it needs to be.


Parse a Multi-Select Value in Visual Flow [Unmanaged Package included]

In my post on using a Flow inside another Flow, I mentioned wanting to create a Flow that could be re-used for the problem of needing to parse a Multi-Select value.  So, here it is!

Unmanaged Package:

https://login.salesforce.com/packaging/installPackage.apexp?p0=04ti0000000YDzZ

Let’s talk about what is in this Unmanaged Package, so that you understand what you’re installing into your Org.  I want you to be able to easily reference this Flow for any use cases you might have.  So, that is why it is listed as Unmanaged and why I’ll have this detailed blog post on what is going on.

Flow Overview

parse-flow-image

ParseFlow.jpg

Let’s talk about what each of these Elements are doing.

Remove Brackets

The Remove Brackets Element is cleaning up the input String that we have.

Remove Brackets Formula.jpg

The Formula (sorry, it doesn’t want to stay formatted for me):

TRIM(
SUBSTITUTE(
SUBSTITUTE(
{!input_MultiSelectString},
“[“,””),
“]”,””),
) + “;”

Note: I am cleaning up the original Input variable.  After I clean the variable, I am assigning that new value (my Text Formula above) to the new Text Variable called Multi_Select_Value.

removebrackets

Add Left Value

What we want to do now, is grab the Left value in our String and add it into a Collection Variable.  This will be what you can Loop through to perform login on.

Grab Left Value Formula.jpg

The Formula:

(LEFT({!Multi_Select_Value},FIND(“;”,{!Multi_Select_Value})-1))

grableft

Remove Last Parsed Value

Now that we’ve successfully added the first value into our Collection, we want to remove that value and its semicolon from the String.  This will allow us to then see if we have remaining values or not in our next element.

removelastparsedvalue

The Formula:

TRIM((RIGHT({!Multi_Select_Value},LEN({!Multi_Select_Value})-FIND(“;”,{!Multi_Select_Value}))))

removeparsed

Remaining Values to be Parsed?

All we’re doing here is checking to see if the value of Multi_Select_Value is null or not.  If it is null, then we want to exit the Flow and send out our Output.  If it is not null, we want to continue along and keep parsing until we have a null value.

decisionofparse

How to Guide Users Submitting Records for Approval with Visual Flow

I’ve often thought that the Submit for Approval Button in Salesforce could use some work.  It really doesn’t give the User any good information for why they might not meet the criteria for submitting their record for approval.  Isn’t there a better way?  I think so!  With the use of Visual Flow we’re able to guide the User through a tailored experience to help them submit their record with ease!

We’ll do this by querying the record(s) that we need to access, and then using decisions to determine what might be missing and present the User with the option to update the key fields missing.  In my example I’ll just keep it simple by looking for the Amount field.  If they haven’t filled out that value already, we’ll ask for them to update the Opportunity with the Amount before they can proceed to submitting the record for approval.  Let’s get started!

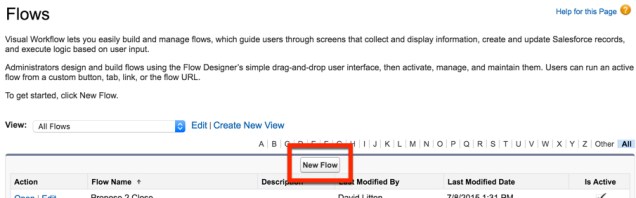
Navigate over to create a new Flow. (Setup | Create | Workflows & Approvals | Flows)

New Flow

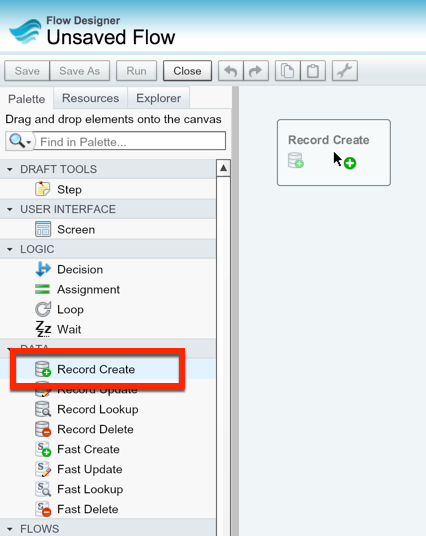
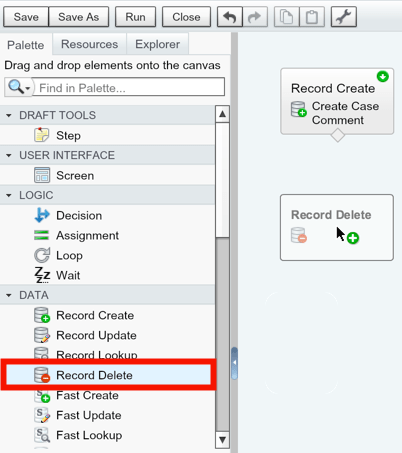
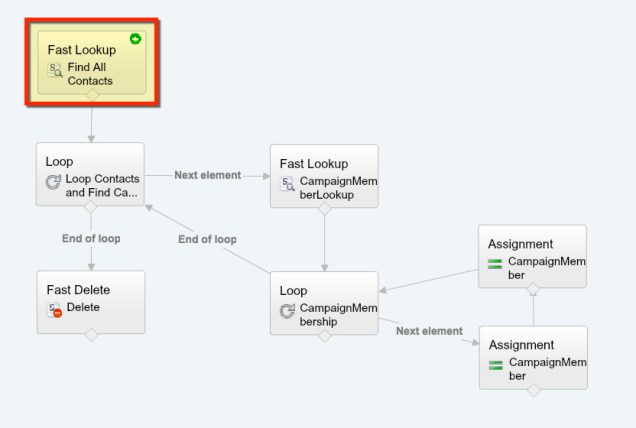
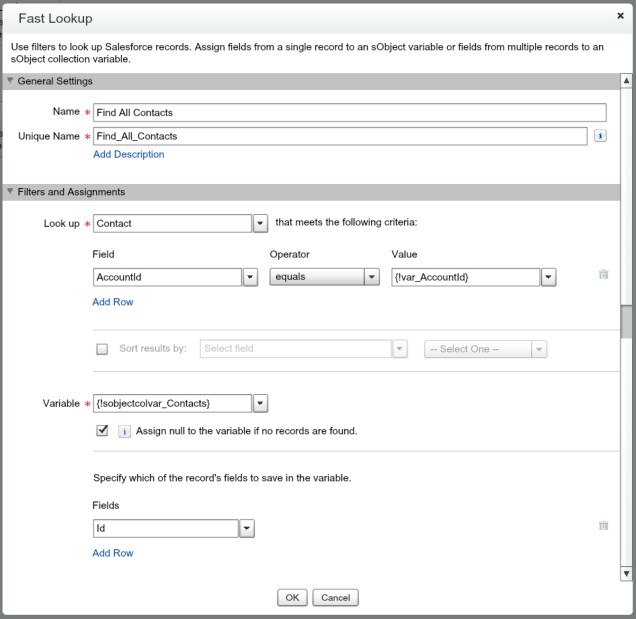
The first step is going to be grabbing our Record Lookup.

drag-oppty

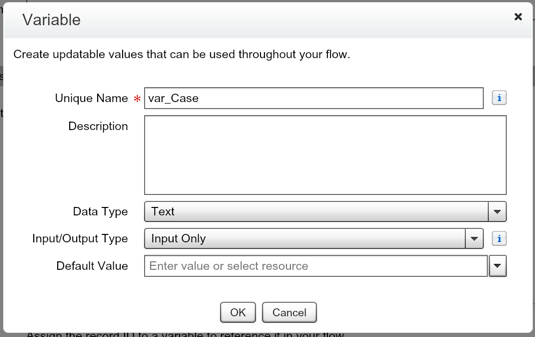
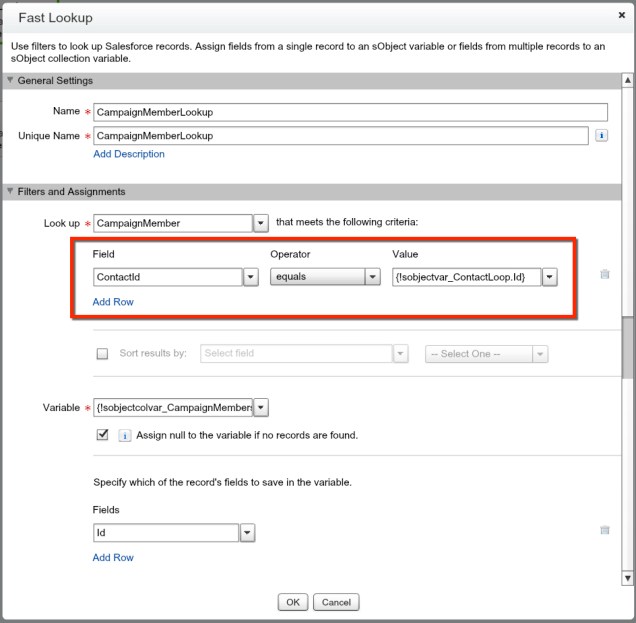
We’ll need to set the Record Lookup to find the Opportunity that matches the Opportunity ID variable we setup (and pass in through our Button – see How to write a Button URL for your Flow if you need a refresher on this).

var_oppid

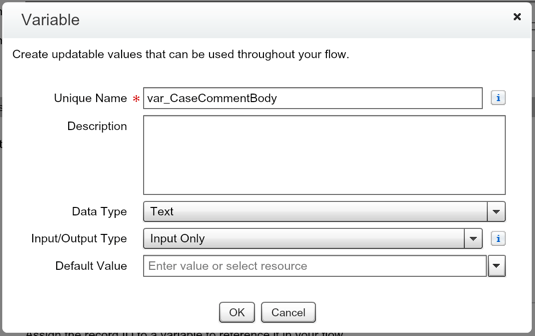
I’ll also create a variable to store the Amount of our Opportunity.  This will allow us to reference the value.

opprecordlookup

Note:  We could technically pass additional values in our Button, or any number of fields that we want to (besides Currency to Currency, is a limitation within URL).  Regardless of the ability to do it or not, I like to try and keep the complexity in one spot (in the Flow), as opposed to multiple (the Flow and Button).  Also, we’re not expecting this to run in batch as it is only going to happen when a User clicks the button, so we’re not as worried about an extra query (typically).

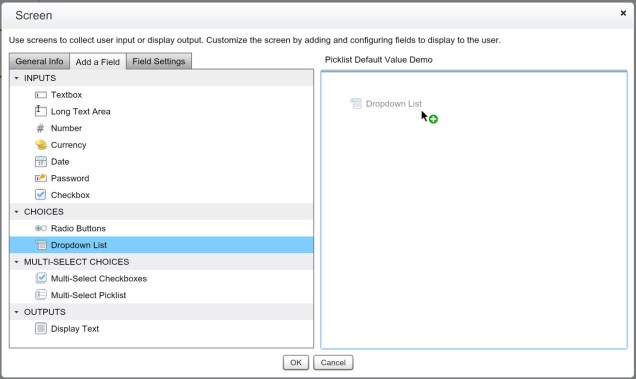
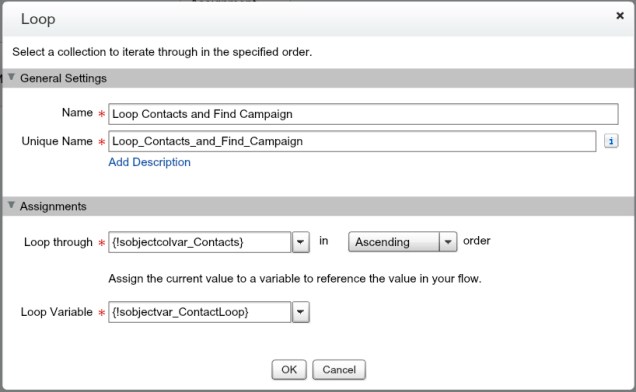
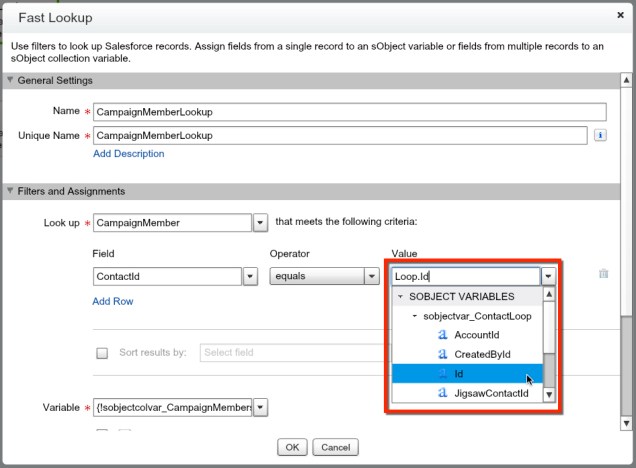
Alright, so we’ve got our Amount field.  Now, we want to drag in our Decision Element to determine if we found a value in it or not.

amountDecision.jpg

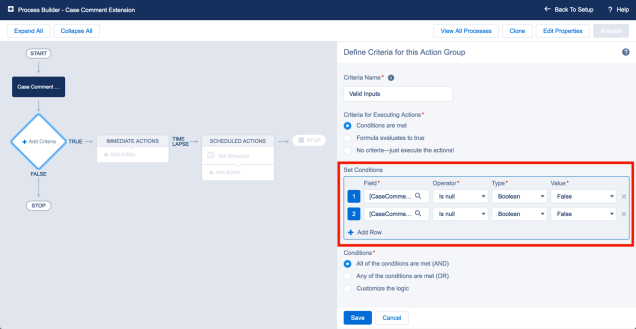
For our example, all we need to check is if the Amount is greater than 0.  We’ll use the Default Outcome in this scenario to take our User to a Screen to fill out the Amount before we submit for approval.  If we were checking multiple fields, this decision logic could get more complicated (depending on how customized you wanted to the experience to be).

AmtGreaterthan0.jpg

I enjoy finishing a part of any automation I setup, so lets drag in our Submit for Approval Element and knock out this part of our Flow.  Then we can worry about the Default Outcome routing.

Submit for Approval drag.jpg

All you have to do is pass in the Opportunity ID as the Record ID.  Nice and easy!

oppsubmitforapproval

Great, so let’s jump into the other route of the Decision, when someone needs to fill out the Amount of their Opportunity.

DragScreen.jpg

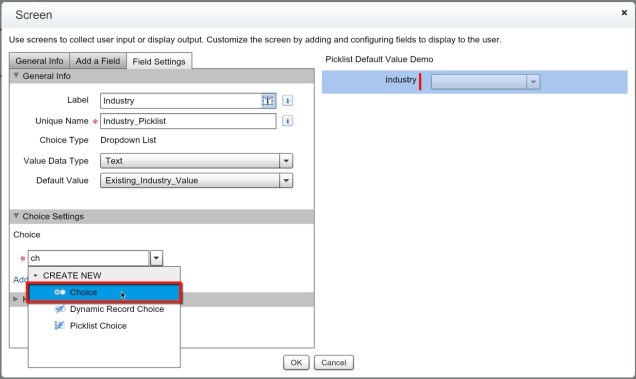
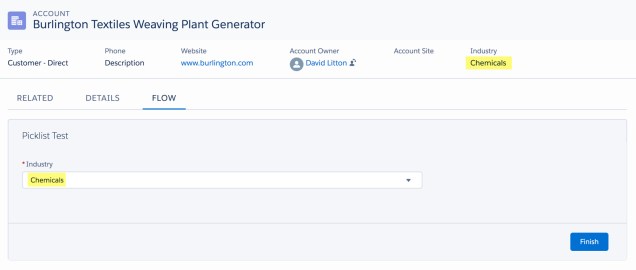
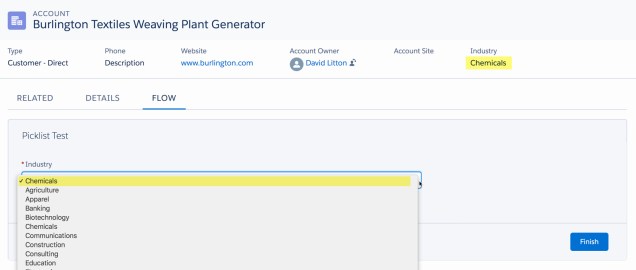
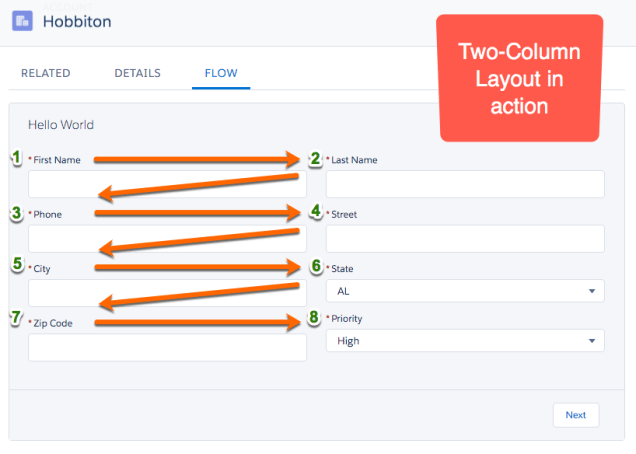
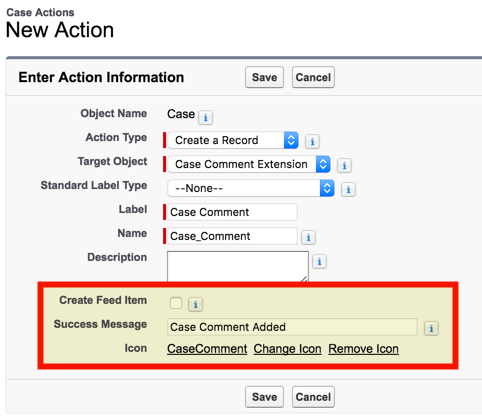
On our Screen, we simply give a nice message to our User alerting them of what is expected.

ScreenAmt.jpg

I would recommend passing in variables like the Opportunity Name, Account Name, and other key fields into your Text Template.  You want the User to be confident of what record they’re currently updating.

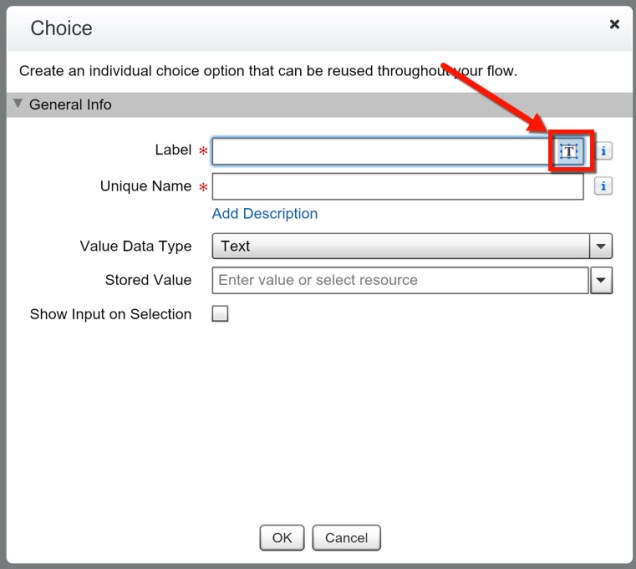
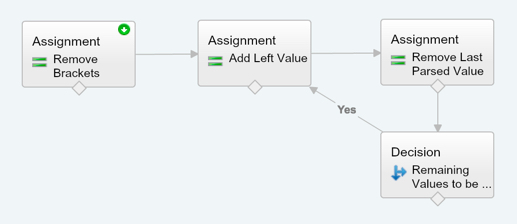
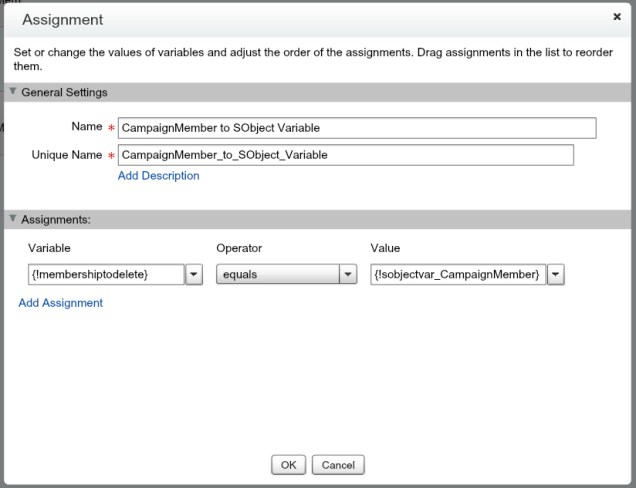
We’ve now got to drag out a Assignment Element and update our Amount variable with the entered Amount.  I like to use Assignments after Screen Elements so that if I’m using multiple Screen Elements I can consolidate the values into one variable.

AssignVar.jpg

Now, make sure you’re setting the variable value to the Screen Input field correctly.  It can be easy to make a mistake here and assign the wrong value!

varassignment

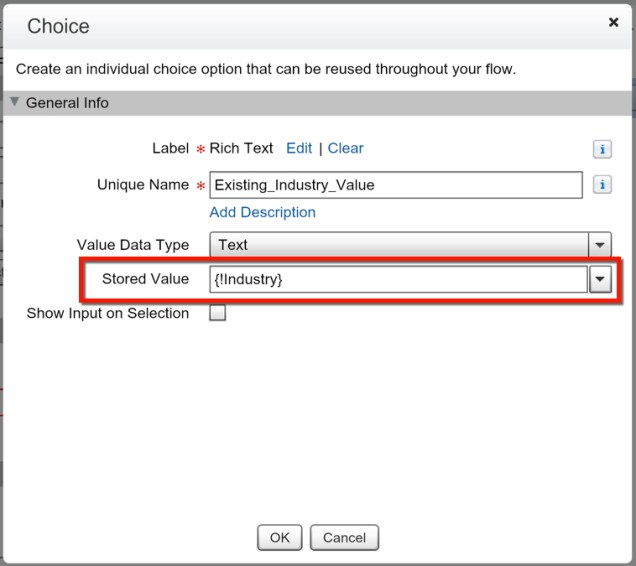
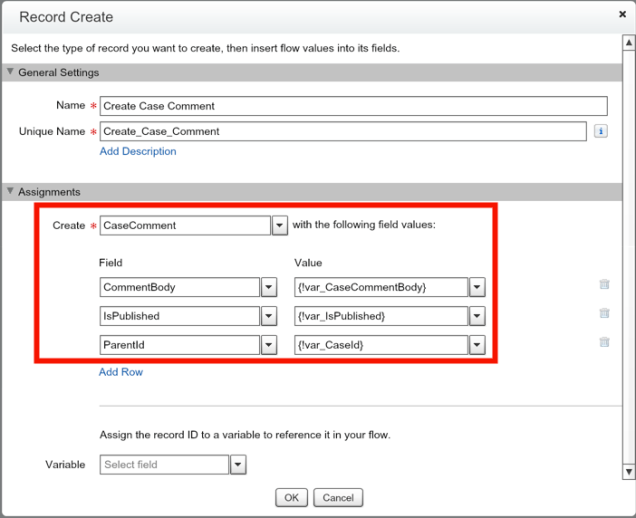
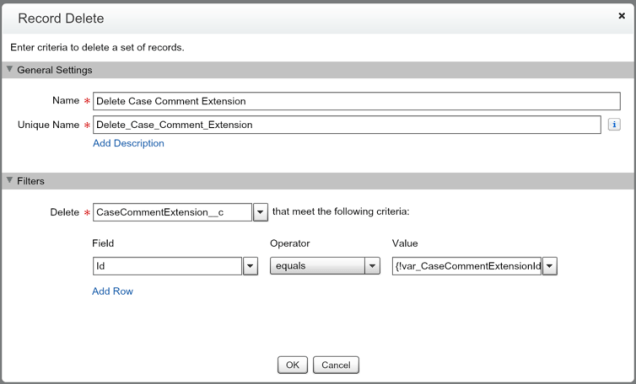
We’ve now got to drag out a Record Update and update our Opportunity with the entered Amount.

dragupdate

Now we just need to add in the Amount field to our Record Update.  We can use the Amount variable here, because we just assigned the Screen Input value to that variable.

recordupdateop

From here, I find the easiest thing is to just route this back to the original Decision and see if it meets the criteria to proceed on.  You can determine how strict and customized you need your routing to be, but if you can keep it simple try to do so.  Mapping the Record Update back to the Decision Element gets us our finalized Flow.

FinishedSubmitFlow.jpg

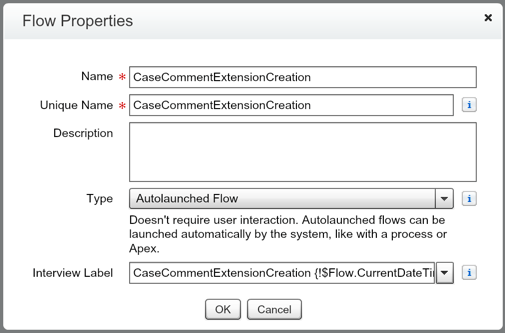
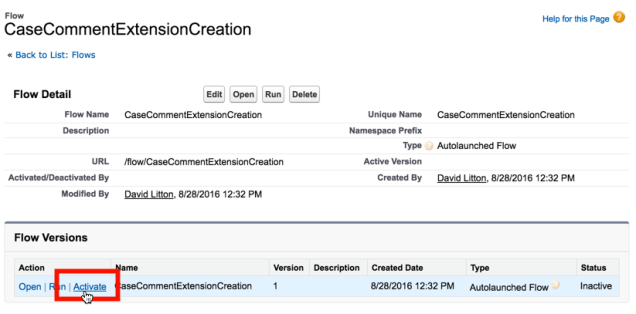
Let’s Save the Flow and then Activate it.

save-flow

activateflow

Now, let’s go create a new Button on our Opportunity   (Setup | Customize | Opportunities | Buttons, Links, and Actions)

newButton.jpg

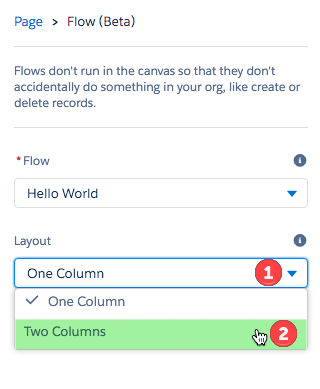
For the Button you’ll want to go grab your Flow’s URL.  This was on the Flow Detail page.

FlowURL.jpg

Paste that in, and we’ll add in the variable assignment for our Button.

action

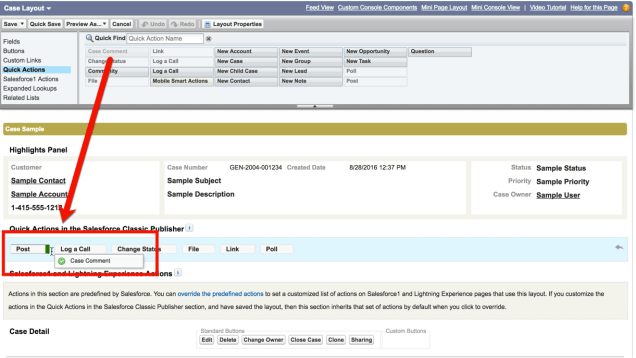
Save, and then drag the Button onto your Opportunity Layout.  You’ll want to check the API Name when you hover over the Button to ensure you’ve selected your Custom Button and not the Standard one.

Add To Layout.jpg

All that is left is for you to test it out!

SubmitForApprovalFlow.gif

Hopefully this post was able to stir up some ideas of what is possible for you to do within your own Org!


Understanding how Two-Column Screens work in Visual Flow

When I saw the release notes for Winter ’17, I was very excited about the ability to have two-column screens inside of Visual Flow.  When I first published my release notes highlights, there wasn’t any documentation out on how this was going to work.  Salesforce just published the Developer Documentation around the Winter ’17 Preview, and now we can start see the features with more clarity.  So, let’s dive right into this new feature!

You can find the Developer Documentation here on this feature.

Pre-requisite: You must Enable Lightning Flow Runtime for Flows to be able to use this feature.  From Setup, enter Process Automation Settings in the Quick Find box, then select Process Automation Settings.  Select Enable Lightning Flow Runtime for Flows.  Save your changes.

How can you use the Two-Column Layout?

Through a URL Parameter into your Flow, just like you would the Record ID or another variable.  Take a look my post on How to write a URL for your Flow if you need a refresher here.  It is going to look like this:

/flow/flowName?flowLayout=twoColumn

If you’re dropping your Flow into the Lightning App Builder using a Flow Component, you can also control the Layout in that component.  Simply choose the Two-Column Layout in the Flow Component’s Layout selector.  This defaults to One-Column (as you would expect).

FlowComponentLayout.png

How does the Two-Column Layout work?

Very similar to the standard Page Layouts.  You can determine the order of the fields, and every field alternates from left to right.  Be warned, it can look somewhat funky when you have fields that are not all aligned.
one-column

two-column-order

Things to keep in mind…

The Layout is for ALL Screens in your Flow

Let me reiterate this.  When you select your Layout, this is for ALL Screens inside your Flow.  You simply can’t control the column layout at the Screen level.  Another thing to keep in mind, is you’re selecting the Layout when you’re using the Flow.  This is all done in the URL or in the individual Flow Lightning Component – not when you Save or Activate your Flow.

Only available with the new Lightning Skin

Your Flow can be viewed in both Single and Double Column layouts.  If you have a Flow exposed on a Visualforce Page, you will not be able to select Two-Column Layout (at this time).  Flow’s launched by Visualforce will not use the new Lightning Skin, and thus this feature is not available.

classicview.png

Tab-key Order not customizable

You’re unable to change user’s Tab-key Order in the Two-Column layout.  It is automatically set to Top-Down.  If you’re not quite sure what I mean, the Tab-key Order is something that you’ve see in every Section Properties in a Page Layout.  This is not a huge issue to me, but I think it could annoy your Power Users who use Tab-keys efficiently.

taborder.png

Responsiveness

The Two-Column layout doesn’t care what the size of the user’s screen is.  Which means it is not mobile responsive.  This is something you’re reminded of in the Lightning App Builder through a Help Bubble, but not when you’re using a URL parameter.  Make sure you keep that in mind when you’re deciding to go with a Two-Column Layout.

Responsiveness.png

Recap: The new feature of having Two-Column screens comes with some drawbacks.  We’re not able to control Screens separately inside one Flow.  Right now if you’ve got something that you want to be accessed through a URL button (and not a Visualforce Page housing the Flow), then this will be a great solution for you.  I am hopeful this is just the beginning and we’ll soon be able to customize this at the Screen level, but we’ll see with time if I’m being overly optimistic.

How to use Case Comments with Communities in the Service Console Feed View & Salesforce1

This past week I had someone who is looking to use Case Comments in the Service Cloud, but wanted it to be listed as an Action in the Feed.  I thought it would be a good use case of many different tools within Salesforce being used together.  I am looking at possibly doing this with code and basing it off this post, but for now I figured that I’de show you how without code.  Let me be clear that if you’re not using a Community that you can simply use the Internal Comments field instead without having to do anything.  The only negative of going with this solution is that you’re not going to have your Case Comment Chatter Post visible until your Chatter feed is refreshed, but that is something that also happens with the Internal Comments field.  The Case Comment record is visible instantly.  And this works nicely with Salesforce1.  With that said, let’s jump right in!

Automation Overview:

  1. Inputs for Case Comment received (Action)
  2. Process Builder triggered (Pass inputs into Visual Flow)
  3. Case Comment created in Flow

For this solution we have two different options in how we can do it architecturally:

  1. Record Create – Create new Custom Object
  2. Record Create – Create new Task Record
  3. Record Update – Use Custom Fields on Account/Opportunity

For me, because of not wanting to further complicate the Task Object and not wanting to add excess fields to the Case Object, I’m going to go with option 1 and create a new Custom Object.

How will we build this?

  1. Create the Case Comment Extension Object
  2. Create our Visual Flow to create the Case Comment
  3. Create our Process Builder to launch the Visual Flow
  4. Create our Action on the Case

For this solution we have two different options in how we can do it architecturally:

  1. Record Create – Create new Custom Object
  2. Record Create – Create new Task Record
  3. Record Update – Use Custom Fields on Account/Opportunity

For me, because of not wanting to further complicate the Task Object and not wanting to add excess fields to the Case Object, I’m going to go with option 1 and create a new Custom Object.

What fields do we need create in this Custom Object?

  1. Auto Number
  2. Case (Master-Detail)
  3. Comment (Long Text Area)
  4. Public (Checkbox) Note: this only applies if you have a Customer Community.

CaseCommentExtensionObject

Let’s get our Flow created first since we can’t Activate the Process Builder without it  (Setup | Create | Workflows & Approvals | Flows).

NewFlow.jpg

The first step is going to be grabbing our Record Create.

RecordCreate1.jpg

We now need to create the variables we will use to create the Case Comment.

Case Id

CaseCommentParentIdVariable

IsPrimary (This is a BOOLEAN, not Text)

CaseCommentIsPublishedVariable

CommentBody

CaseCommentBodyVariable

Lets make sure everything is correctly mapped inside our Record Create.

CaseCommentCreation

Great!  So lets hit OK and set this as our Starting Element.

SetAsStartElementCaseComment

Now lets drag in our Record Delete.  This is so that we don’t add useless data into Salesforce.

RecordDeleteDrag

Create a variable for the Record Id of the Custom Object record we just created, when our Action is used.

var_CaseCommentExtensionId

Map it in our Record Delete.

DeleteCaseCommentExtension

Connect the elements together to finish our Flow.

FinishedFlow

And lastly we want to Save and then Activate our Flow!

SaveCaseCommentFlow

ActivateCaseCommentFlow

Fantastic!  Now we need to setup our Process Builder that fires this Flow.  So lets go create a new Process Builder for this.  (Setup | Create | Workflows & Approvals | Process Builder)

CaseCommentExtensionPBCreation

We want the Process Builder to fire on our Custom Object that we created, Case Comment Extension, and we want it to fire only when a record is created.

CaseCommentExtensionPB1

We don’t need to set any criteria here, but to be safe let’s just make sure that we have a Case ID and Comment before proceeding.

CaseCommentExtensionPB2

Now we need to map the variables in our Flow to the Values in the Custom Object, using the Type Reference.

CaseCommentExtensionPB3

Hit Save, then Activate your Process Builder. Now, lets navigate to go create our Action.

CaseCommentActionNewButton

Keep it on the default, Create a Record, and select Case Comment Extension (our Custom Object we created earlier).

CaseCommentAction1

Let’s make sure we turn off the Create Feed Item, so we don’t spam the Chatter Feed since the Case Comment itself will cause a Feed Item to be created.  Also, make sure we add in a nice Success Message and custom Icon to make the action look sharp!

CaseCommentAction2

Remove the Case Field and drag Public and Comment into the Action’s Page Layout.  Make sure you require the Comment field.

CaseCommentAction3

It will give you a small popup warning you about not having the Case field on the Layout, but you can ignore it and move on.

CaseCommentAction4

We now need to setup a Predefined Field Value for our Case field.

CaseCommentAction5

Set Case.Id to our custom Case field.

CaseCommentAction6

Now all that is left is for us to update our layout(s)!

CaseCommentActionToLayout

And with that, lets take a look at the finished product!

CaseCommentAction.png

Five Best Practices for Building a Clean Visual Flow

We’ve all been there, where you’re learning to write your first Visual Flow.  The main thing we’re focused on is just making sure that it is functional.  That’s fine while you are in your Sandbox developing, but once you’ve got it working correctly you need to make sure your Flow follows these five best practices.

Elements are Organized

One of the top rules for writing code is using proper indentation.  David Liu (SFDC99) is known for his love (or OCD) of clean code.  Visual Flow’s equivalent to indentation is the alignment of the elements into a clean format.  Think of it like you’re having company over – you would make sure you cleaned your house up before they arrived.

Your Flow should be very easy for you to follow the Flow Elements from start to finish without having to strain your eyes.  Keeping it clean also lets your Flow be easier to make future updates to it.  You don’t have to take apart your Flow to make sure you didn’t miss anything on your update.  So, be sure you spend the extra minute or two to make sure your Flow is sharp looking!

Bad

Messy Flow

Good

Sharp Flow

Naming Convention

In the developer realm, camel Case is the standard.  In Flow, we’re stepping into the developer world without really having to write code.  It obviously isn’t required that you use camel Case as your naming convention, but it is important that you follow a consistent naming convention.  If you don’t, your Flow will be much harder to read.

camel.png

Variable Names

In addition to your naming conventions, you need to make sure your variable names make sense.  I have opened up way too many Flows that use variable names that are not clear. If someone has to do some detective work to figure out what your variable is doing, you need to rethink your variable naming.  Variable naming can often be hard to do correctly, because you have to summarize the function of the variable into a small concise variable.

DoCaseId — Don’tRecordId

Why? RecordId is very generic and does not tell me what Object it is referring to.  I would have to go find where the value was assigned to see the Object it is the Id for.  CaseId is clear and I don’t have to do any research to figure out what it is.

Fault Messages

When your Flow fails its important for everyone to be alerted.  If you’re a Solo Admin, then you can technically get away without using a Fault Message, because Salesforce’s Email Alert will go to you.  However, if you have more than one person developing in your Org, this is a requirement! By setting up a Fault Message, you can easily alert all of the Admins and Developers of the issue.

It is also important to use multiple Fault Messages inside your Flow.  You’re able to customize the Email being sent out to provide specific information that pertains to that particular part of your Flow.  This will help you as you troubleshoot your Flow.

Fault Message


Descriptions

Make sure you use Descriptions in your Visual Flow.  This goes along with having your Flow Elements all aligned and easy to read.  You want your Flow to be easily digestible.  It is important to not write blatantly obvious Descriptions, just to write them.  You want to make your Descriptions helpful.

Anytime you have to do something unique inside your Flow you should include a Description to explain what, and more importantly why.  An example would be when you use a Formula in your Flow.

Description.png


Recap: Think long term when you’re building your Flows (or anything).  Just like you want to create a good User Experience for your End Users, make sure you create a good one for the Admins & Developers that are maintaining the Org.  None of these best practices require a significant amount of time to follow, and the benefits of having a clean Flow will be worth the extra effort!  And if you’re still reading, make sure you check out my The 6 Most Common Visual Flow Errors to Avoid.


How to use a Loop inside a Loop (in Flow)

This past week I saw multiple comments about using a Loops, and one in particular around doing a Loop inside of another Loop.  It is a pretty rare thing that you’ll do with Flow, because of the limits that you’re going to be dealing with, it is very easy to hit a wall with this solution.  Your second Loop is very inefficient, and has to run for every record that is found in the first Loop (which means a Fast Lookup/Query).  This SOQL queries limitation has been improved, prior to writing this blog I thought the limit was 50, but it seems Salesforce recently improved that limitation to 100.

So, keep your limits in mind when you begin to architect a solution like this.  Sometimes it can’t simply be done safely with Flow and you need to move to Apex.

limitsflow

Note: I know that you can add a Formula Field that brings the AccountID to the Campaign Member, but this is a simple example that gets the main point across.

Business Case:

  • When we lose a Client and mark them as a Former Client we want to remove all of their Contacts from all of their Campaigns

Process Overview:

  1. Account Record Meets Criteria – Process Builder triggered (Pass inputs into Visual Flow)
  2. Flow Finds ALL Contacts Associated to Account
  3. Flow Finds ALL Campaign Memberships for ALL Contacts
  4. Flow Deletes ALL Campaign Memberships for ALL Contacts


Now, because I’ve already done a post on Fast Lookups and Loops, I am not going to really dive into the individual pieces of this Flow.  I am going to give an outline of what each Element is doing, but I will only be focusing on the areas that are key to understanding how you can use a Loop inside of a Loop.

First, we are going to start out our Flow by looking for ALL of the Contacts related to our Account.  All we need to do is pass in our Account ID into the Flow so that we have that as a Filter.

First Element.jpg

FastLookup1.jpg

Next, we need to now Loop between each of the Contacts that we have found with our Fast Lookup, so to do that we need to drag in our Loop.

Second Element.jpg

Loop1.jpg

Now, this gets us to our Second Fast Lookup, which is where the magic happens.  In here, we simply need to take a step back and think about what we are trying to filter.  In this case I am trying to find all of the Campaign Memberships associated to a particular Contact (so that I can add them to a collection and then eventually delete them).  So, in my Fast Lookup I should be using my Looped Variable to bring in the Contact’s ID.

Third Element.jpg

FL in Loop 0.jpg

FL in Loop 1.jpg

Just like that, we are dynamically filtering this Fast Lookup for each Contact that comes into our Loop!  Pretty simple, right?  All that is left for us now is to setup our next Loop and talk about what we are doing there.

For each Campaign Membership our Contact has, we will be sending them through our next Loop.

Fourth Element.jpg

CampaignMember.jpg

Next, we want to assign the Loop Variable to another SObject Variable, our first step in creating a SObject Collection Variable.

Fifth Element.jpg

Assignment1

Now, we want to assign the SObject Variable to our SObject Collection Variable.

Sixth Element

Assignment2

So we just completed our Loop for the Campaign Memberships!  Awesome!  But, what happens when that Looped Contact has no more Campaign Memberships for us to Loop through?  This is where I’ve seen many people mess up there Flows (including myself every once and a while!), because there is typically a lot going around.  You need to correctly map your second/inside Loop to your first/outside Loop!  This is where we then repeat the process for every Contact that we had in our first Fast Lookup.

Loop to Loop.jpg

Great!  Now, all that is left is for us to determine what happens at the end of our First Loop.  In this scenario we want are sending them to a Fast Delete to get removed in bulk!

Seventh Element

FastDelete.jpg

Great, we are all set!  All that is left for us is to build our Process Builder to launch this Flow.

RECAP:  Loops inside of Loops are powerful features that can let bend the limits of Flow.  These should be used sparingly when you know your inside Loop won’t be used in a high enough volume that you’ll hit a transaction limitation with your Flow.  If you’re getting not confident that you’re going to stay away from that limitation, you should consider building this in Apex instead.  As you could imagine with a scenario like the one above, if we had any Accounts with upwards of 100+ Contacts we would be in some trouble! Beware of the limits!