About three months ago, as we were getting ready for Summer ’16, I posted The “One Process Builder Per Object” Design Pattern. On that post, my friend Chad Seales commented on asking how you would manage One Process Builder for a whole Object, because one benefit of having separate Process Builders is that you can Activate or Inactive any of them as you need. He brought up a very good point, and one I had somewhat overlooked before the post. So we’ll go over how to do just that by using Custom Settings!
Concept Overview:
- Create Checkbox Field on your Object
- Create Custom Setting
- Create Checkboxes on your Custom Setting for each “Process Group”
- Reference the Custom Field and Custom Setting in your Process Builder to determine if your Criteria is Active or Inactive.
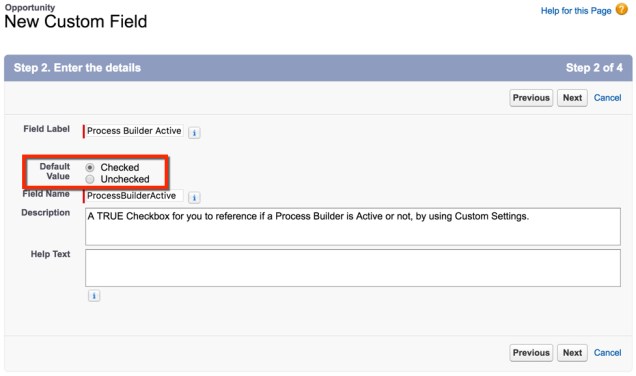
Navigate to your Object and create a Custom Field with the type Checkbox. Make sure the Default Value is Checked/TRUE. For my example I’ll be working on the Opportunity. I’m going to call this field Process Builder Active. Make sure to leave a nice description so that any other Admin will know what this field is being used for. Note – if you’re in an Object with existing records, you’ll have to populate this Checkbox as TRUE through a data load (Default Values do not work retroactively).
Navigate to create a Custom Settings (Setup | Develop | Custom Settings). Select New.

You’ll want to make sure that you select Hierarchy as your Setting Type. If you want additional information on the difference between List and Hierarchy, check out Salesforce’s documentation.

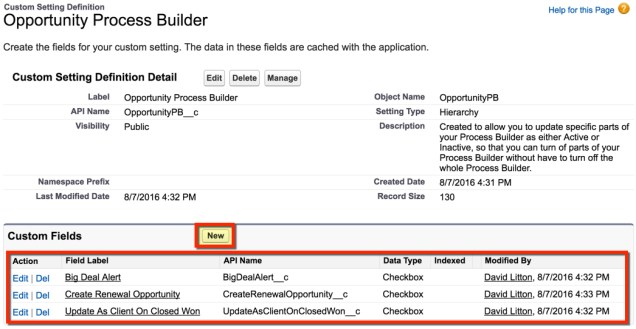
It is time to click New and add in the different Process Groups or Criteria that you want to control. For each of these, you’ll want to create a Checkbox Field.
Hit the Manage button. This takes us to what I call the “record” of the Custom Setting.

We then want to hit the New Button. This is where we will determine if those Checkboxes are TRUE or FALSE.

Check the boxes for the Process Groups you want Active.

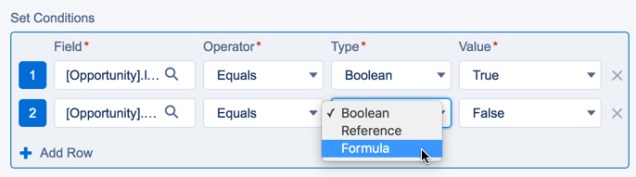
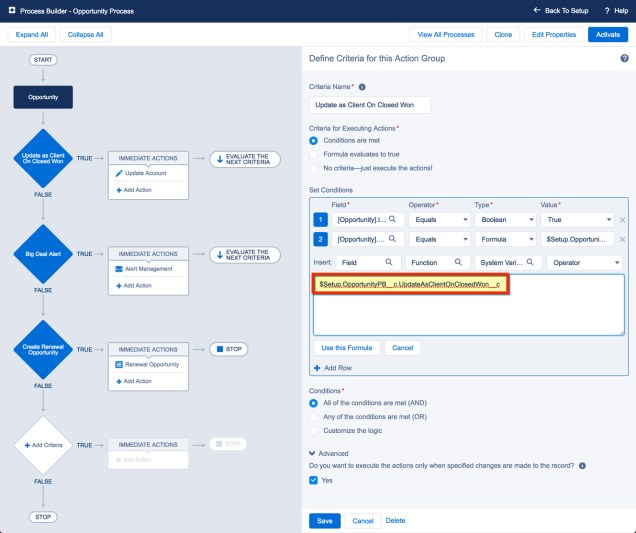
Simple as that… we’re now done with our Custom Setting (until you need to add another Process Group down the road). Head over to Process Builder, and lets talk about using our Custom Setting values in our Process Builder. We need to add a final condition to our Criteria. So, lets add the Custom Field we created Process Builder Active.

Select Formula as the Type.
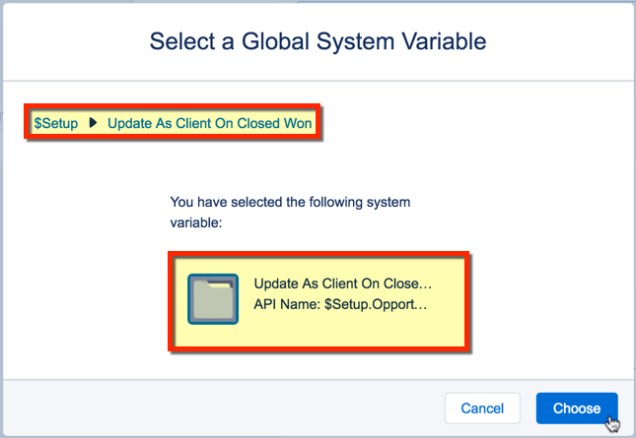
Select the System Variable search tool.

Hit $Setup and then select the Process Group Checkbox that you want to use. Note – $Setup is where all your Boolean Custom Settings fields live inside of Process Builder.
All that is left for you now is to hit Use this Formula!
For a quick summary, we are used Custom Settings to house the Active Status of our different Process Groups (what used to be individual Process Builders). This allows you to turn on (or off) specific Criteria inside your Process Builder off without affecting the whole Process Builder! If you’re being a good Admin and doing this in your Sandbox – note the “record” in your Custom Setting won’t deploy with your Change Set. You’ll have to manually update that (or through data loader if you have more than 3 checkboxes).

David, this is great stuff. One question. I’m not certain of why you are creating a custom checkbox field on the Oppty in the example (ProcessBuilderActive). Couldn’t you just have easily set the custom setting in the process equal to “true” vs. having it set to equal to the custom checkbox field. I have a feeling I am missing some added control this will give you, but can’t figure out what it is. Additional clarification would be much appreciated. Thanks- Clayce
LikeLike
Clayce, you’re correct – if you wanted to use the “Formula evaluates to true” as your Criteria instead of “Conditions are met”, then it would be possible. I went with an example of “Conditions are met”, because for most this is the easiest to understand and use… and not all of your Criteria really need to have a “Formula evaluates for true”, so the Custom Field route allows you more flexibility in how you build your Criteria. But, I’ll make look to get this updated in the near future to make sure others see that is an option. Thanks for the feedback!
LikeLike
Thanks for the quick reply… thinking about it some more with my team we also recognize using the custom field on the Oppty object also gives you more control at the individual record level; i.e. you can control turning the entire process on/off for individual Oppty records for testing, etc.
Thanks again- Clayce
LikeLike
Hi David,
Great idea on being able to use the criteria field instead of the formula. I am currently converting all the workflows into process builder. I wanted to see if you have any ideas if there can be default profile we can use instead of setting up each profile in custom setting. My workflows are not profile specific.
Thanks,
Jaiti
LikeLike