Introduction to Salesforce Actions

Salesforce Actions are one of my favorite tools.  If you’ve got a group of Users that are heavily using Salesforce1, then you can really be a rockstar for them by understanding how to use Actions correctly.  But, Actions also work in Chatter Feeds, Quick Actions, and Lightning Experience!  While Buttons are not extinct, Actions are the future and you should look at using them!

salesforce_lightning.jpg

Global Actions

Where can these be used?  These can be used on any Record Detail Pages & Home Pages… so anywhere an Action can be.

Actions

Can be used on Record Detail Pages for the specified Object.  The biggest difference between a Global Action and an Action is an Action allows you to preform a Record Update.

Global Actions vs Actions

Global Actions allow you to build an Action that can be used across multiple objects!  This means, if you have a specific Record Create, Visualforce Page, or Custom Canvas that you want displayed in multiple spots (or maybe just on the Home Page), then this is your best option.  With the Global Action you are able to re-use your Action across multiple areas, which means it takes less effort to develop and is easier to maintain!

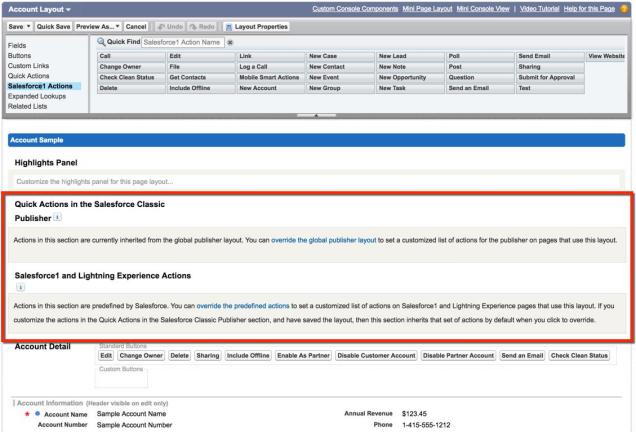
Quick Action (Classic) vs Salesforce1 & Lightning Experience

Ability to have different layout for Salesforce Classic compared to Salesforce1 & Lightning Experience.  When Salesforce added Lighnting Experience they did not group it into the Quick Actions layout, but instead added it to the Salesforce1 Action layout.  So, if you currently are using Lightning Experience, the layout (at this time) will have to be the same between desktop and mobile.  Down the road Salesforce might split this up into a new layout so that we can once again have different actions for the Desktop than our mobile devices.

Action layouts for each object are predefined by Salesforce, but you are easily able to override and drag-and-drop Actions around in the layout (just as you would a Field).  If you customize the Quick Actions (Classic) layout, but not the Salesforce1 & Lightning Experience layout, then the Salesforce1 layout will mirror the Quick Actions layout.

Actions Layout.jpg

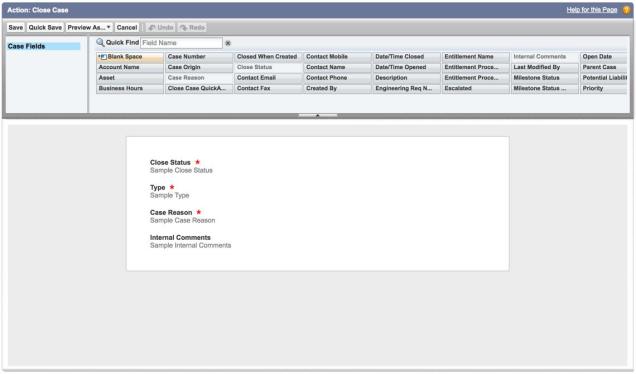
Each Action has its own Layout (Works with Record Create, Record Update, and Log a Call)

One nice thing about Actions is how easy it is to drag-and-drop the fields that you want to be displayed for your Action.  Pretty powerful!  Combine with Predefined Values and you’ve got the ability to really streamline the experience!

Your Layout.jpg

Predefined Values (Works with Record Create, Record Update, and Log a Call)

With Actions, one of the biggest selling points is the ability to use Predefined Field Values.  This allows you to save your End Users time entering information (just as you would ‘pre-populate’ fields with a button URL hack).  You’re able to reference the Object that you’re on (if applicable), and the System Fields like the Running User and Custom Settings.  If you choose to display these values on the Action Layout, the End User can change the default value if needed.  If you don’t need the End User’s input, then simply remove it from the layout and the Predefined Field Value will do the rest.

Predefined Value.jpg

Action Design Considerations

Have you noticed that both Global Actions and Actions allow for you to select Log a Call as a type of Action?  All this really is doing is setting some predefined fields/layout changes for you, but it is still a Record Create of a Task.  The benefit, besides not having to set some of those predefined values, is that you get a beautiful Custom Icon!  When you are creating your Actions, be it a Visualforce Action or a simple Record Update, make sure that you’re using the Lightning Design System to use an appropriate Icon.  User Experience matters!
Lightning Design5

Lightning Design6

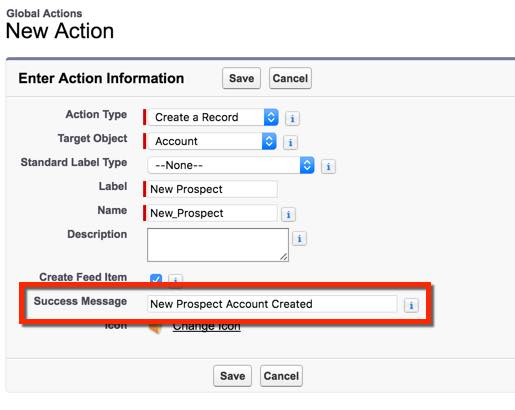
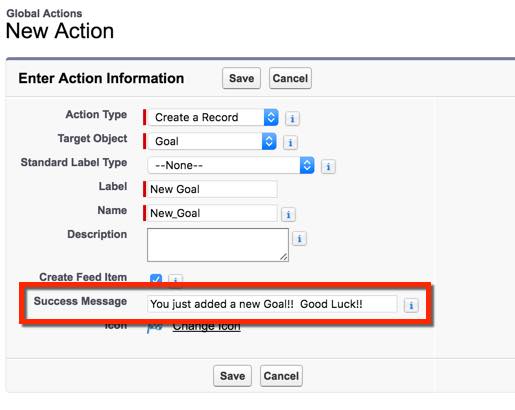
As of the Spring ’16 Release, we have the ability to now use Success Messages for our non-coded Actions (Record Create, Log a Call, and Record Update)!  This is something small (just like picking a Custom Icon), but it really does enhance your the User Experience of your Action.

Success Message 1

Success Message 2

Sometimes the Chatter Feed can get annoying if every little thing done shows up.  This issue  was also resolved with the Spring ’16 Release, giving us the ability to choose whether or not we want to Create Feed Item with our Action for any Record Create (includes Log a Call).

Create Feed Item


Understanding how to write Process Builder Criteria

I am working on a mini-series related to understanding Bulkification (related to Process Builder and Visual Flow).   So, you’re going to see a theme of posts like this and Building your Process Builder for Optimum Performance and Bulkification where I focus on some design considerations with Process Builder and Flow.  The reason behind these posts are because Process Builder and Flow are extremely powerful tools that give those previously developer-only powers to the masses.  And as we all know… with great power comes great responsibility!  So, lets do our part to make sure that we build our Process Builders and Flows in a way that would not cause developers headaches.  I’ll cover the basics of the different types of criteria, and then go over why it matters that you take building criteria seriously.

spiderman1.jpg

When setting the criteria for our Process Builder to fire, our options are:

  1. Conditions are met
  2. Formula evaluates to true
  3. No criteria – just execute the actions!

Lets dive deeper into each of these and talk about when and why would use them, and some of the common mistakes that are made around these.

Conditions are met

criteriapb.jpg

Using this as our criteria gives us a few more options than what we used to have with Workflow Rules criteria.  Now, we have operators like Is changed and Is null that were previously unavailable to us.  Outside of those new options it is essentially just a cleaner UI.  Don’t forget about the ability to make your Value a Formula (see condition #3), you can use awesome functions like PRIORVALUE and grab in cool System things like your Custom Settings!  Speaking of, Jennifer Lee has a great post on using Custom Settings in Process Builder that is a must read for anyone not familiar with Custom Metadata or Custom Settings!

Conditions.jpg

So we can pretty much do pretty much everything inside this criteria option… but what are the pitfalls that we will run into?

Forgetting to check the Advanced checkbox.

I really wish that Salesforce didn’t hide this section, it needs to be front and center!  I feel like this is one of the biggest errors that people make when building a Process Builder.  It is often overlooked until you’ve got a Process Builder that is creating a record or sending an email, and you realize that you’ve just had six emails get sent out to a Client!criteriaadvanced.jpg

Using Is changed

While I absolutely LOVE this operator that Salesforce gave us within Process Builder, the fact of the matter is I have seen tons of Success Community questions where people get stuck on this.  It isn’t documented very well that Is changed will ONLY run on Updates.  This will not run on Create.  That means, you’re up a creek without a paddle if you’re trying to build your Process Builder to only fire when a value changes, but also have it work if that field has been filled out on create.  If anyone has a clever way that they’ve found to bypass this issue, I’de love to hear it.

Formula evaluates to true

criteriapb2.jpg

While not as simple as the conditions are met option, this gives us the ability to do everything that we would want to do.  The problem is that this often is more fragile than the rest.

API Field Name Changes

This option unfortunately will NOT update your formula if you have to change the field name.  Keep this in mind, because just about everywhere else in the UI this is something we’re accustomed to.  You will however be greeted with a lovely error message anytime you try to Clone ur Update your Process Builder

errormsg.jpg

Is changed for new records works!! kinda…

Here is a simple example of how you could use the formula evaluates to run on new records and still run ischanged on updates.

We essentially have separated our criteria into On record create and On any updates.

(ISNEW() && NOT(ISBLANK(field)) || ISCHANGED(field)

In my below example I only have to use ISNEW() because the Case Status is always filled out.

ischanged.jpg

No criteria – just execute the actions!

criteriapb3.jpg

This should not be used unless you have a very good reason.  Just because we have a simple action does a Record Update and nothing else does not mean that we want it to always fire on every edit.  This means that every single edit our Process Builder is firing.  How many situations can you think of that actually require a Process Builder to fire every single time?  Don’t be a lazy Admin and use this option just because you can!

Why does this matter?

Because of how Salesforce ‘bulkifies’ our Process Builders and Flow!

bulk.jpg

https://releasenotes.docs.salesforce.com/en-us/winter16/release-notes/rn_forcecom_process_bulkification.htm

The issue is that as we continue to customize an Object with more and more Process Builders and Flows you keep adding to the string length!  Remember that every simple Record Update in your Process Builder, no matter how simple, counts as an actual query that will be added into that ‘bucket’.  Previously with Workflow Rules you never had to worry about those simple Field Updates running on every edit of the record, but now as we try to keep our Process Builders and Flows bulkified it becomes an issue!

By fully understanding our Process Builder’s criteria (and using it correctly), we are able to cut back on the extraneous actions.  This results in two big things:

  1. Reduced process time when you hit Create or Edit a record
  2. You’re more bulkified due to a decreased the number of queries

Which means you’re now the hero of your Org!

hero.jpg

The “One Process Builder Per Object” Design Pattern

Ever since the Summer ’16 release notes dropped, the Salesforce Community has been going ecstatic over the one and only Process Builder improvement.  The Community is so excited with this one feature, that I have not seen anyone complain about Process Builder only had one improvement.  The reason is this improvement is a game changer in the Process Builder world, and it will change the way that we build our Process Builders.

ReleaseNotesImageEvalNextCriteria

Note: Evaluate the Next Criteria has one limitation currently.  It doesn’t work with Scheduled Actions (which makes sense).  So, if your Process Builder has a Criteria that includes Scheduled Actions, you’re out of luck for continuing any further down the Process Builder (and that particular Process won’t really apply to this Blog Post).  So keep in mind during this post that any Process Builder with a Schedule Action can’t be included.

Unable to do Scheduled Actions

One Process Builder to Rule them All!

TheOneRing.jpg

You’re probably asking yourself why would we want to build an extremely long Process Builder?  This idea comes from attempting to mirror the Apex Trigger best practice and design pattern.  Yes, there are additional benefits to this design pattern with Apex as opposed to Process Builder, but the main points still ring true.

#1 – Keep it Simple

No longer do you need to search through tons of Process Builders trying to understand what all is going on behind the scenes.  You’ve got all of your logic in one spot for you to look at (excluding Scheduled Actions).  Heck, Salesforce even mentioned how it makes it easier in the release notes!

release notes.jpg

#2 – Control Your Order of Execution

pemdas.jpg

So, just like with your Order of Operations, it is important to be able to know what order you execute Process Builder actions.  However, unlike the Order of Operations where we can follow a consistent process every time… with Process Builder we don’t know which order our Process Builders will execute in.  If we have 15 different Process Builders on the Cases Object, then we have no control over what order they will be executed.  It is quite scary when you realize you’ve got zero control over the order your Process Builders run in!

With executing multiple criteria in a single Process Builder we are now able to consolidate all of our Process Builders into just ONE.  And, in our one Process Builder we can drag and drop our actions around into the desired Order of Execution.

For a quick summary, creating one Process Builder to rule them all will allow you to simplify your Process Builders for each Object, and will allow you to have consistency in the way your actions are fired.  Do you have to do this?  No, there is nothing stopping you from continuing to build Process Builders in the same fashion that we previously did.  But, I would ask you to consider thinking about incorporating this design pattern into your Orgs once it becomes available.

Salesforce Admin vs Consultant, Whats the difference?

Before I took the plunge into the consulting world, I was an internal Salesforce Administrator and Developer working in Sales Operations.  I was in charge of a 200 user Salesforce org.  We used both Sales and Service Cloud, and we even had two Customer Communities.  Since my jump to become a Consultant I’ve noticed that some skills transferred over and others didn’t.  In this post I’ll make 5 comparisons between a Salesforce Admin/Dev to a Salesforce Consultant. Continue reading