How to use Case Comments with Communities in the Service Console Feed View & Salesforce1

This past week I had someone who is looking to use Case Comments in the Service Cloud, but wanted it to be listed as an Action in the Feed.  I thought it would be a good use case of many different tools within Salesforce being used together.  I am looking at possibly doing this with code and basing it off this post, but for now I figured that I’de show you how without code.  Let me be clear that if you’re not using a Community that you can simply use the Internal Comments field instead without having to do anything.  The only negative of going with this solution is that you’re not going to have your Case Comment Chatter Post visible until your Chatter feed is refreshed, but that is something that also happens with the Internal Comments field.  The Case Comment record is visible instantly.  And this works nicely with Salesforce1.  With that said, let’s jump right in!

Automation Overview:

  1. Inputs for Case Comment received (Action)
  2. Process Builder triggered (Pass inputs into Visual Flow)
  3. Case Comment created in Flow

For this solution we have two different options in how we can do it architecturally:

  1. Record Create – Create new Custom Object
  2. Record Create – Create new Task Record
  3. Record Update – Use Custom Fields on Account/Opportunity

For me, because of not wanting to further complicate the Task Object and not wanting to add excess fields to the Case Object, I’m going to go with option 1 and create a new Custom Object.

How will we build this?

  1. Create the Case Comment Extension Object
  2. Create our Visual Flow to create the Case Comment
  3. Create our Process Builder to launch the Visual Flow
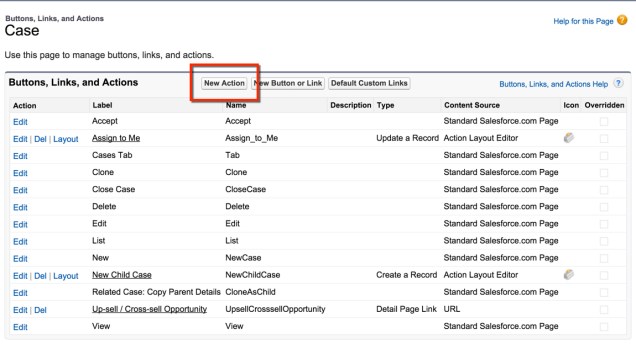
  4. Create our Action on the Case

For this solution we have two different options in how we can do it architecturally:

  1. Record Create – Create new Custom Object
  2. Record Create – Create new Task Record
  3. Record Update – Use Custom Fields on Account/Opportunity

For me, because of not wanting to further complicate the Task Object and not wanting to add excess fields to the Case Object, I’m going to go with option 1 and create a new Custom Object.

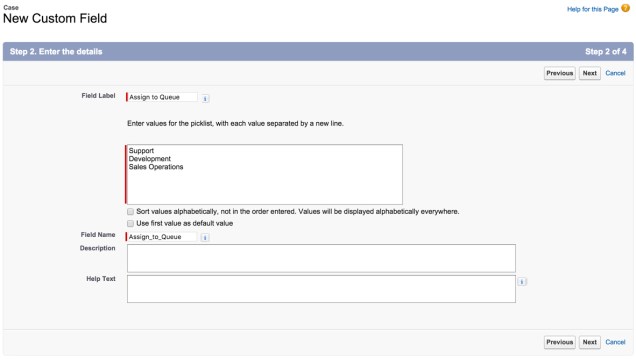
What fields do we need create in this Custom Object?

  1. Auto Number
  2. Case (Master-Detail)
  3. Comment (Long Text Area)
  4. Public (Checkbox) Note: this only applies if you have a Customer Community.

CaseCommentExtensionObject

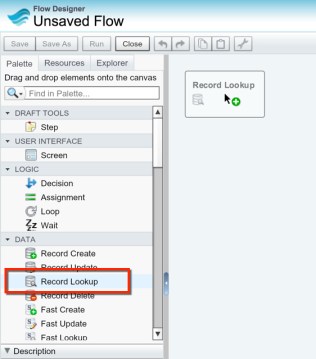
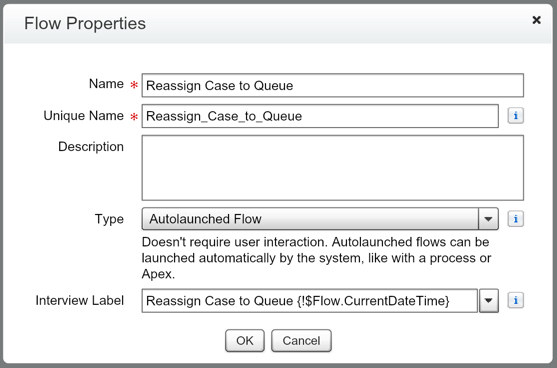
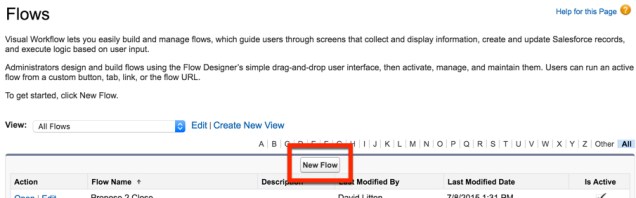
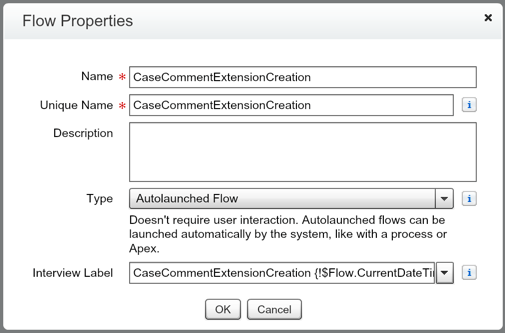
Let’s get our Flow created first since we can’t Activate the Process Builder without it  (Setup | Create | Workflows & Approvals | Flows).

NewFlow.jpg

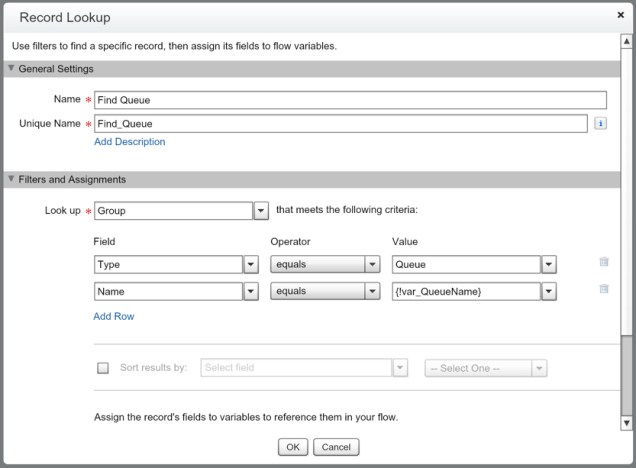
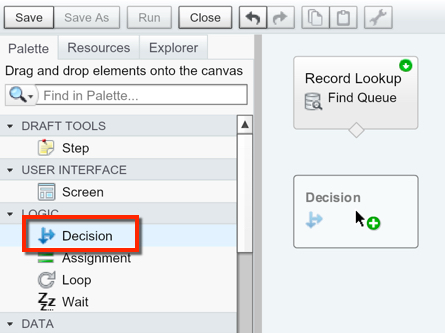
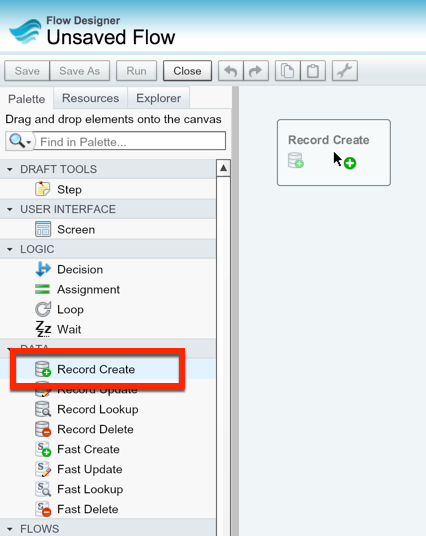
The first step is going to be grabbing our Record Create.

RecordCreate1.jpg

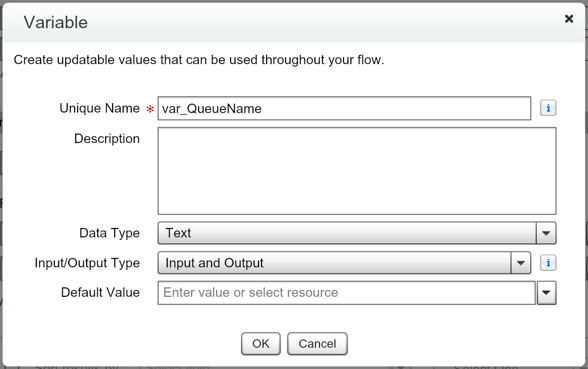
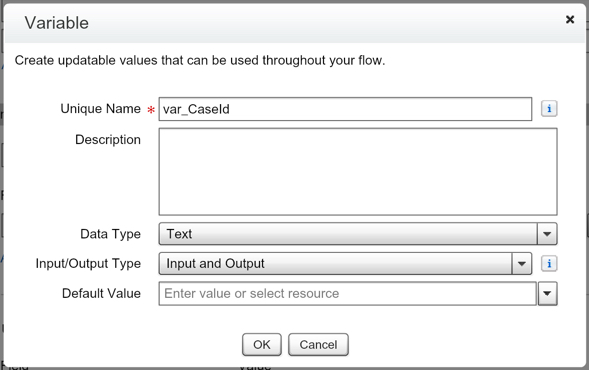
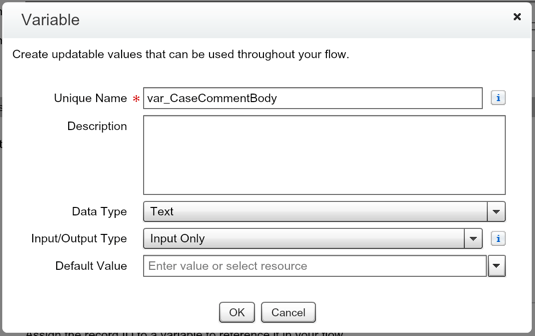
We now need to create the variables we will use to create the Case Comment.

Case Id

CaseCommentParentIdVariable

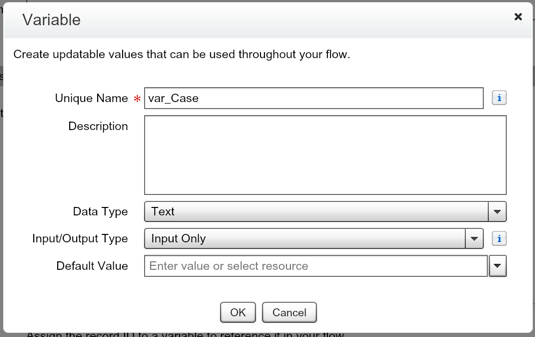
IsPrimary (This is a BOOLEAN, not Text)

CaseCommentIsPublishedVariable

CommentBody

CaseCommentBodyVariable

Lets make sure everything is correctly mapped inside our Record Create.

CaseCommentCreation

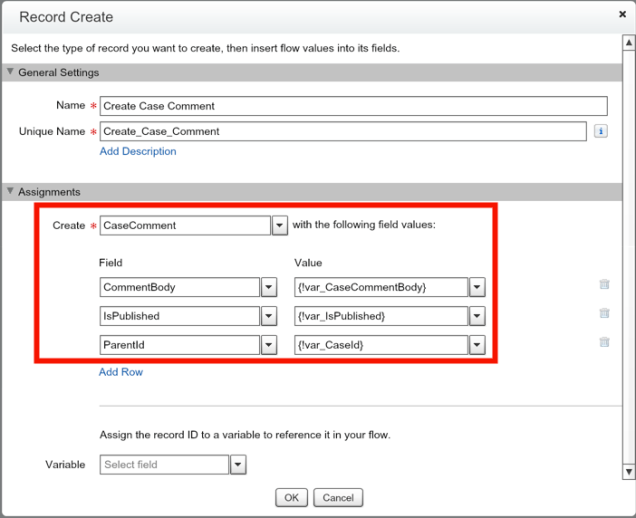
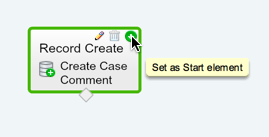
Great!  So lets hit OK and set this as our Starting Element.

SetAsStartElementCaseComment

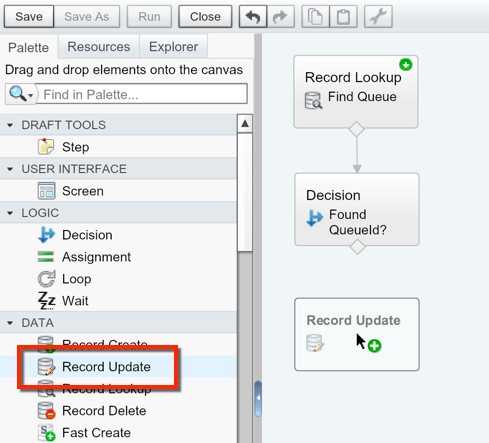
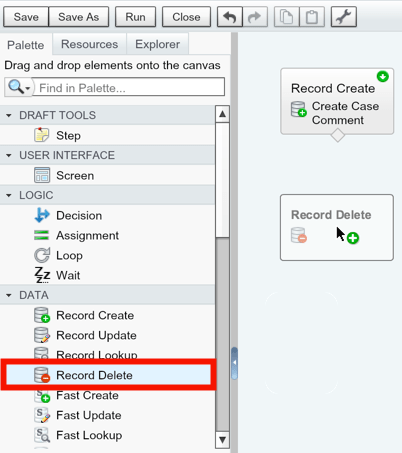
Now lets drag in our Record Delete.  This is so that we don’t add useless data into Salesforce.

RecordDeleteDrag

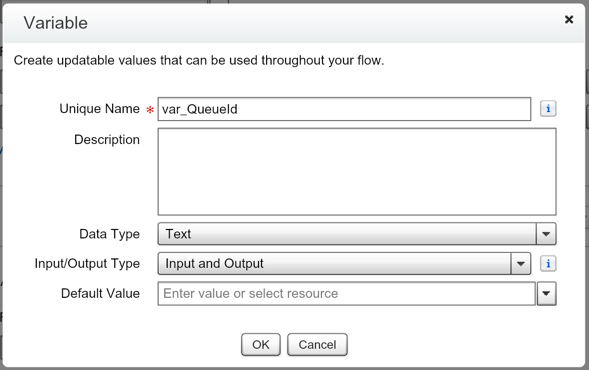
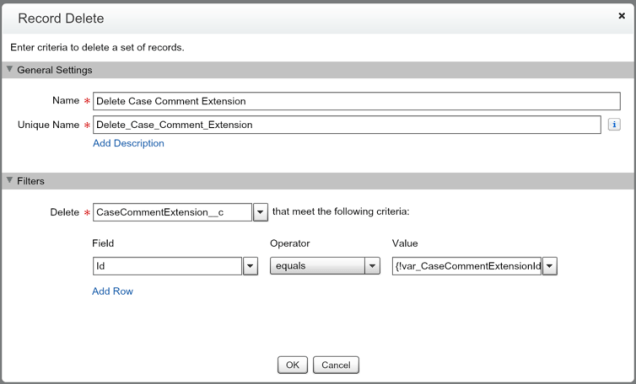
Create a variable for the Record Id of the Custom Object record we just created, when our Action is used.

var_CaseCommentExtensionId

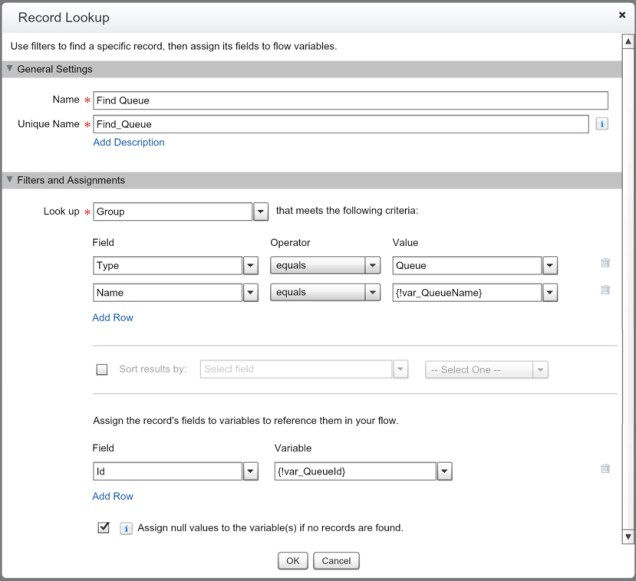
Map it in our Record Delete.

DeleteCaseCommentExtension

Connect the elements together to finish our Flow.

FinishedFlow

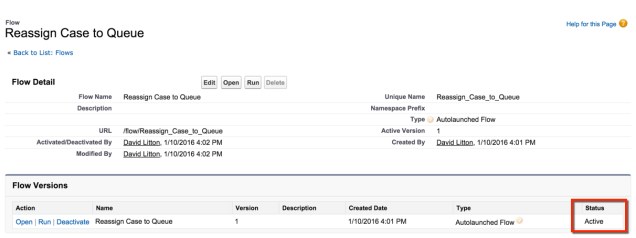
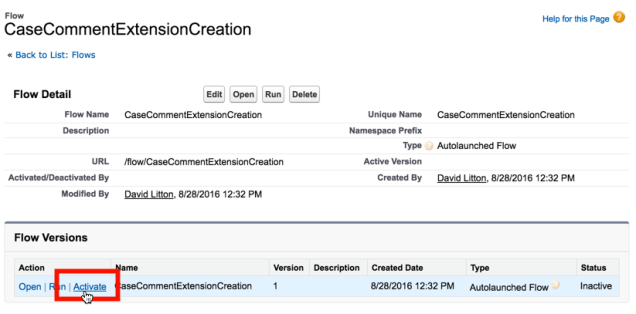
And lastly we want to Save and then Activate our Flow!

SaveCaseCommentFlow

ActivateCaseCommentFlow

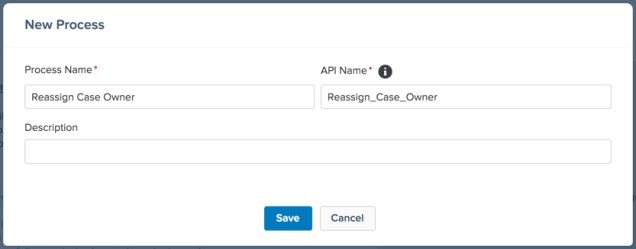
Fantastic!  Now we need to setup our Process Builder that fires this Flow.  So lets go create a new Process Builder for this.  (Setup | Create | Workflows & Approvals | Process Builder)

CaseCommentExtensionPBCreation

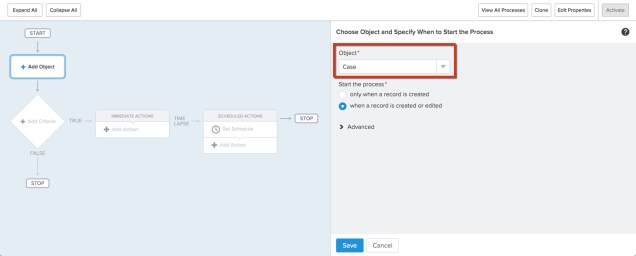
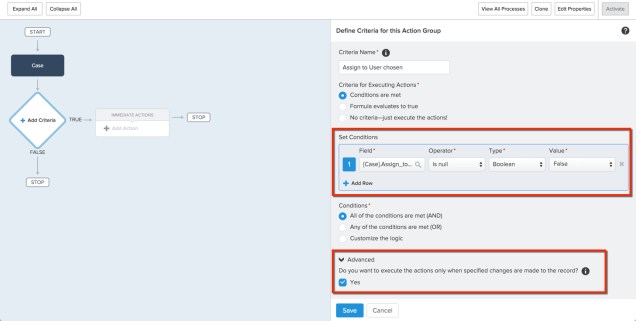
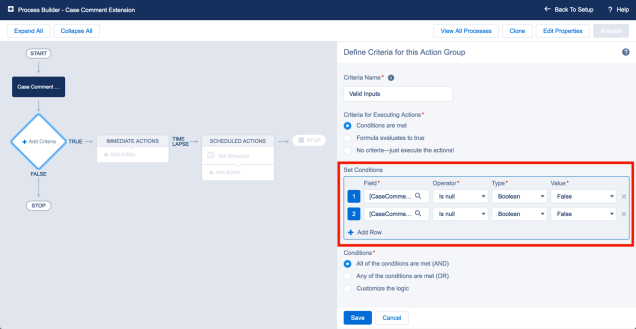
We want the Process Builder to fire on our Custom Object that we created, Case Comment Extension, and we want it to fire only when a record is created.

CaseCommentExtensionPB1

We don’t need to set any criteria here, but to be safe let’s just make sure that we have a Case ID and Comment before proceeding.

CaseCommentExtensionPB2

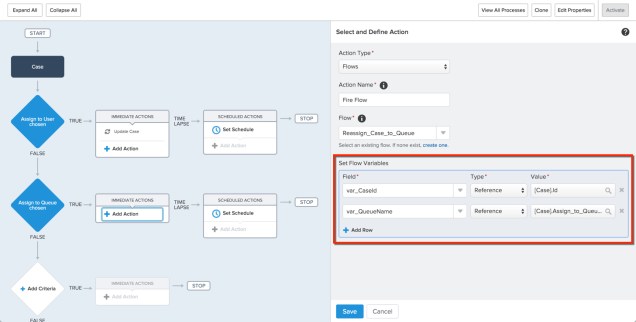
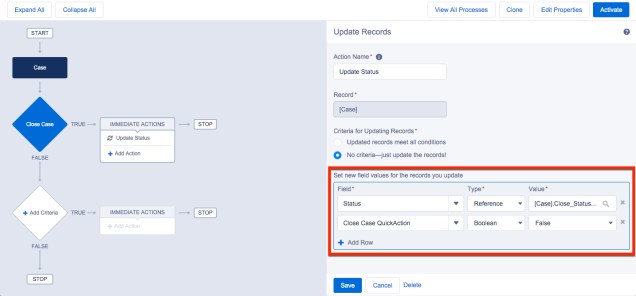
Now we need to map the variables in our Flow to the Values in the Custom Object, using the Type Reference.

CaseCommentExtensionPB3

Hit Save, then Activate your Process Builder. Now, lets navigate to go create our Action.

CaseCommentActionNewButton

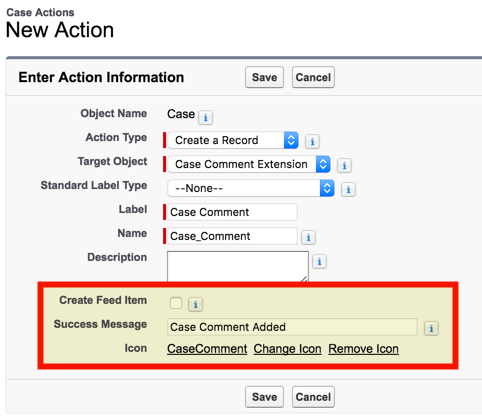
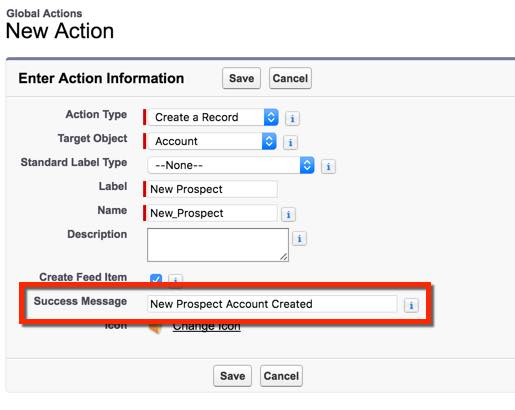
Keep it on the default, Create a Record, and select Case Comment Extension (our Custom Object we created earlier).

CaseCommentAction1

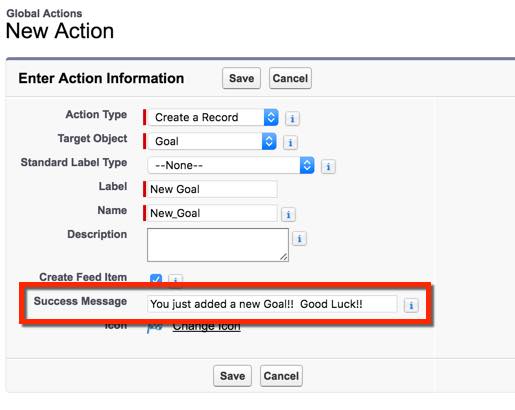
Let’s make sure we turn off the Create Feed Item, so we don’t spam the Chatter Feed since the Case Comment itself will cause a Feed Item to be created.  Also, make sure we add in a nice Success Message and custom Icon to make the action look sharp!

CaseCommentAction2

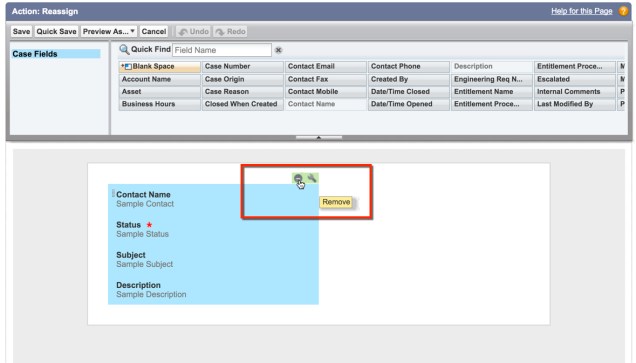
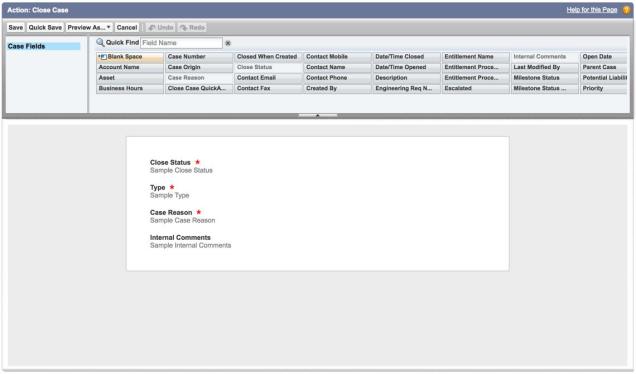
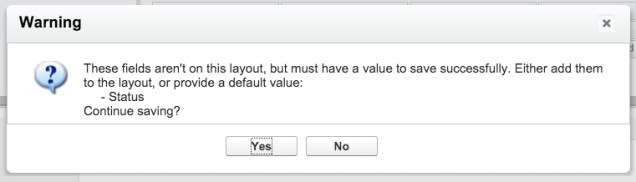
Remove the Case Field and drag Public and Comment into the Action’s Page Layout.  Make sure you require the Comment field.

CaseCommentAction3

It will give you a small popup warning you about not having the Case field on the Layout, but you can ignore it and move on.

CaseCommentAction4

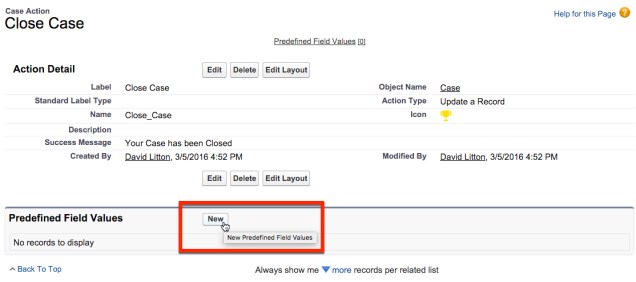
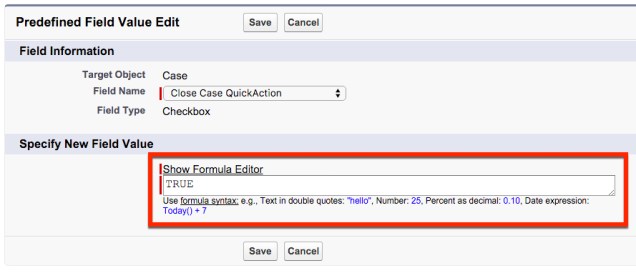
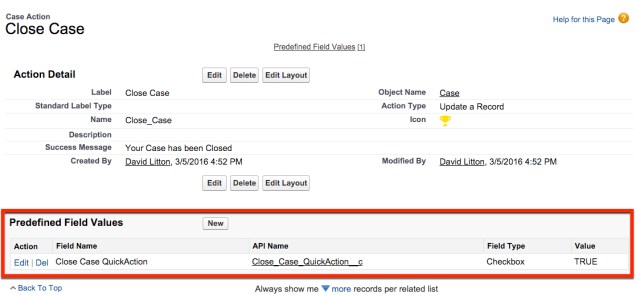
We now need to setup a Predefined Field Value for our Case field.

CaseCommentAction5

Set Case.Id to our custom Case field.

CaseCommentAction6

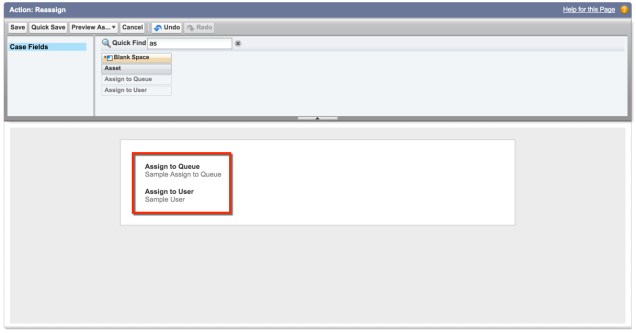
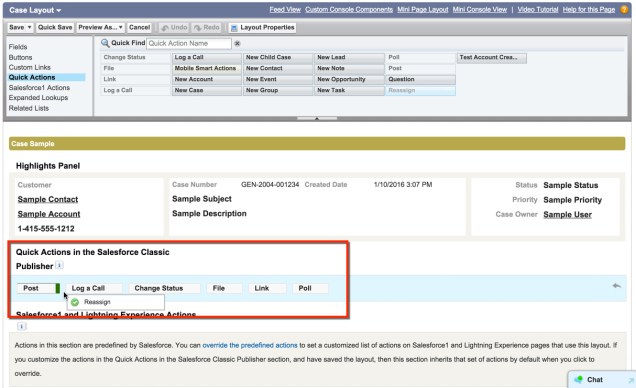
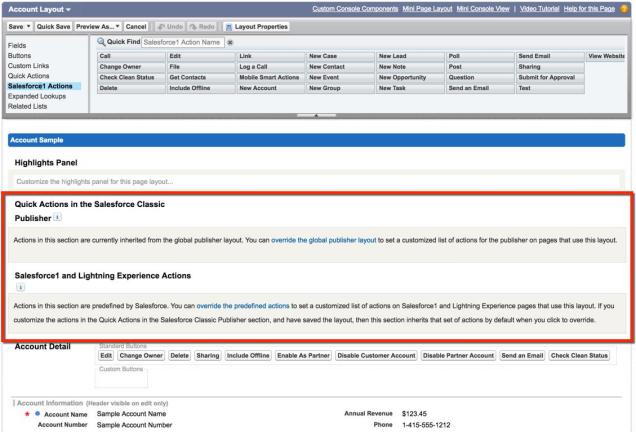
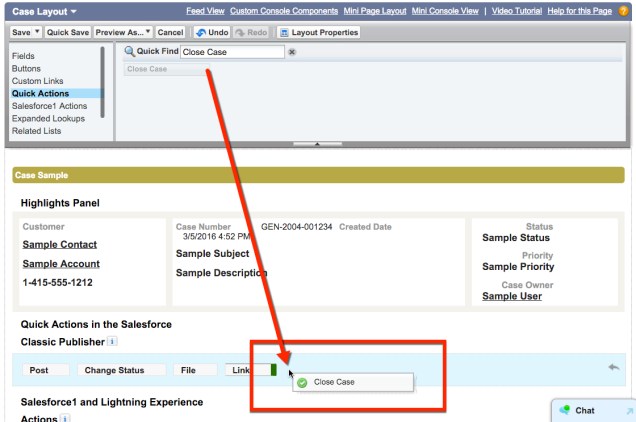
Now all that is left is for us to update our layout(s)!

CaseCommentActionToLayout

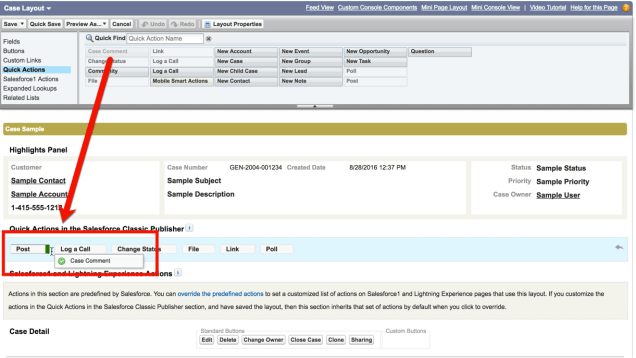
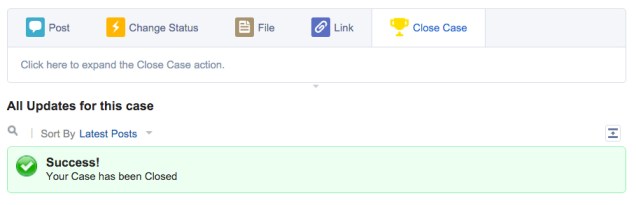
And with that, lets take a look at the finished product!

CaseCommentAction.png

Introduction to Salesforce Actions

Salesforce Actions are one of my favorite tools.  If you’ve got a group of Users that are heavily using Salesforce1, then you can really be a rockstar for them by understanding how to use Actions correctly.  But, Actions also work in Chatter Feeds, Quick Actions, and Lightning Experience!  While Buttons are not extinct, Actions are the future and you should look at using them!

salesforce_lightning.jpg

Global Actions

Where can these be used?  These can be used on any Record Detail Pages & Home Pages… so anywhere an Action can be.

Actions

Can be used on Record Detail Pages for the specified Object.  The biggest difference between a Global Action and an Action is an Action allows you to preform a Record Update.

Global Actions vs Actions

Global Actions allow you to build an Action that can be used across multiple objects!  This means, if you have a specific Record Create, Visualforce Page, or Custom Canvas that you want displayed in multiple spots (or maybe just on the Home Page), then this is your best option.  With the Global Action you are able to re-use your Action across multiple areas, which means it takes less effort to develop and is easier to maintain!

Quick Action (Classic) vs Salesforce1 & Lightning Experience

Ability to have different layout for Salesforce Classic compared to Salesforce1 & Lightning Experience.  When Salesforce added Lighnting Experience they did not group it into the Quick Actions layout, but instead added it to the Salesforce1 Action layout.  So, if you currently are using Lightning Experience, the layout (at this time) will have to be the same between desktop and mobile.  Down the road Salesforce might split this up into a new layout so that we can once again have different actions for the Desktop than our mobile devices.

Action layouts for each object are predefined by Salesforce, but you are easily able to override and drag-and-drop Actions around in the layout (just as you would a Field).  If you customize the Quick Actions (Classic) layout, but not the Salesforce1 & Lightning Experience layout, then the Salesforce1 layout will mirror the Quick Actions layout.

Actions Layout.jpg

Each Action has its own Layout (Works with Record Create, Record Update, and Log a Call)

One nice thing about Actions is how easy it is to drag-and-drop the fields that you want to be displayed for your Action.  Pretty powerful!  Combine with Predefined Values and you’ve got the ability to really streamline the experience!

Your Layout.jpg

Predefined Values (Works with Record Create, Record Update, and Log a Call)

With Actions, one of the biggest selling points is the ability to use Predefined Field Values.  This allows you to save your End Users time entering information (just as you would ‘pre-populate’ fields with a button URL hack).  You’re able to reference the Object that you’re on (if applicable), and the System Fields like the Running User and Custom Settings.  If you choose to display these values on the Action Layout, the End User can change the default value if needed.  If you don’t need the End User’s input, then simply remove it from the layout and the Predefined Field Value will do the rest.

Predefined Value.jpg

Action Design Considerations

Have you noticed that both Global Actions and Actions allow for you to select Log a Call as a type of Action?  All this really is doing is setting some predefined fields/layout changes for you, but it is still a Record Create of a Task.  The benefit, besides not having to set some of those predefined values, is that you get a beautiful Custom Icon!  When you are creating your Actions, be it a Visualforce Action or a simple Record Update, make sure that you’re using the Lightning Design System to use an appropriate Icon.  User Experience matters!
Lightning Design5

Lightning Design6

As of the Spring ’16 Release, we have the ability to now use Success Messages for our non-coded Actions (Record Create, Log a Call, and Record Update)!  This is something small (just like picking a Custom Icon), but it really does enhance your the User Experience of your Action.

Success Message 1

Success Message 2

Sometimes the Chatter Feed can get annoying if every little thing done shows up.  This issue  was also resolved with the Spring ’16 Release, giving us the ability to choose whether or not we want to Create Feed Item with our Action for any Record Create (includes Log a Call).

Create Feed Item


Close Cases with a Quick Action

If you have used Cases in Salesforce, I am sure you’re aware of the Closed Case layout.  This is great, it lets you require the fields that must be filled out before a User can close a Case.  Now, the issue comes when Salesforce rolled out the Feed View in the Console.  Our Users are supposed to live in the Feed, and it would be great if we could have a Quick Action for closing the Case so it is easy to use on the Desktop and Phone!  However, if you’re limiting Close Statuses to the Close Case Layout, you can’t simply drag in your Status field!  You’ve got to get creative!  So we’ll show you how with a Quick Action and a Process Builder we can make our own customized Close Case Quick Action!

How do we do this?

  1. Create our new Fields
  2. Create the Quick Action
  3. Create the Process Builder
  4. Add the Quick Action to the Page Layout

Lets get started!  First, lets create Close Status, which will mirror what your existing closed Status values are.  Remember, if you add a new closed Status value, you’ll need to update it here too.  Not ideal, but it is all we can do right now.

Close Status.jpg

Next, we want to add in a field that will let us know our Quick Action has been fired.  This will be a Checkbox field.

CloseCaseQuickAction.jpg

Now that we have all of our new fields, lets go and create a Quick Action.  To do this, we want to navigate to the Buttons, Links, and Actions section under Cases.  From there, we will hit New Action.

New Action.jpg

We want to now select our Action Type to be Update a Record, which means we are updating the record the action is executed on.

UpdateRecord

Now lets name our Action Close Case and then we get to do my favorite two parts of an Action!  We get to create our Success Message and add our custom Icon.  For those of you new to seeing the Success Message, this will be displayed after someones hits Update on our Action and close the Case.  Previously we weren’t able to modify that message, but now Salesforce gave us that power!  So lets use it!

Success Message

For this Action I’ve got a trophy from the Lightning Design System I want to use.  If you’re unfamiliar with the Lightning Design System and how you can use it to make your Actions and anything Lightning look awesome, check out my post on it!

First, lets get rid of all the fields on the default Layout.

ActionLayout1

Now, lets add in the fields that we want for our Closed Case Layout, and lets set the fields required that we want to require them to use.

ActionLayout2

As you go to save the Action you’ll see a warning message from Salesforce letting you know a required field (Status) is not on your layout.  You can ignore it 🙂

ActionLayout3

Before we move on, we need to use the Predefined Field Values to our advantage, and have Close Case QuickAction set to TRUE.  This will allow us to know every time the Action is pressed, and when we want to trigger our Process Builder.

Predefined FieldsPredefined TRUEPredefined DoNE.jpg

Now on to creating our Process Builder!  This is where the magic comes in.  If you noticed, our field Close Status is not magically linked to the Status field.  But, we need it to be.  The reason we are using Process Builder and not a Workflow Rule is Workflow Rules are not able to pass in a dynamic value of a field, but Process Builder can!  With Process Builder we will be able to make any update to the Close Status field pass into our Status Field.

Lets go create a new Process Builder for this.  (Setup | Create | Workflows & Approvals | Process Builder)

New PB 1.jpg

Set this to have the ability to fire from the Case Object on when a record is created or edited.

PB2.jpg

For our Criteria we need it to be whenever our Close Case QuickAction boolean is TRUE.  We also want to check in our Advanced section the box to make sure we don’t keep firing this Process Builder with every edit (though, our Record Update technically would stop that).

PB 2.jpg

When this happens, we want to do a Record Update to change the Status to the Close Status value, and we want to reset the Close Status QuickAction field to FALSE.

PB 3

Now Save & Activate the Process Builder.

To finish up, lets navigate over to the Page Layout editor and drop in our new Quick Action!

Page Layout 1.jpg

Hit Save.  Now lets navigate to a Case and check out our hard work in action!

Page Layout 2.jpg

Fill out the required fields, hit Update, and watch the Case get closed!

Page Layout 3

Hopefully the simple combination of  an Action and Process Builder shows you how easy it is to take your Actions to the next level!

Reassign Case using a Quick Action and Flow

I’ve lately been involved with quite a lot of Service Cloud implementations.  One thing that I’ve noticed almost all of them have in common is that their Cases never seem to always go to the right Department – or they need to be sent to another mid-Case.  The most common complaint usually has to deal with how many screens someone has to go through to successfully reassign the Case, especially if you’re in the Feed View and not the Detail View of the Service Console.  If you noticed, Owner isn’t an option for us in a Record Update on the Quick Action Page Layout.  So, that means we have to get creative to solve this business problem!

We need to make sure we have a few things built before we begin.  In this case, we need to add two fields to our Cases.

The first field is going to be a dropdown that will allow us to mirror the list of Queues available for Cases.  We will call this Assign to Queue.

Reassign to Queue

The next field we need to create is a User Lookup.  This we’re going to call Assign to User.  We are using this in place of the Owner field, because that isn’t allowed (at the time of this post). Note: this is a Lookup to the USER Object, not CASE.  The Child Relationship Name is referring to what this Lookup would be called in relationship to the User Object on a Page Layout (if that was visible), not that it is a Lookup to the User.

User Lookup

We could make a Validation Rule to only allow one of those fields to be filled out, but we’re just going to do a decision of ‘what matters’ in our Process Builder that will ignore that being needed.

Now that we have our Custom Fields built, lets make sure every value on the Reassign to Queue field has a match!

Queues.jpg

Now that we have that taken care of, lets build our Action!  Navigate to the Buttons, Links, and Actions section under Cases and then select New Action.

New Action box
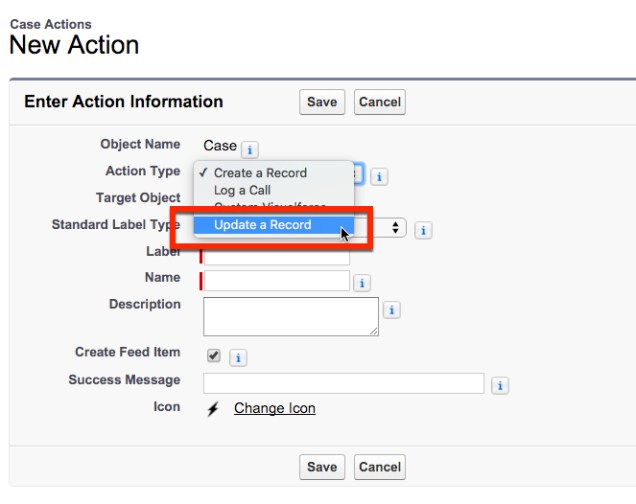
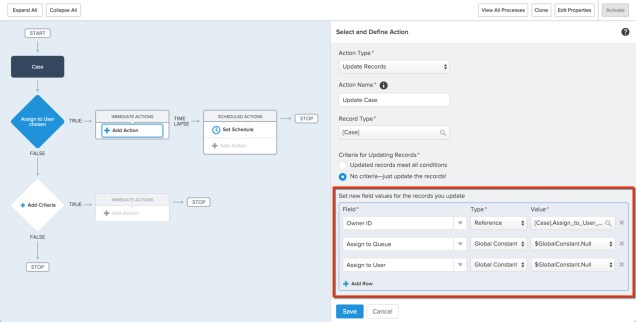
For this Action we are going to be doing a Record Update.  This is because we are going to be updating one of the Assign to fields we created at the beginning.

Action Update a Record

You have the option to insert your own Icon here.  I like to do this for my clients and even customize it to be one of the colors from their logo.  I’ve got a post coming shortly on how you would do this, but for the meantime you can go checkout http://www.lightningdesignsystem.com by yourself!

Action Change Icon

Now we need to clear out default layout our Action has.


Clear Layout

To finish our Action we just need to drag in our Queue and User fields.  Once you do this hit Save and you’re done with your Action!

Edit Action Layout

Now we need to go add it to our Case’s Page Layout.  We want to drag it down to the Quick Actions section.  If you haven’t customized your Salesforce1 Actions yet, they’ll just mirrors your Quick Actions layout.

Drag into Layout


And this is what it looks like!

Finished Action


Now, lets jump over and build out our Flow!  (Setup | Create | Workflows & Approvals | Flows)

New Flow

The first step is going to be grabbing our Record Lookup.

RecordLookup1

We’re going to be needing to create a variable to store our Queue Name, which we will pass in from our Process Builder.

var_QueueName

Notice, we are using a filter to make sure that Type = Queue.  This is because the Group Object houses more than just Queues.  It houses other types of Groups like Public Groups!  We just want to make sure we bring back the correct ID in case another type of Group has the same Name.

Find Queue

Now lets create a variable to store that ID that we are looking to get.

var_QueueId

Our finished Record Lookup will look like this:

Find Queue 2

Lets set it as our starting element

SetStartElement.jpg

The next thing we are going to do is to use a Decision to validate that we found an Id.  You can read more about it in my post on using Decisions as your Test Coverage, so we won’t cover this step in detail here.

Add Decision.jpg

QueueDecision.jpg

Now, lets drag in a Record Update element so that we can update our Case!

Drag Record Update

We want to create a variable to house our Case Id that we are going to pass in from our Process Builder.  This allows us to make sure we are updating the correct Case.

var_CaseId

We need to update the OwnerId with our  variable var_QueueId, and to update the Assign to Queue field with an empty string so that it can be used again.

UpdateCase

After saving our Record Update, we need to connect our elements together and then save our Flow.

FinishedFlowQueue.jpg

Save Queue Flow.jpg

Make sure you activate your Flow or it can’t be referenced in Process Builder!

ActiveFlowQueue.jpg

Now, our Flow is completed and activated, but right now its doing nothing!  So we need to have a Process Builder trigger it.  However, did you notice it seems like we’re missing something?  We also have the Assign to User field.  We didn’t put that in our Flow!  Well, turns out we don’t need to.  We can take care of that in our Process Builder!

So lets go create a new Process Builder for this.  (Setup | Create | Workflows & Approvals | Process Builder)

NewProcessBuilderQueue

Set this to have the ability to fire from the Case Object on when a record is created or edited.

onCaseObject

For our Criteria we need it to be whenever our Assign to User is filled out, which would be the equivalent of saying that it isn’t null.  So, lets use “is null” equals “false” as our conditions.

Criteria #1.jpg

When this happens, we want to do a Record Update to change the OwnerId to the Assign to User Id, as well as we want to clear out any values in the Assign to User and Assign to Queue fields.

Record Update in Process Builder.jpg

Now that we’ve got our first situation complete (when the Assign to User is chosen), lets work on our second one (when Assign to Queue was chosen).

Criteria #2.jpg

When we meet this criteria, we want to go to our Flow and do our query to see if we find a matching Queue.  So lets create our Flow Action and pass in our variables.

SetFlowVariables.jpg

Hit Save and then Activate your Process Builder and you’re done!  Go grab a nice drink and enjoy your accomplishment!

Hopefully the combination of Actions, Flow, and Process Builder has got your mind racing with cool automations you can make yourself!