If you have used Cases in Salesforce, I am sure you’re aware of the Closed Case layout. This is great, it lets you require the fields that must be filled out before a User can close a Case. Now, the issue comes when Salesforce rolled out the Feed View in the Console. Our Users are supposed to live in the Feed, and it would be great if we could have a Quick Action for closing the Case so it is easy to use on the Desktop and Phone! However, if you’re limiting Close Statuses to the Close Case Layout, you can’t simply drag in your Status field! You’ve got to get creative! So we’ll show you how with a Quick Action and a Process Builder we can make our own customized Close Case Quick Action!
How do we do this?
- Create our new Fields
- Create the Quick Action
- Create the Process Builder
- Add the Quick Action to the Page Layout
Lets get started! First, lets create Close Status, which will mirror what your existing closed Status values are. Remember, if you add a new closed Status value, you’ll need to update it here too. Not ideal, but it is all we can do right now.

Next, we want to add in a field that will let us know our Quick Action has been fired. This will be a Checkbox field.

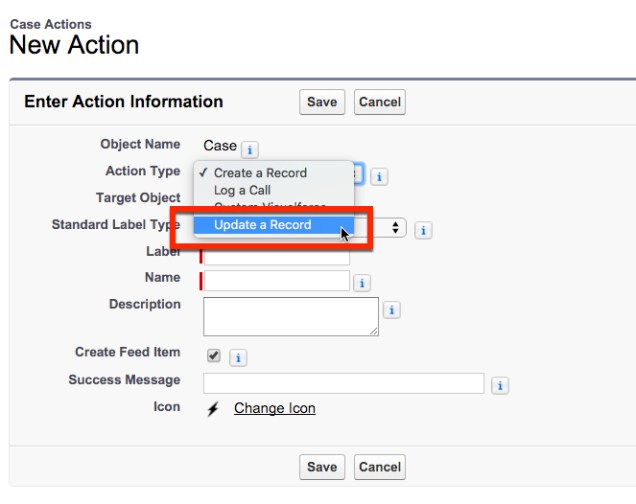
Now that we have all of our new fields, lets go and create a Quick Action. To do this, we want to navigate to the Buttons, Links, and Actions section under Cases. From there, we will hit New Action.

We want to now select our Action Type to be Update a Record, which means we are updating the record the action is executed on.
Now lets name our Action Close Case and then we get to do my favorite two parts of an Action! We get to create our Success Message and add our custom Icon. For those of you new to seeing the Success Message, this will be displayed after someones hits Update on our Action and close the Case. Previously we weren’t able to modify that message, but now Salesforce gave us that power! So lets use it!

For this Action I’ve got a trophy from the Lightning Design System I want to use. If you’re unfamiliar with the Lightning Design System and how you can use it to make your Actions and anything Lightning look awesome, check out my post on it!
First, lets get rid of all the fields on the default Layout.

Now, lets add in the fields that we want for our Closed Case Layout, and lets set the fields required that we want to require them to use.

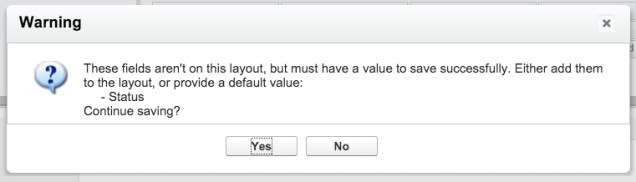
As you go to save the Action you’ll see a warning message from Salesforce letting you know a required field (Status) is not on your layout. You can ignore it 🙂
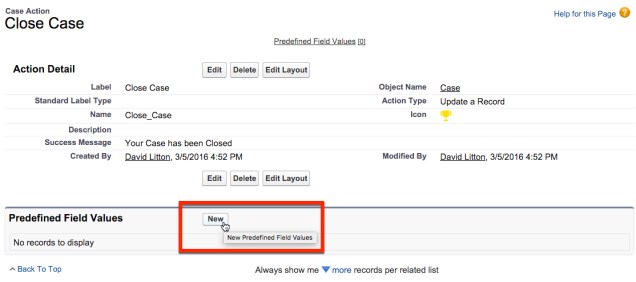
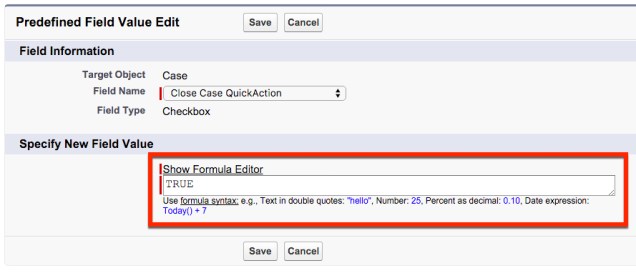
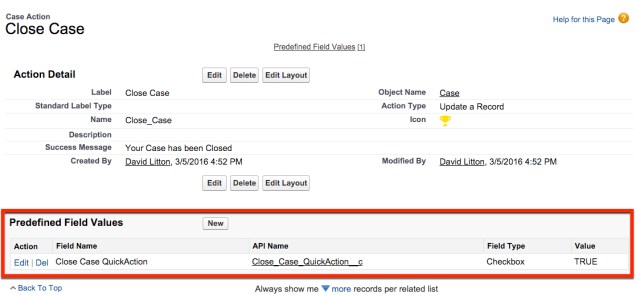
Before we move on, we need to use the Predefined Field Values to our advantage, and have Close Case QuickAction set to TRUE. This will allow us to know every time the Action is pressed, and when we want to trigger our Process Builder.
Now on to creating our Process Builder! This is where the magic comes in. If you noticed, our field Close Status is not magically linked to the Status field. But, we need it to be. The reason we are using Process Builder and not a Workflow Rule is Workflow Rules are not able to pass in a dynamic value of a field, but Process Builder can! With Process Builder we will be able to make any update to the Close Status field pass into our Status Field.
Lets go create a new Process Builder for this. (Setup | Create | Workflows & Approvals | Process Builder)

Set this to have the ability to fire from the Case Object on when a record is created or edited.

For our Criteria we need it to be whenever our Close Case QuickAction boolean is TRUE. We also want to check in our Advanced section the box to make sure we don’t keep firing this Process Builder with every edit (though, our Record Update technically would stop that).

When this happens, we want to do a Record Update to change the Status to the Close Status value, and we want to reset the Close Status QuickAction field to FALSE.
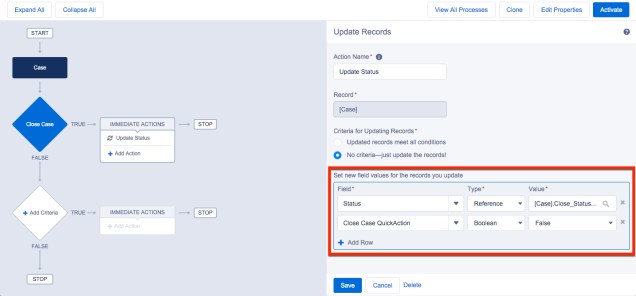
Now Save & Activate the Process Builder.
To finish up, lets navigate over to the Page Layout editor and drop in our new Quick Action!
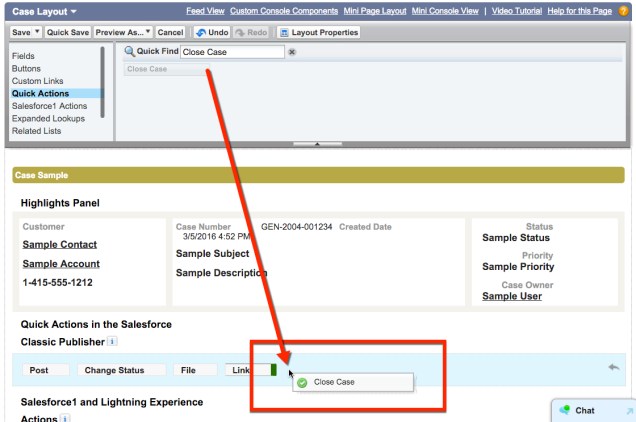
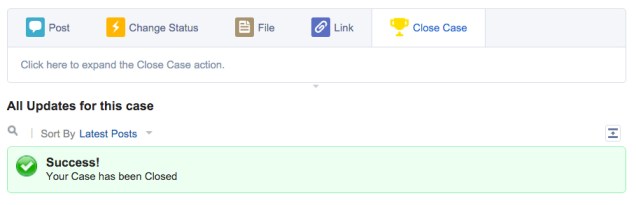
Hit Save. Now lets navigate to a Case and check out our hard work in action!

Fill out the required fields, hit Update, and watch the Case get closed!
Hopefully the simple combination of an Action and Process Builder shows you how easy it is to take your Actions to the next level!
