Have you ever found yourself reusing a Flow over and over? Maybe its to calculate something or its a series of Lookups and Decisions that you always use on your Accounts, Opportunities, or Leads? With Flows we have the ability to use Flows inside of other Flows. But, why would we want to do this? If I am honest, this was one of those areas of Visual Flow that I never really used until I started to get into actual code. When coding, I learned to create a common area of methods that I can call from any Apex Trigger or Apex Class, and now I have reusable pieces of code. Why does this matter? Well, when changes happen… and they always happen… we only have to go to one spot to make the update to that particular method!

As you begin to use some of the same logic over and over in your Flows, you’ll have to keep rebuilding that same piece of your Flow. I don’t know about you, but that really doesn’t sound fun to me. Think Flowception like using Custom Settings or Custom Metadata, you have multiple Process Builders or Flows that reference that data, and when you need to make a change you only have to make the update in one place. With using Flows in the same way that we might use an Apex Class or Custom Settings, we can save time as we build new Flows and as we make updates.
Now that we’ve covered why you would want to use a Flow inside a Flow, lets show you how simple it can be! For my example, I’ve got a Flow that I’ve built that cleans and parses out a multi-select value and turns it into a collection variable, so that you can loop through each value and apply your criteria. If you think this sounds somewhat familiar, you’d be correct! That is because there are two near identical posts out there (by some very respected and active people in the Salesforce Community):
- Rakesh Gupta (Automation Champion) (Parsing Multi-select ID Values from a Flow Interview)
- Mayank Srivastava (Suceed with Salesforce) (The exact same example I’ll be using)
This past week I had two different clients that needed to parse through a Multi-Select. Unfortunately, Rakesh’s managed package that parses Multi-select ID values did not work, because both solutions needed to be Autolaunched Flows (and I was using strings and not IDs). So, I built it myself.
If you read Mayank’s blog post, you’ll see there is quite a lot going on to parse the multi-select value:
- Remove brackets
- Add a semi-colon to the end
- Separate each string value between the semi-colons
- Add those values into a collection that can be used
Why would I want to rebuild this complex piece of logic in every Flow that I need to parse out a multi-select value? That makes this is a prime example of a Flow that acts as a calculation or formula that could be reused across many different Flows (and Orgs). It is on my to-do list to do what Rakesh did and package this up so others can reuse this… stay tuned!
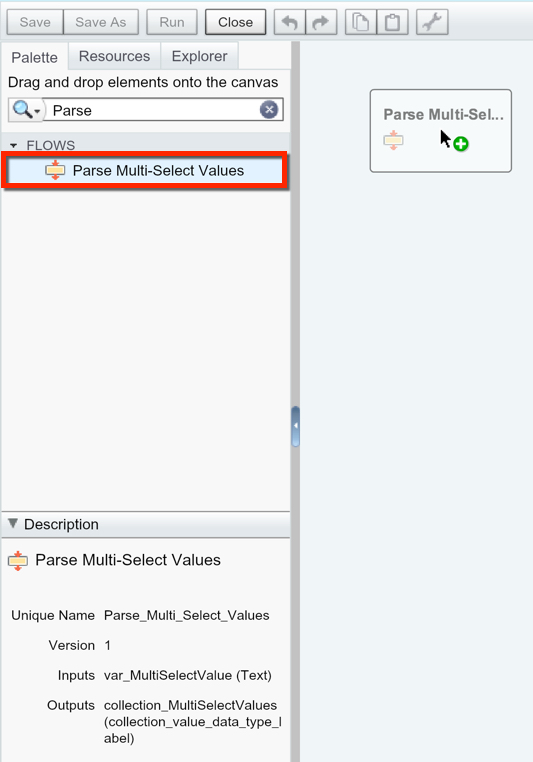
Now that we know what our example Flow is doing, lets jump into our Visual Flow Designer! I’ve got quite a lot of Flow’s in my Org, so I am going to use the search at the top to find the Flow I am looking for and drag it into my canvas.
Now, if you remember my post on Visual Flow Resource Tutorial – Input & Output Type, I pretty much said don’t worry about your Input and Output type. That is true, as the only downside to putting everything as Input & Output is that it clutters what you’re seeing when you go to assign values to your variables. But, when you get into reusing a Flow, you’ll want to start considering cleaning up which variables are input and which are output. That way you can make it as simple as possible to reuse.
If you notice for my Flow, I only have one input and one output variable, and they are worded clearly so you know how to use it.
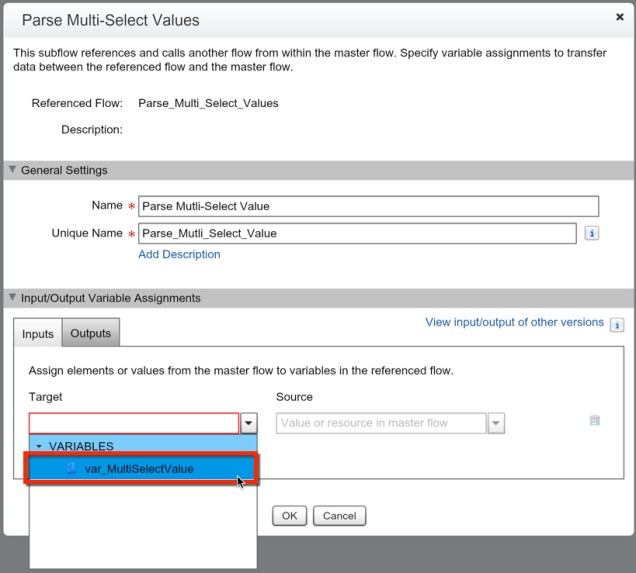
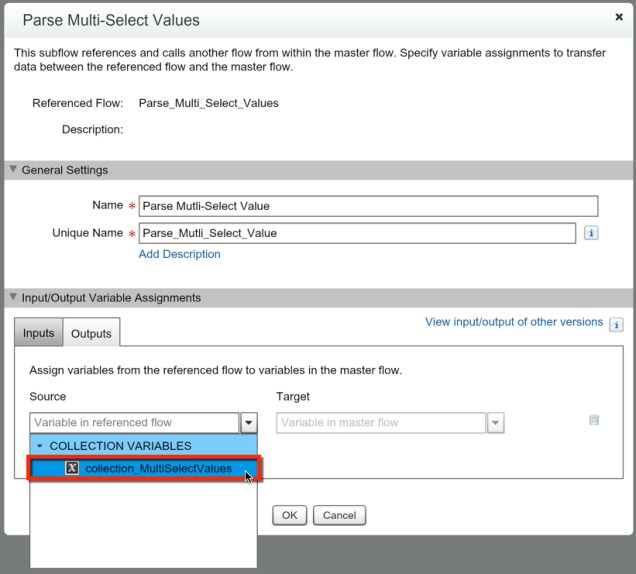
All that is left is for me to assign the Source (child Flow) values to the Target (Flow you’re building). So lets do that.
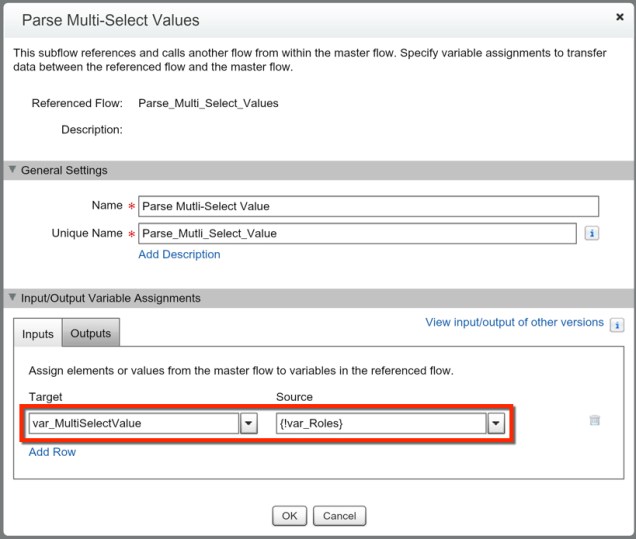
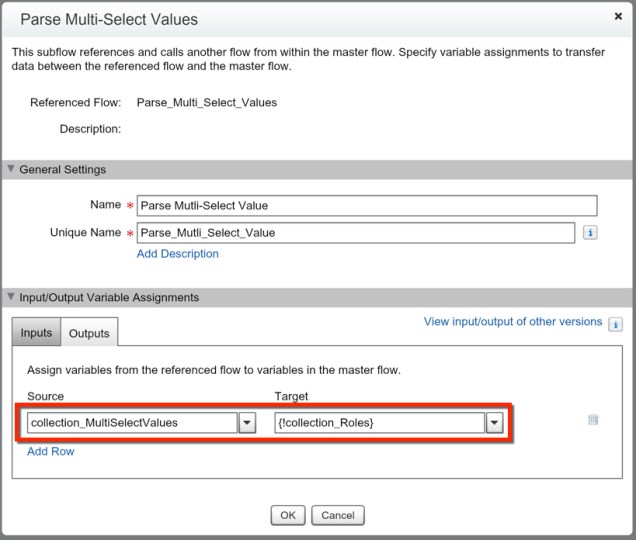
Note: If you have additional values that you need to pass into your child Flow, all you need to do is use the Add Row option, just like you see in any other element. Also, you have the View input/output of other versions, which allows you to look at the variables in versions other than the Active one for that Flow.
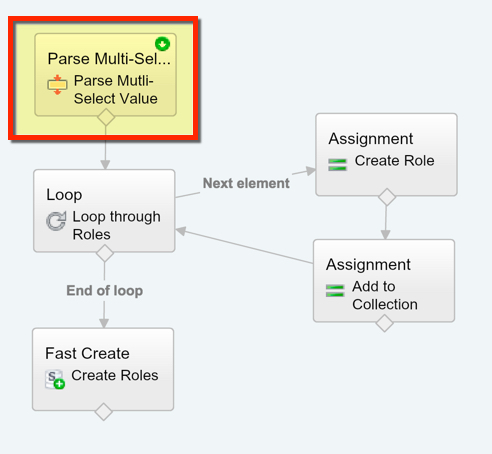
Now, all we need to do is finish the logic of our current Flow, and we get something that might look like this.
RECAP: Using a Flow inside of a Flow is a powerful way to build something scalable with Flow. You can save tons of time by building reusable pieces of Flow that you find yourself commonly using. By doing this you are not only saving time, but you’re also building something that will make any updates down the road easier. When you find yourself doing something in more than one Flow, you should consider putting it in its own Flow.

2 thoughts on “Flowception – How to use a Flow inside another Flow”