Once and a while you get into the situation where you want a non-Admin User to manage a few specific Permission Sets and/or Public Groups. Let me start this off by saying Delegated Administration is a fantastic option to use. However, I’ve run into the scenario where that sometimes doesn’t do the trick. If you’re dealing with someone non-technical this type of Admin work can be a difficult End User experience. One of the most often times I do this is working with special permissions for Community Users. That is because Community Users don’t even have Public Groups visible on their User Detail! So, if the manager has administer more than type of group or assignment, it is easy for them to make a mistake. So, how can we make this as easy of an experience as possible and help to reduce errors?
Simple, we use a Checkbox (and sometimes a Picklist)!

In this post we are going to go over my method of simplifying how you can assign Permissions by using a field on the User Object that any User can be given access to. Let me reiterate why I do this:
- Makes it dummy proof. It takes the thought out of the End User managing the Permission. All your End User needs to do is Check or Uncheck a box (or select a different picklist value). There is less of a chance for them to add or remove the wrong permission.
- A List View cam show your End User who has (or hasn’t) been given the permissions they’re assigning. This makes it easy for them to see whose been given the appropriate access, and they don’t have to go into the Permission Set, Public Group, Queue, or Chatter Group to verify they’ve removed or added someone.
- Easier training for the Admin. It isn’t as hard to train someone to check a box or use a picklist!
Ok, so now that we have established why I think this is a great solution, lets get rolling!
For this example we are going to go use a Checkbox to assign a Permission Set to a Community User. The Permission Set will be granting access to our Knowledge Article Type that is only available for our Premier Support customers (similar to Salesforce’s Premier Support). To do this, we need to create a Checkbox on the User Object, and make sure we only give access to the appropriate Users (assign via Profile or Permission Set).
Note: while we are only assigning a Permission Set in this example (to keep it simple), you can easily add on using this same blue print and swapping out the Object to whatever Object you need.
Automation Overview:
- User Record Meets Criteria – Process Builder triggered (Pass inputs into Visual Flow)
- Flow Checks to see if existing Permission Set Assignment
- Flow Determines if we add or remove the Permission Set Assignment
- Flow adds or removes the Permission Set Assignment
We will be creating:
- Premier Support [User Field – Checkbox]
- Flow to run our logic
- Process Builder to launch our Flow
So start off by creating your new Checkbox field

Now that we have our Premier Support Checkbox created, we can go create our Flow (Setup | Create | Workflows & Approvals | Flows).
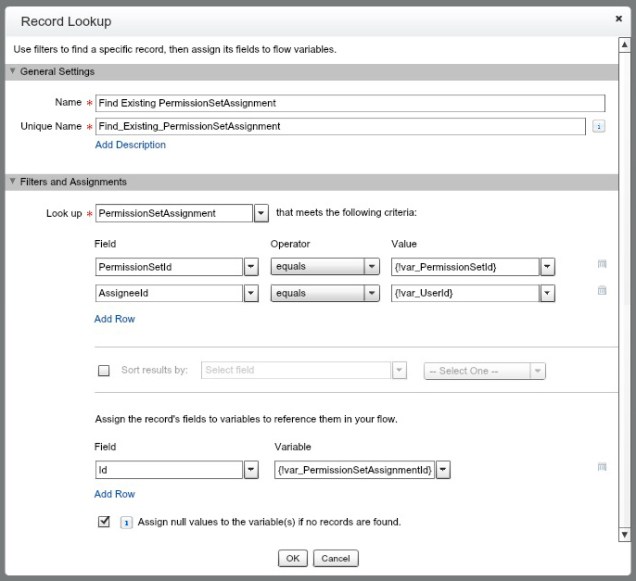
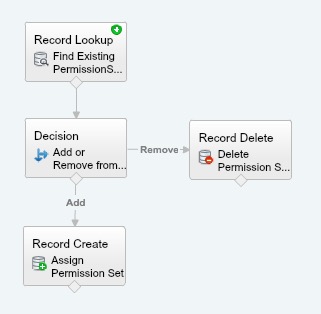
The first step is going to be grabbing our Record Lookup.
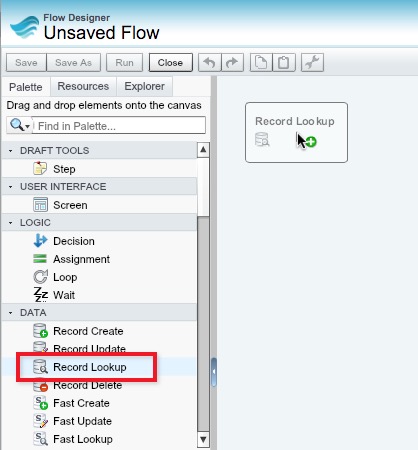
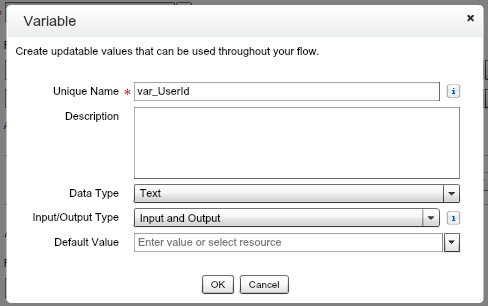
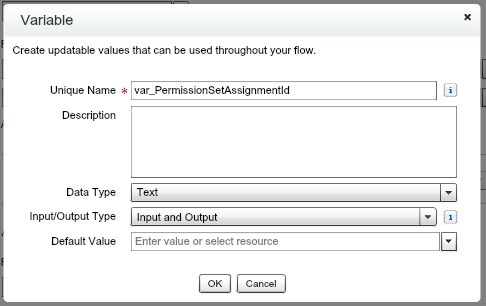
We are going to be doing a Lookup on our Permission Set Assignment Object. We want to see if we have a matching Permission Set Assignment or not. We will want to setup our criteria, and set an ID if we find a Record. To do so we will need to have these three variables created:
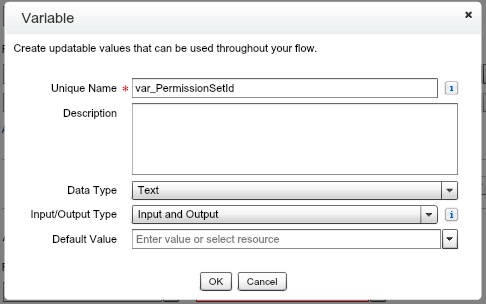
var_UserId – The Id of the User the Process Builder is triggered from (passed in from PB)
var_PermissionSetAssignmentId – The Id of the Permission Set Assignment, if the User has been assigned the Permission Set already.
var_PermissionSetId – The Id of the Permission Set associated to Premier Support (passed in from PB)
This will give us a final Record Lookup that looks like this
Great, now lets set this as our Start Element

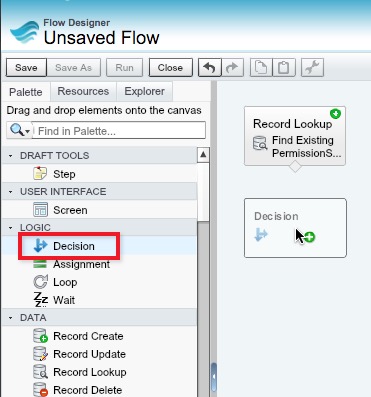
Now, we need to setup a Decision to see if we need to add or remove the Permission Set assignment. So, lets drag that out to our Canvas.
We will need to have a variable for our Checkbox field. So lets create that and call it var_PremierSupport. Make sure you set it to the Type of Boolean.

Now, lets setup our Decision Criteria. The first one will be if we want to ADD the Permission Set to the User, we want to check to make sure the var_PremierSupport EQUALS TRUE and the var_PermissionSetAssignmentId IS NULL is TRUE
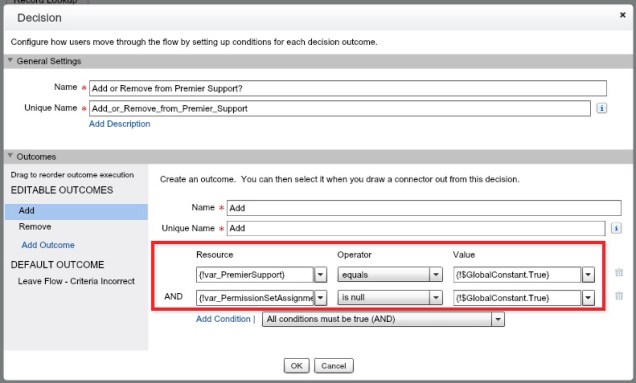
The second one will be if we want to REMOVE the Permission Set from the User, we want to check to make sure the var_PremierSupport EQUALS FALSE and the var_PermissionSetAssignmentId IS NULL is FALSE
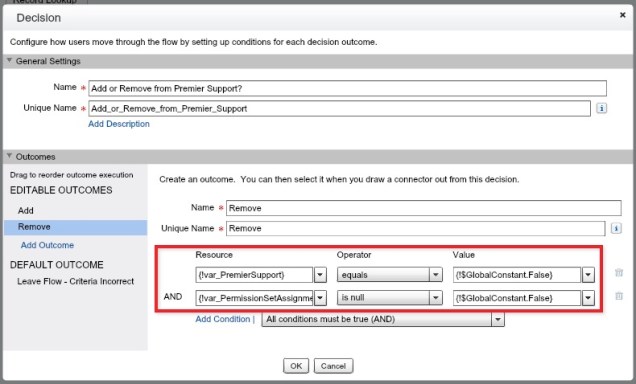
If for some reason we don’t meet either of those criteria, we are going to leave it be and let it exit the Flow (because something is wrong).
Note: You probably want to setup some sort of Fault email to be sent to yourself so that you know there was an issue (possibly an Admin assigning the Permission Set already), but hopefully that won’t ever happen.
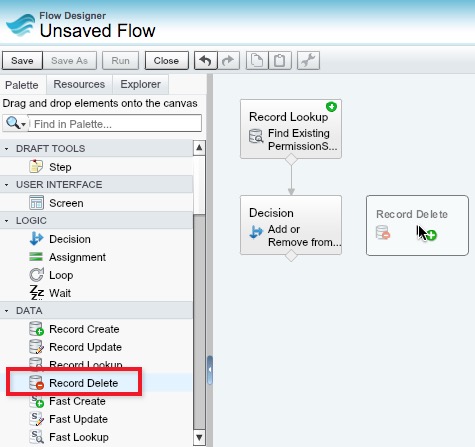
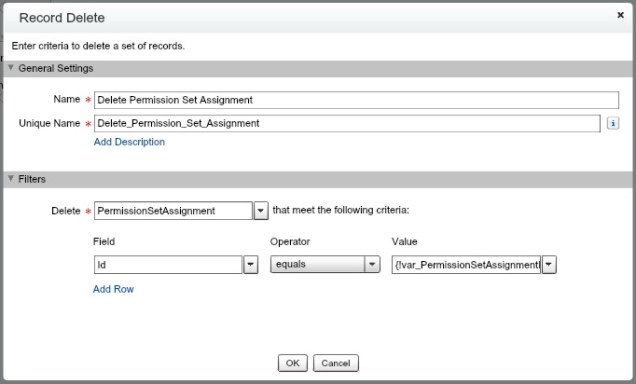
Now, lets drag out our Record Delete. This will be for when our record matches our Remove criteria.
This is an easy Element to setup. We just have to select the Permission Set Assignment Object and then map our Id to the Id field.
After we save this Element, make sure you map your Decision to it with the Remove outcome.
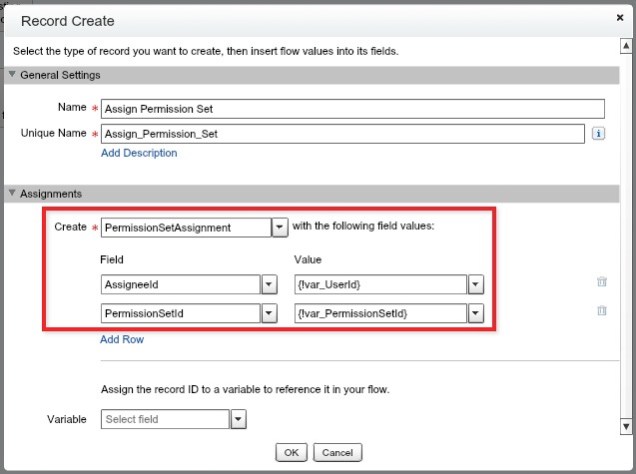
Now, let us drag out a Record Create. This will be for when our record matches the Add criteria.
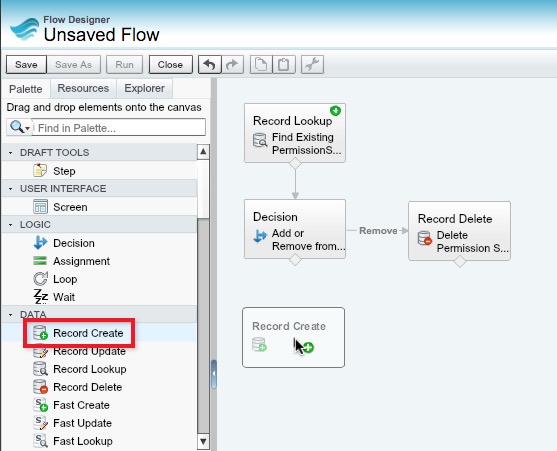
Great, now we just need to select our Permission Set Assignment Object and then map our var_UserId and var_PermissionSetId fields.
Now, we need to map our Decision to the Record Create.
Lastly we want to Save and then Activate our Flow!
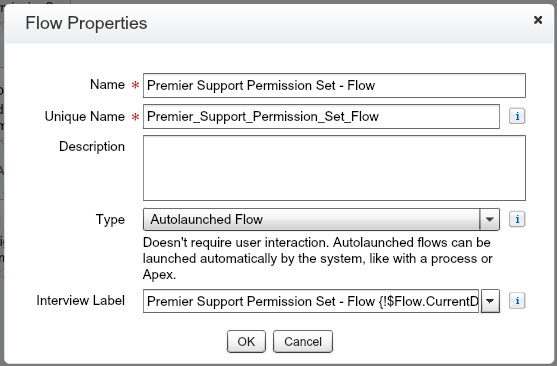
Note: I like to append “- Flow” to my Autolaunched Flows. This makes things clearer when I am dealing with them on the backend since Flow and Process Builder both are in the Flow metadata folder.
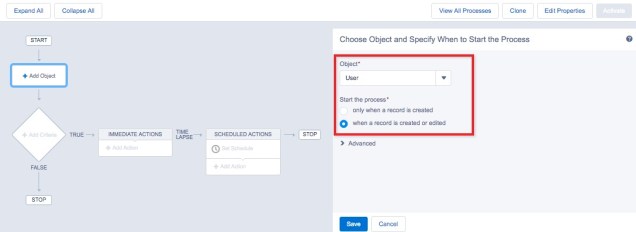
Fantastic! Now we need to setup our Process Builder that launches this Flow. So lets go create a new Process Builder for this. (Setup | Create | Workflows & Approvals | Process Builder)
We want the Process Builder to fire on our Account, so for our object select User, and for starting the process select when a record is created or edited.
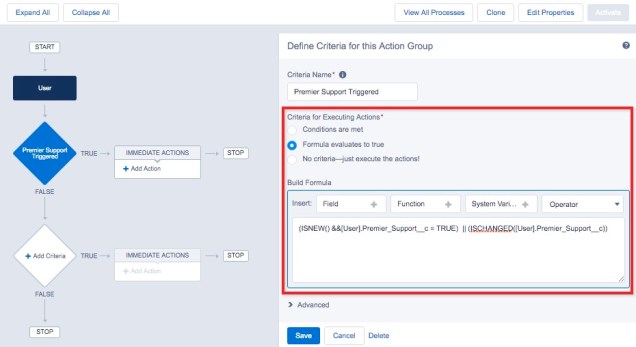
Now we need to setup our Criteria. Unfortunately an ISCHANGED function doesn’t run on new Cases. So we have to break out the formula editor and use this formula:
(ISNEW() &&[User].Premier_Support__c = TRUE) || (ISCHANGED([User].Premier_Support__c))
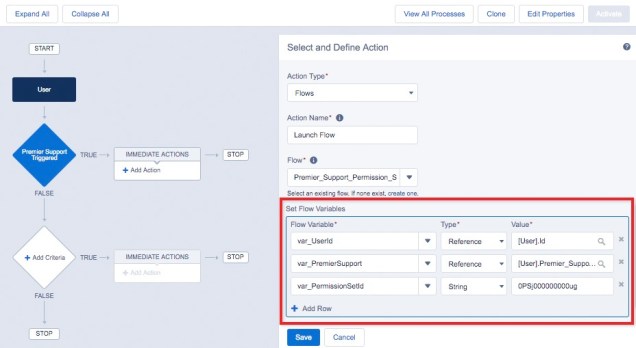
Now we get to setup our Immediate Action of launching a Flow. All we need to do is pass in our User Id(Reference), Premier Support (Reference), and Permission Set ID (String).
Note: we are to breaking my hard coding an Id rule for this example. I would recommend that you pass in the Permission Set Name and query for the Permission Set ID in your Flow. I am ignoring that because I want to keep this blog post simple.
Hit Save, and then hit Activate up in the top right corner… and you’re done!

One thought on “How to let a non-Admin EASILY assign Permission Sets and/or Public Groups”