If you’re using a Table inside your Dashboard or Lens, as you start to drill down into the data you probably want to either navigate to the record or perform an action. Currently, that is not something Wave is setup to do out-of-the-box. While this is not a very hard thing to setup, it could be somewhat confusing for any Administrator that is trying to learn Wave. By the end of this you’ll post you’ll hopefully have no issues adding the Open Record and Actions to your Dataset, and understand some of the quirks associated with the feature.
The first thing to note, is this is Dataset specific. This change has to take place on every Dataset that you want the ability to drill into.
Before we get started, let’s see what we’re going to accomplish in this blog post:
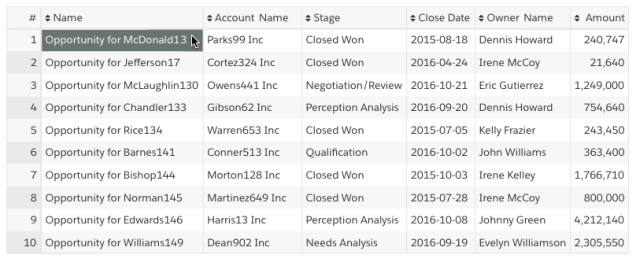
Default
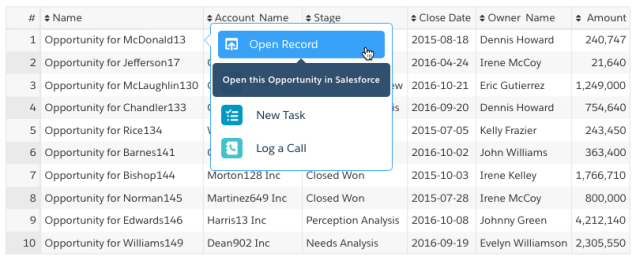
Quick Actions & Record Open Enabled
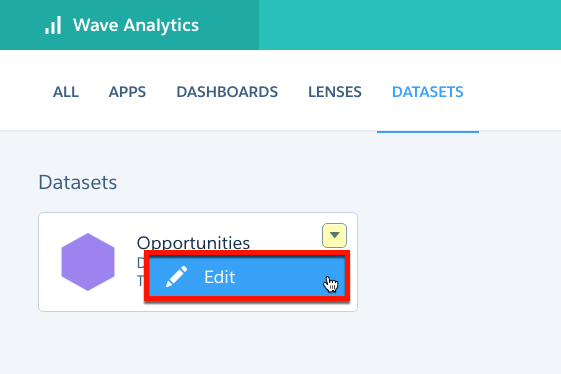
Navigate to your Dataset
We want to navigate to our Dataset by selecting Edit under the Dataset.
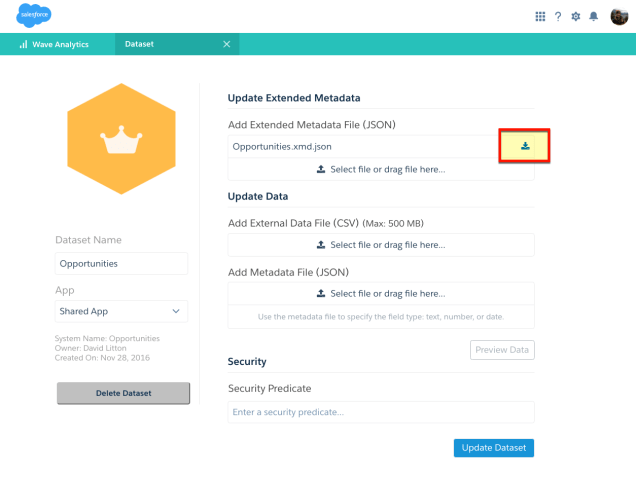
Download the XMD JSON
You’ll see a blue download icon, hit that to download the file.
Open & Reformat the JSON
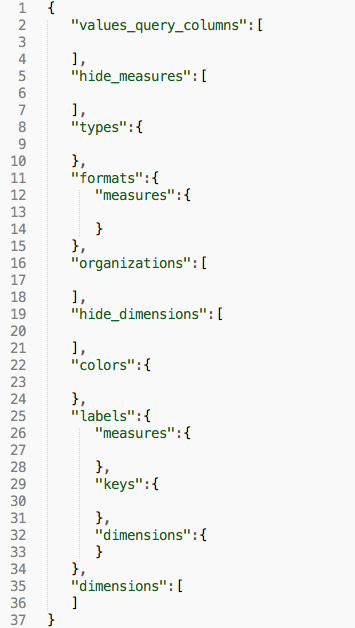
When I open the XMD file in Sublime, you’ll notice it isn’t formatted in a readable way. I would recommend getting a plugin that will reformat this for you. If that isn’t an option for you, no big deal, I’ve found this site to be great at formatting and helping you troubleshoot errors. After it is formatted, it should look something like this (if you’re working with a clean Dataset):
Understanding the Parameters
Great, so we’ve got the code formatted to work with now. Let’s talk about what paremters we have available to work with:
- recordIdField
- This is the field that enables your Actions and the Link to the record.
- Field
- The name of the dimension that the menu appears on in dashboard and lens charts and tables.
- Let me make sure it is clear — you can not add this to a Measure
- This ideally is a unique value to enhance the end user experience. If it is not, make sure you use the recordDisplayFields parameter to improve the user experience.
- The name of the dimension that the menu appears on in dashboard and lens charts and tables.
- recordDisplayFields
- If you put your action and record open on a field that isn’t unique in your table, Salesforce will ask you to select the record that you want to work with.
- linkTemplate
- The default for this is to the Record Id field (the row’s Id). However, you can use this parameter to setup a custom URL that you send the User to.
- linkTooltip
- This is used if you want the Record Open to have a hover message.
- sfdcActions
- By default the Actions will be displayed as your Page Layout’s Actions. If you want to modify the values in Wave, then you’ll want to customize this to create your own custom list.
- linkTemplateEnabled
- Default is TRUE. Set this to FALSE if you want to turn the Link off and only have the Actions.
- salesforceActionsEnabled
- Default is TRUE. Set this to FALSE if you want to turn the Actions off and only have the Link.
What it looks like together

Update the XMD JSON
Now you just need to upload the updated JSON file into the Dataset, and then hit Update Dataset

Select Update Dataset

All that is left for you to do now is run your Dataflow again so that our updates are put in place. After your Dataflow finishes running, go in and validate that you now have the Record Link and Quick Actions working! It looks like this:
I would recommend looking at this article if you want to do a deep dive into this.
