If you’ve got a Sales team that works extensively with their mobile phones, then you’ve probably run into the limitation of being unable to add Contacts to your Account or Opportunity Contact Roles. This is something that common sense would think was available, until you get that dreaded email from an annoyed Sales Rep asking why they can’t add another Contact Role from their phone. And then you spend 10 minutes making sure you’re not going crazy, because you just assumed they could. With this post we’re going to go over a quick and easy workaround for this. We will be specifically solving this for the Opportunity Contact Roles scenario.

Automation Overview:
- Inputs for Contact Role received (Action)
- Process Builder triggered (Pass inputs into Visual Flow)
- Contact Role created in Flow
- Add Action to Opportunity Layout
For this solution we have two different options in how we can do it architecturally:
- Record Create – Create new Custom Object
- Record Update – Use Custom Fields on Account/Opportunity
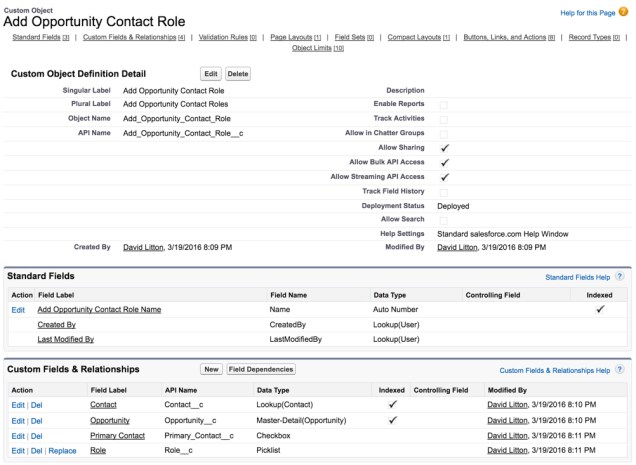
For me, because some of these fields are similar to other fields you might find on an Opportunity, I am going to go with a new Custom Object. What fields do we need create in this Custom Object?
- Auto Number
- Opportunity (Master-Detail)
- Contact (Lookup)
- Role (Picklist, match Contact Roles)
- Primary Contact (Checkbox/Boolean)
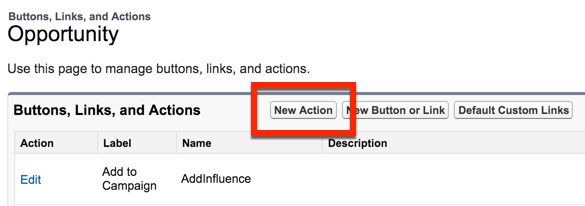
Now that we have our Object ready, we can go create our Action.
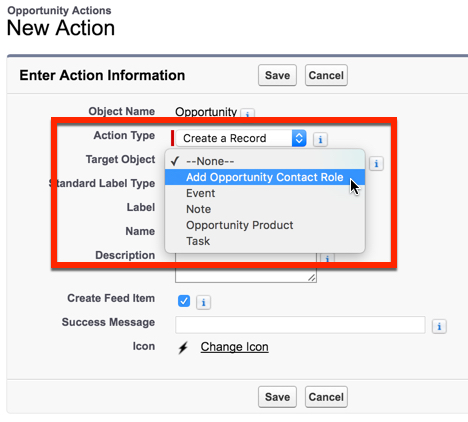
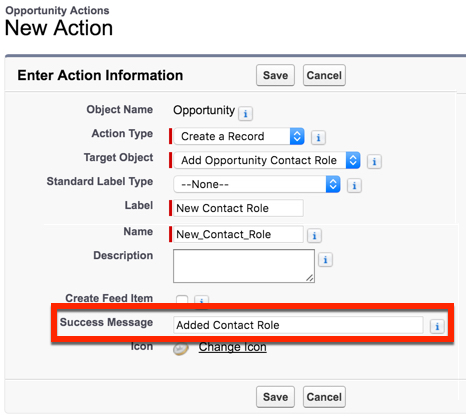
Keep it on the default, Create a Record, and select Add Opportunity Contact Role (our Custom Object we created).
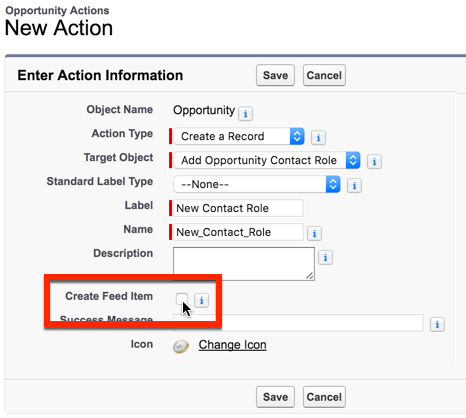
Label the Action New Contact Role and then uncheck Create Feed Item. This stops our action from adding a Chatter Post to our Opportunity.
My favorite part, write your custom Success Message.
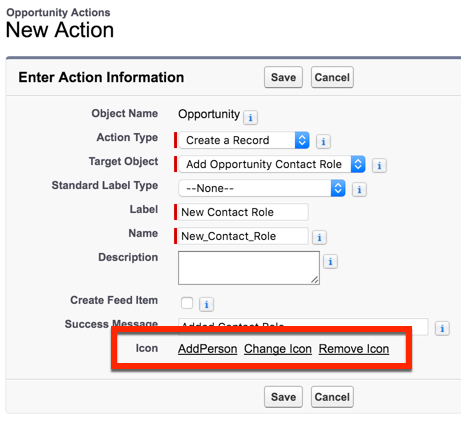
Lastly, we need to change the Icon to our Custom one. If you haven’t read my post on the Lightning Design System, now would be the time to do so! Don’t use the boring default icon, make this your own creation!!
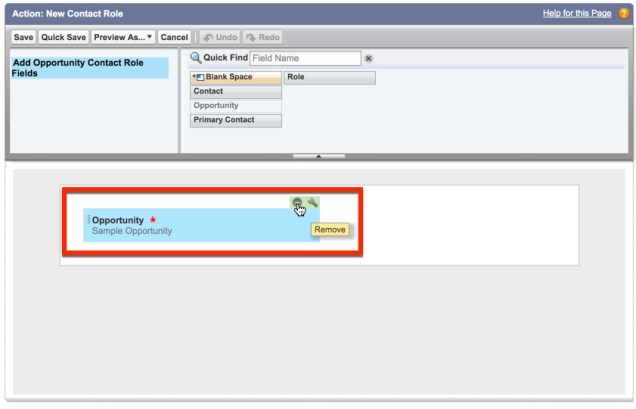
Now to edit our Layout… Lets remove Opportunity, because that is implied.
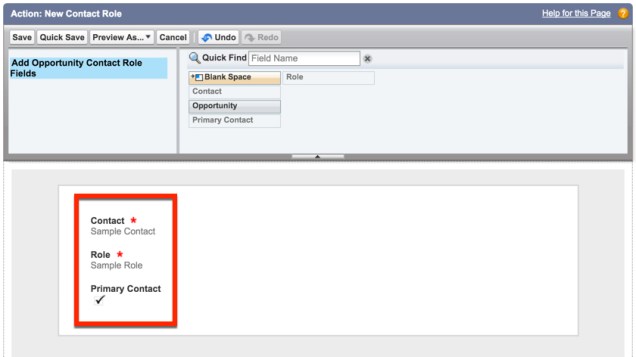
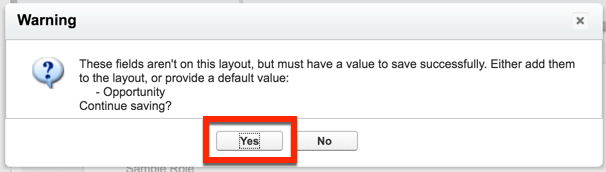
Lets add in our other fields, and make the Contact and Role required.
Hit Save, and ignore the Alert message from Salesforce.
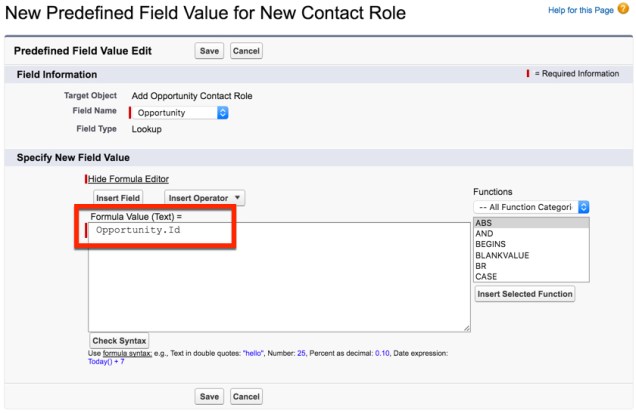
Now, lets create a new Predefined Field Value.

We want to select our Opportunity field and put in the related .
Great, we are done with the Action!
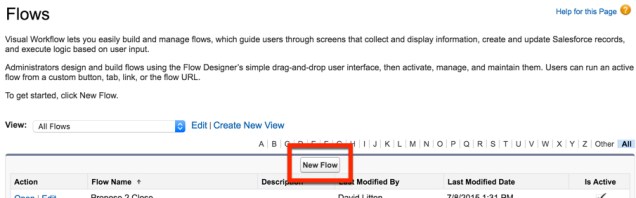
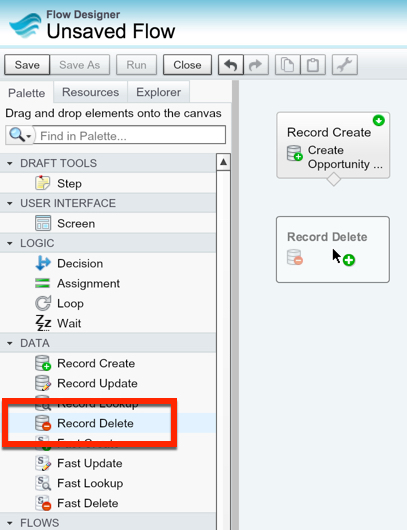
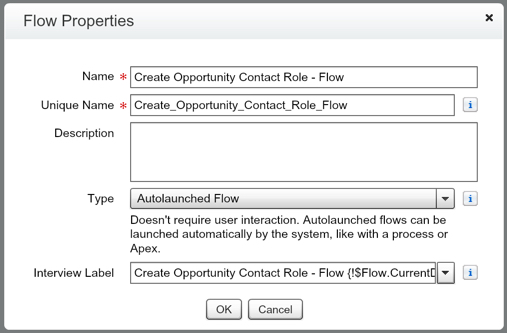
We now have to create the Process Builder and Visual Flow. Let’s get our Flow created first since we can’t Activate the Process Builder without it (Setup | Create | Workflows & Approvals | Flows).
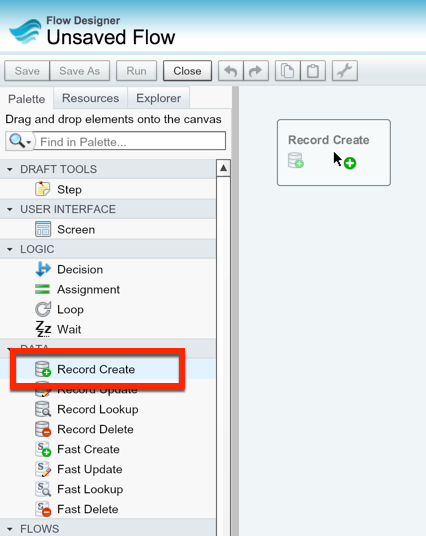
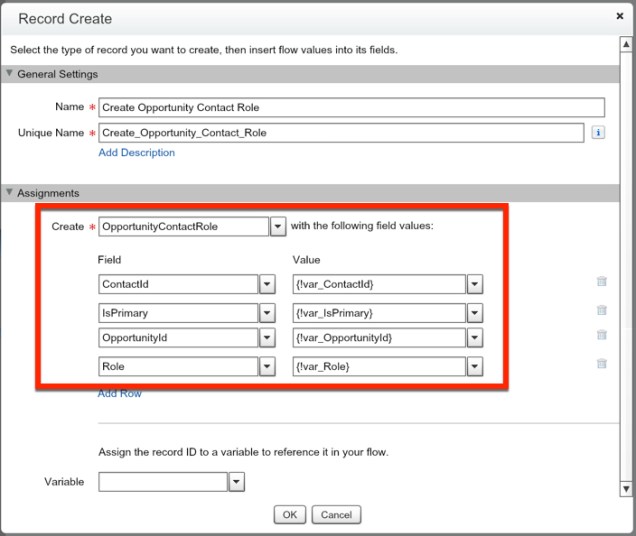
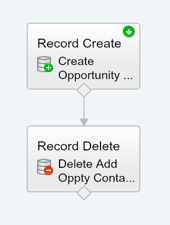
The first step is going to be grabbing our Record Create.
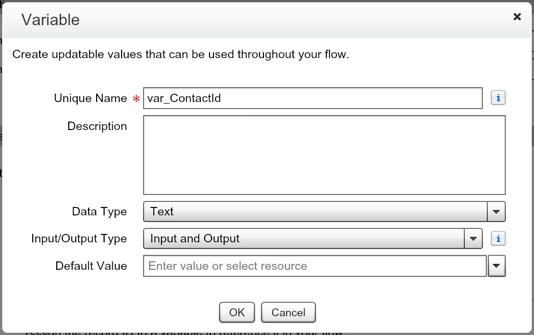
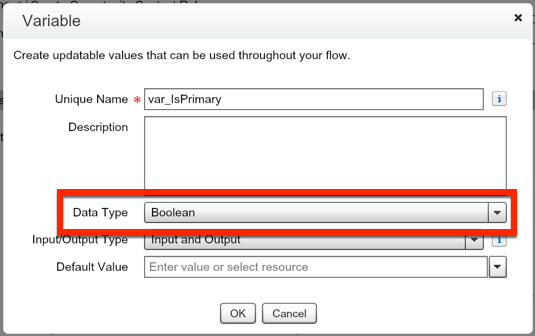
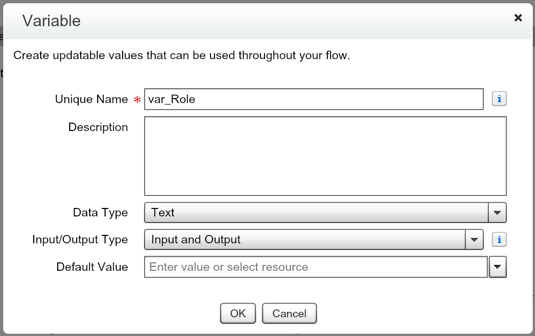
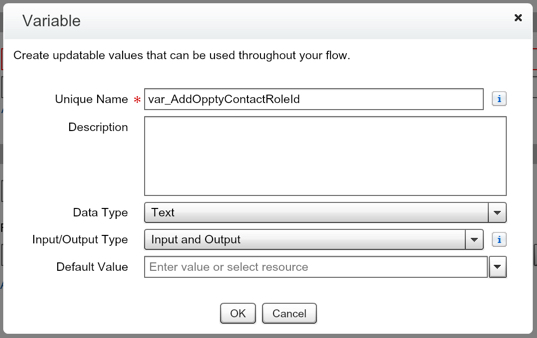
We now need to create the variables we will use to create the Opportunity Contact Role.
Contact Id
IsPrimary (This is a BOOLEAN, not Text)
Opportunity Id

Role
Lets make sure everything is correctly mapped inside our Record Create.
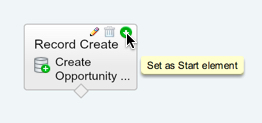
Great! So lets hit OK and set this as our Starting Element.
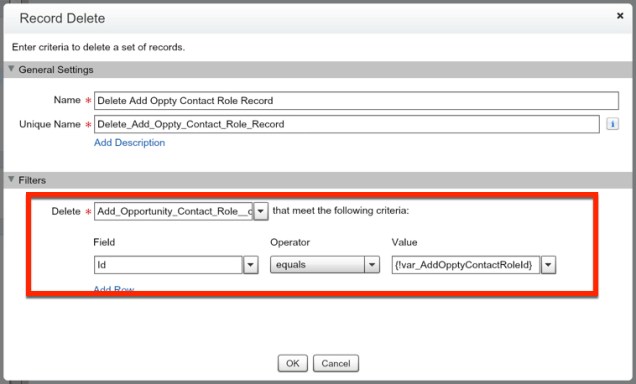
Now lets drag in our Record Delete. This is so that we don’t add in extra data to our system. However, if you want to track the usage of this Action by running reports on this Object, then you can skip ahead to saving the Flow. Also, if you went with the option to go with using Custom Fields on the Opportunity instead of a Custom Object, you’d want to use a Record Update to reset the values to an empty string.
Create a variable for the Record Id of the Custom Object record we just created, when our Action is used.
Map it in our Record Delete.
Connect the elements together to finish our Flow.
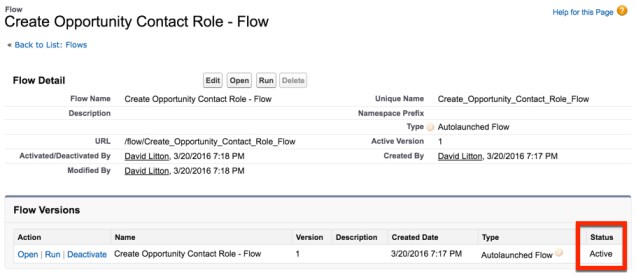
And lastly we want to Save and then Activate our Flow!
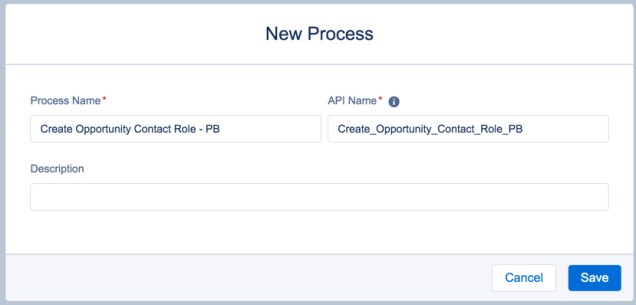
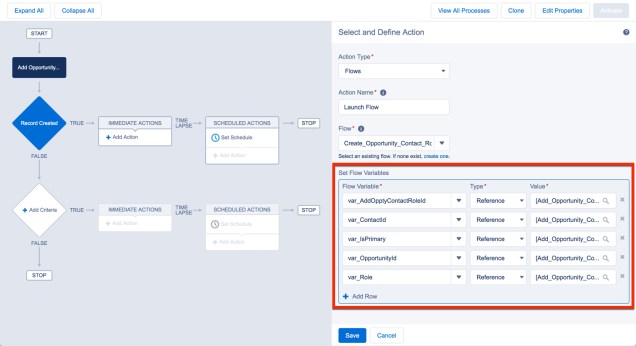
Fantastic! Now we need to setup our Process Builder that fires this Flow. So lets go create a new Process Builder for this. (Setup | Create | Workflows & Approvals | Process Builder)
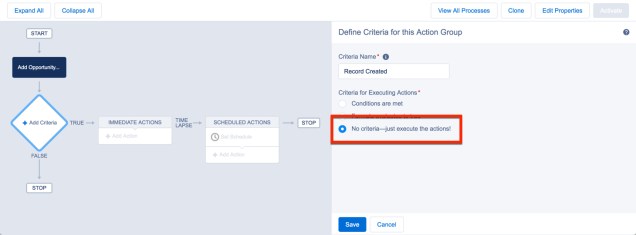
We want the Process Builder to fire on our Custom Object that we created, Add Opportunity Contact Role, and we want it to fire only when a record is created.
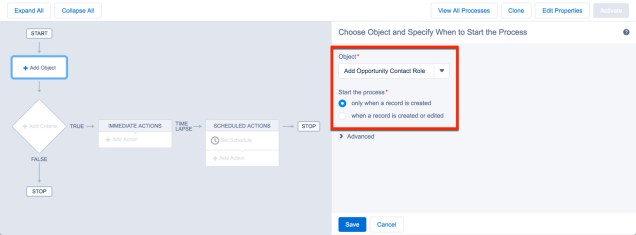
We don’t need to set any criteria here, as we want it to run every time a record is created.
Now we need to map the variables in our Flow to the Values in the Custom Object, using the Type Reference.
Hit Save, then Activate your Process Builder. You’re done! Now all that is left is for us to update our Salesforce1 Actions layout!
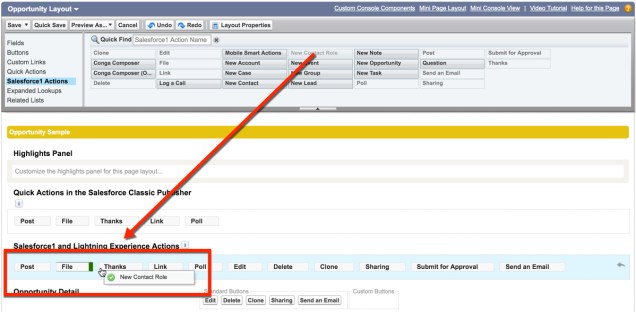
Now open up Salesforce1 and look at your finished product!


With a simple Flow and Process Builder we are now able to bypass a silly limitation that Salesforce1 currently has. But, hopefully this won’t be necessary much longer if you vote for this idea: https://success.salesforce.com/ideaView?id=08730000000DpbEAAS

Awesome solution and write up. Thanks, David!
LikeLike
Thanks Vance! 🙂
LikeLike
great solution!
LikeLike
Thanks Anna!
LikeLike
Deploying this one with one of my clients now! Thanks
LikeLike
Thanks David! I am going with this solution this week! Life saver!
LikeLike
Glad it helped out :-)!! Thanks for letting me know it was a helpful post for you!
LikeLike