A few weeks back I decided to create a Package. I had thought about creating one for months, but never invested the time into it. It was way easier than I thought it would be! If you’ve created a Change Set before, then you’re ahead of the game. This blog post will hopefully give those of you who haven’t created your own Package the confidence and encouragement to! If you’ve developed something that could be beneficial to other Admins, consider packaging it up and sharing it with the Community!

What types of packages are available for us?

Unmanaged Package
This is what you’ll see many of those Salesforce Labs and other free AppExchange Apps use. By being Unmanaged, it gives the installer (Admin) full control of everything they installed. It functions as if the Admin built it themselves.
Managed Package
This is what you’ll see an ISV Partner use. The red section is their magic sauce, and they don’t want you to touch it. This also allows them to Upgrade their package periodically with new enhancements and features.
(for additional details, please see the Salesforce documentation)
Should you set a Namespace?
If you’re going with the Managed Package, you don’t have a choice. Managed Packages require a Namespace. If you’re creating an Unmanaged Package, it is up to you! The benefit for using the Namespace would be that you won’t have to worry about anyone having conflicting API Names in their Org. If you choose to go without using a Namespace, the benefit for the Admin is that it really functions exactly as if they built it themselves.
Before adding a Namespace

After adding a Namespace


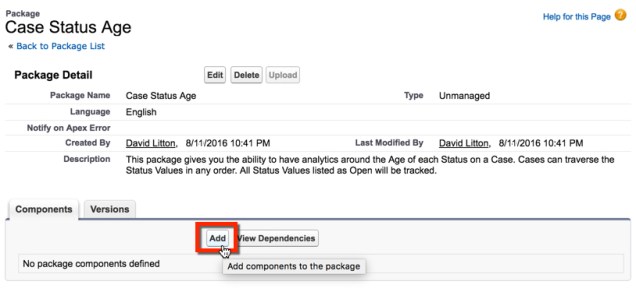
Creating your Package
Select New in the Packages section.

- Pick your Package’s Name
- Make sure you put in a very good Description for your Package, so any Admin can quickly recognize what your Package is doing. Don’t make another Admin’s life harder!
- Determine if you want to use a Configure Custom Link (Displays as a Configure link within Salesforce)
- Notify on Apex Error (enter the username of the person who should recieve an email if an exception occurs in Apex code that is not caught by the code)
- Decided if you want it to be Managed or Unmanaged

Add in your Components
This functions just like Building a Change Set. Select New and then you’ll go through and choose the Component Type that you want to add to your Package.

The dependencies will automatically populate for you.

Name your Version
When you’re ready, Select the Upload Button.
This will allow you to now choose a Version Name, Version Number. You can optionally add in Release Notes, Post Install Instructions, and a Description to be shown after installation. While the last three areas are optional, think about the Admins that will use your App and make sure you’re not leaving them in the dark on setting up and maintaining your Package/App.
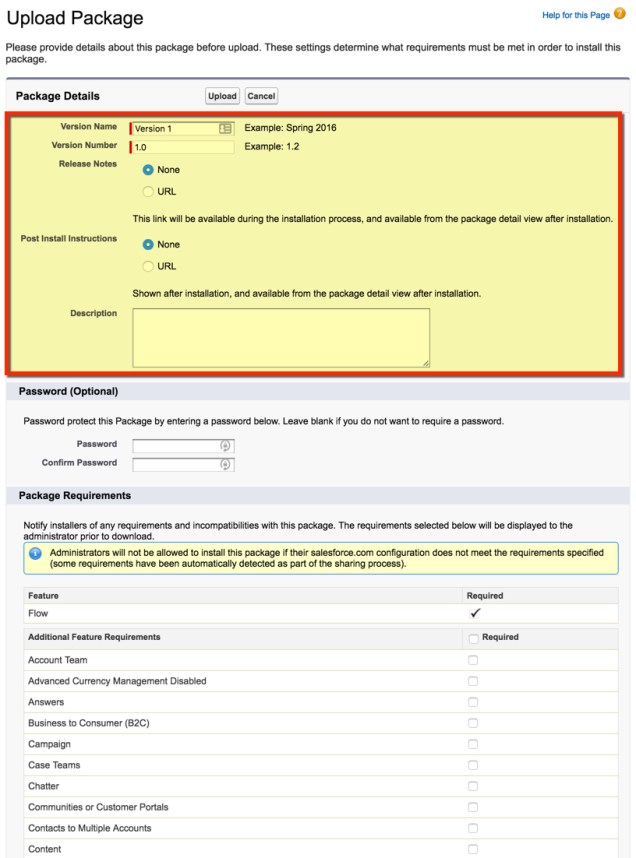
You can optionally add Password protection to your package, require Features to be enabled, and Require Objects. I am not covering this in detail, because Salesforce automatically detects the required pieces that are apart of your package.
Select Upload… and we’re all done! Take a look at your Installation URL, you did it! You can pass this URL to anyone that you want. You could even look to get your Package added to the AppExchange!

If you ever want to remove your a Version from being available, just select the Deprecate button while clicked in on a Version. This allows you to make sure nobody can download an older Version of your Package.
Recap: Creating a Package sounds crazier than it really is. It is very simple to do and if you have an idea or solution that you think other Admins would benefit from, you can Package that up and share it with the Community! It is important to remember to use Best Practices with your Packages, and to make sure your have clear and clean Documentation in your Package for the Admins that will use it. Take the extra time to polish your solution. That means plenty of Descriptions and hopefully some Post Install Instructions!
