In Customer Support you might get a ticket that comes in Friday afternoon, and doesn’t get worked on until Monday morning. While your Support Team only actually spent 5 minutes working, the basic Case Age calculations tell us that it took almost 3 days! So, the problem we are going to be solving is how to find out the actual ‘time worked’ on the Case. You’ll see at the end of this post how we could easily make this more complicated by tracking the Status, Owner, and other Case Fields on “START” and on “END” of working on a Case, but for now lets keep it simple!
If you’re interested in just having better Case Age tracking, make sure you also check out this post: How to track the Case Age of each Status. There is even an Unmanaged Package for you in the Packages tab!
Before we can start building the Flow, we must get everything built. We need to create a new Custom Object with a few Custom Fields and a Roll-up Summary Field on the Case.
First lets navigate to the Custom Objects page (Setup | Create | Objects)

Second, lets create a New Custom Object

Next, we need to fill out the information for our Object. The keys to this is to make sure you are doing an Auto Number for the Data Type of the Record’s Name. I typically check everything under the Optional Features and Object Creation Options, its always easier to just remove it after creation if you need to.

Ok great! Now our Object is created. But, we need to create some Custom Fields to hold the data that we are trying to track. For this post, as I mentioned at the start, we are only dealing with the Time. If you want to get advanced and track other fields from the Case, you can easily do that!

Now, as you can see we have a field called “Minutes” here that is a Formula (Number; 16,2). So lets take a look at what is going on inside of that field and how we are making a Date/Time field into a Minutes calculation.
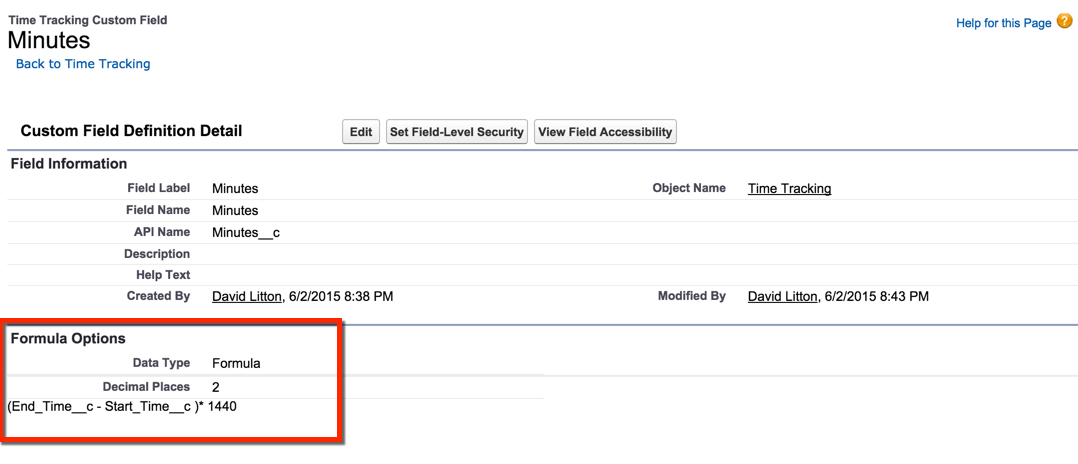
( End_Time__c - Start_Time__c ) * 1440
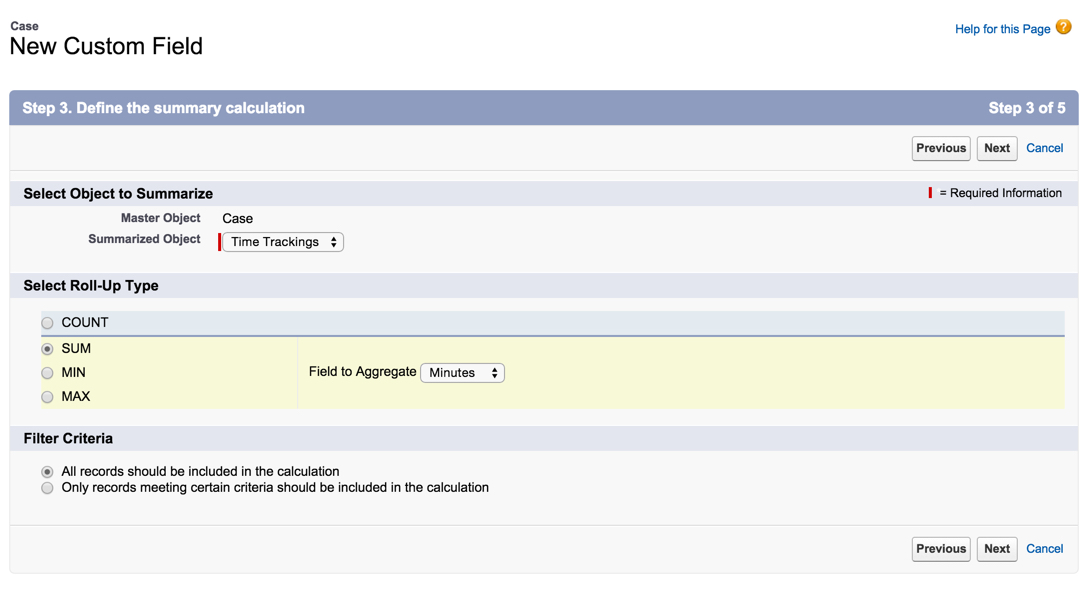
Awesome, we are now done with our Custom Object! We need to go navigate to our Case Object and create a Roll-up Summary Field to summarize our Minutes from the Time Tracking Object we just created. This way we can see the running total of all Users that worked on the Case. If we want to view reports based on individuals, we would simply need to run a Time Tracking report or look at the Related List.
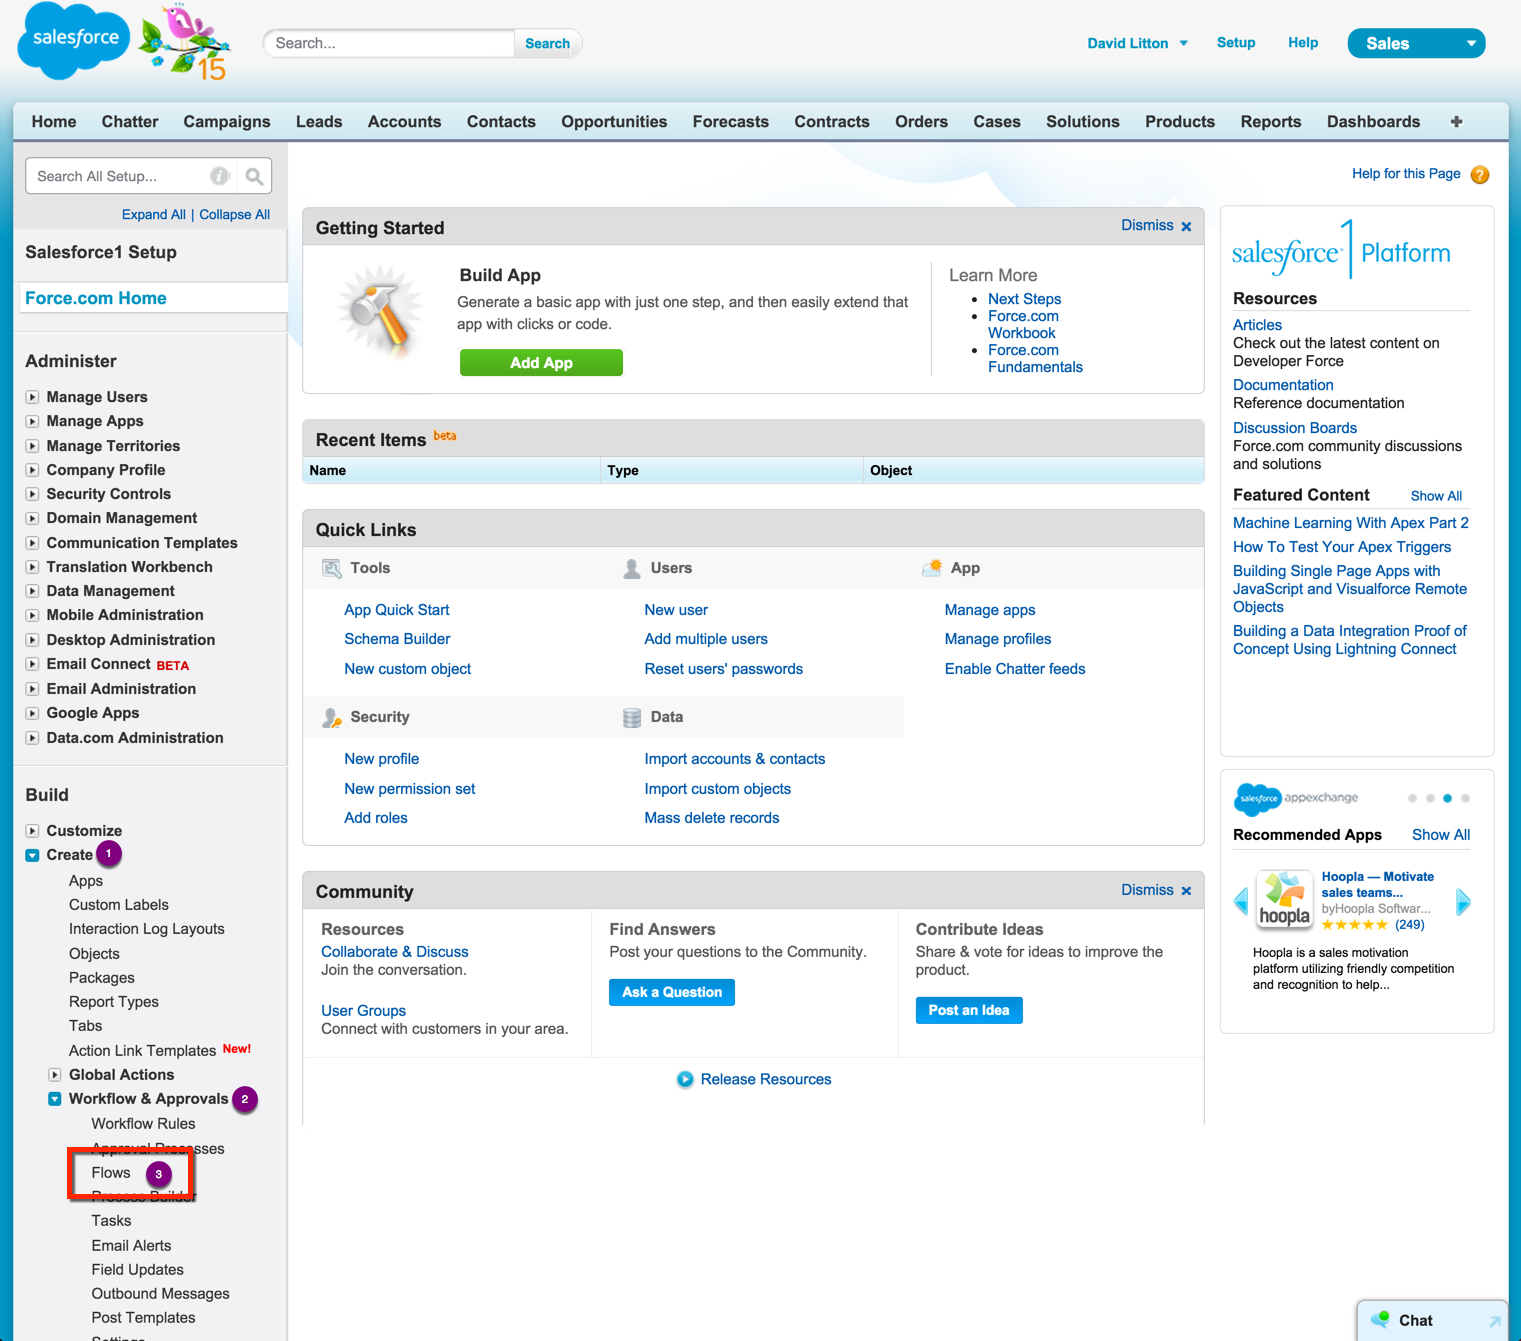
Great, now that we have gotten the formalities out, we can get into the good stuff. So, lets begin by navigating to the Flow (Setup | Create | Workflows & Approvals | Flows)
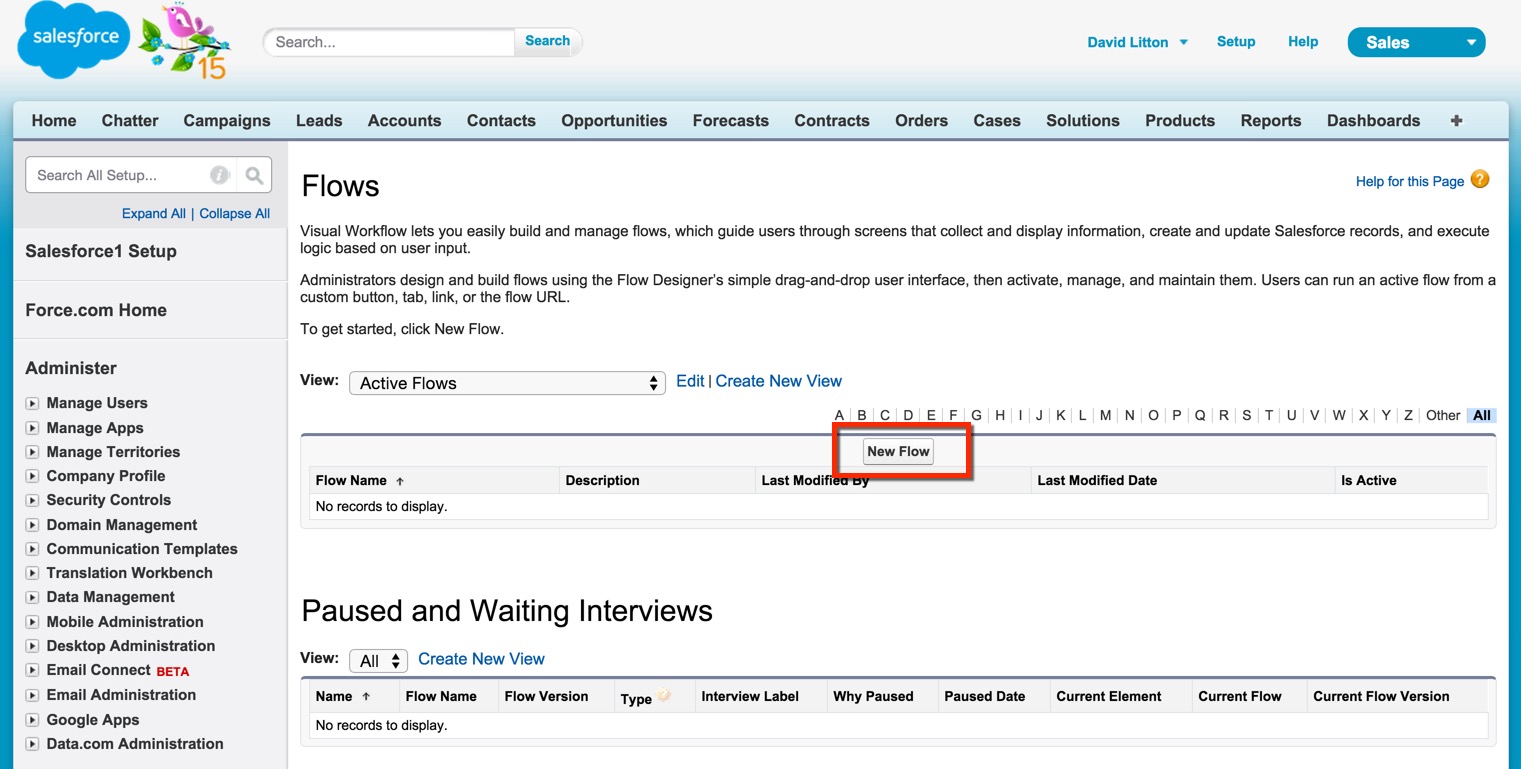
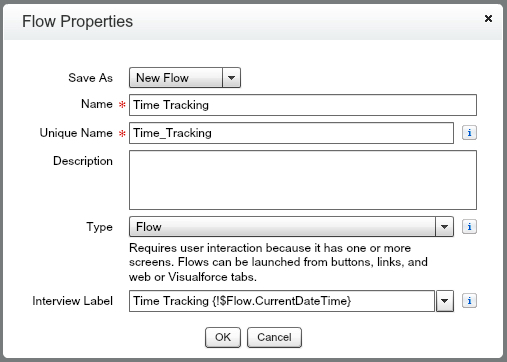
Then, hit “New Flow”
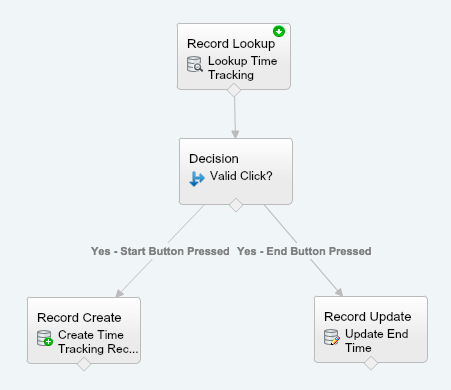
Now here is where all the fun starts! We are going to knock out two birds with one stone, and combine our Start and End Buttons into just ONE Flow.
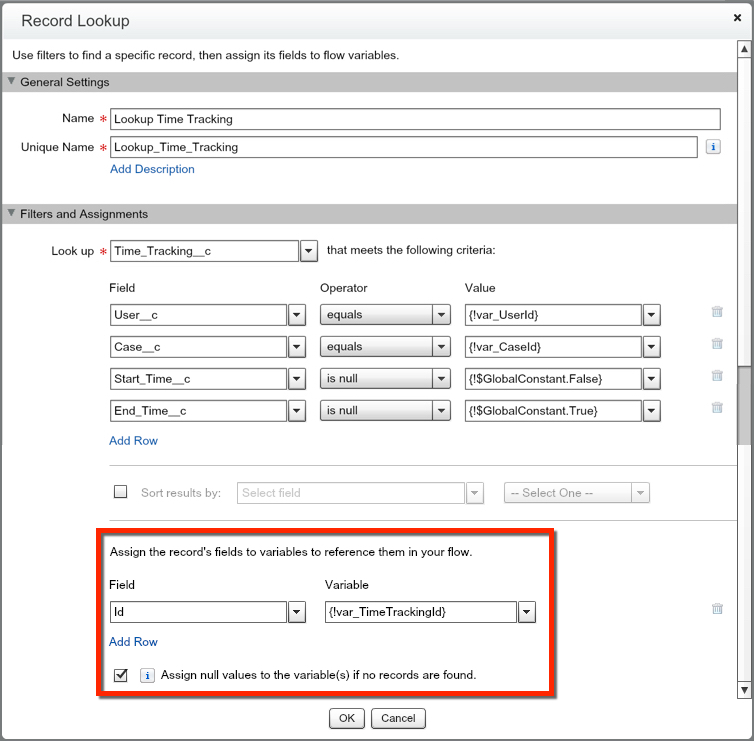
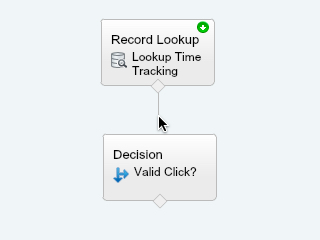
Lets start our Flow off with a Record Lookup. In this Lookup we will be searching to see if there is already an open Time Tracking record. This will help us determine if the clicks on our Buttons are valid, or if they were accidental. So, we want to search for a Record from the Running User that has a Start Time, but does not have an End Time, which means they are still Open.
![]()
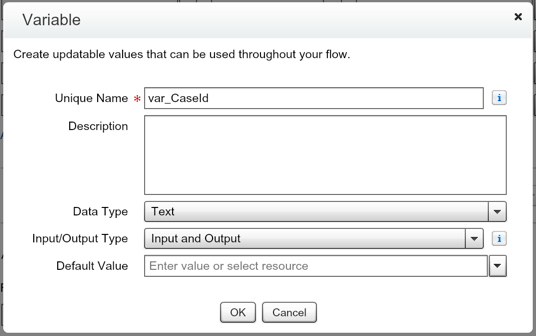
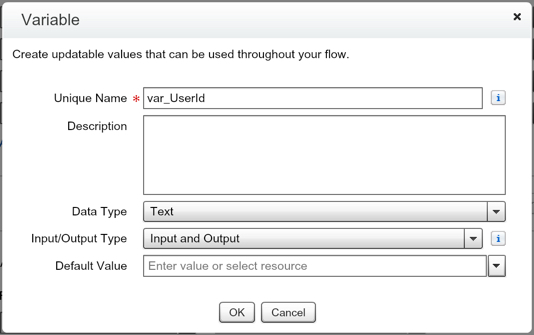
Now we need to create two variables to help us setup our Filtering. First we will create a Text Variable called “var_CaseId” and then we will create a Text Variable called “var_UserId”.
Now lets finish adding our Lookup criteria in using those variables that we just created.
![]()
Now that we have our criteria set, lets assign the Id of the record we may or may not find to be referenced in our Flow. To do this, we will need to first create the new Text Variable “var_TimeTrackingId”.
![]()
When we set the Id to be this variable, make sure you check the box to assign null values if no record is found.
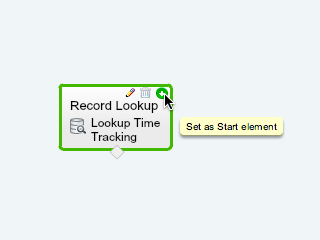
Lastly, we need to set this as our Start element!
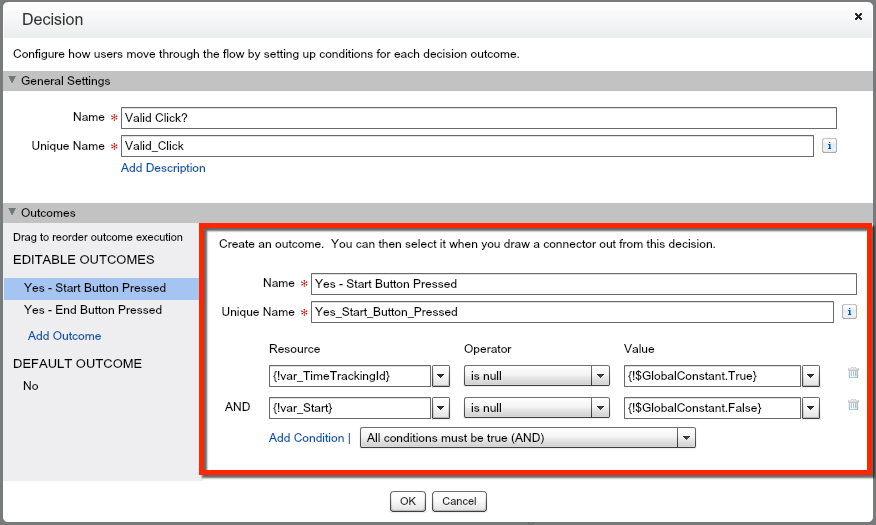
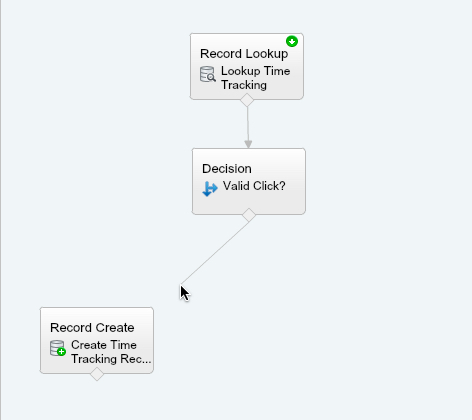
Now, lets determine if our Buttons being clicked was intentional or not. For instance, if we are clicking from the Start Button, we want to avoid creating a duplicate or extra record.
For our first Outcome, lets determine if the Start Button was pressed, and if there is NOT an existing Time Tracking record for this Running User. To do this, we will see if our var_Start was populated on the click, and if var_TimeTrackingId is null. If both of these are true, we want to pass the Flow
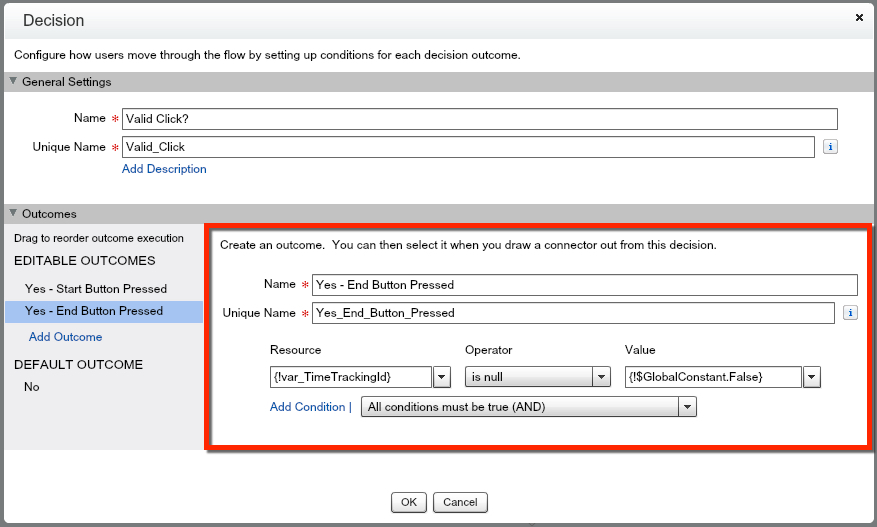
For our second Outcome, lets determine if there is an existing Time Tracking record for us to upload. If there is, we know it was a valid click, and we can proceed to updating the Time Tracking record. To do this, we will see if our Record Lookup found a value. Also, we want to make sure that this didn’t come from the Start Button being clicked, so lets filter on that variable as well.
To finish, change your Default Outcome to “No”. We will not connect “No” to anything, because it means that the click was accidental.
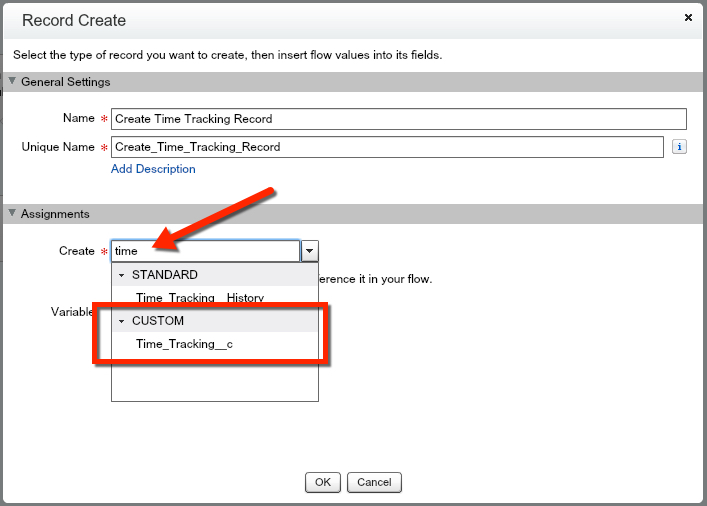
Alright, now we need to setup the Record Create for our “Start” Button being clicked. So lets grab the Record Create element and search for our Time Tracking Object.
Now, lets determine what our New Record will look like. We want to map our UserId, CaseId, and the current Date/Time to the new Time Tracking record. For creating the Start Time value, we want to use the SYSTEM field “$Flow.CurrentDateTime”.
![]()
Because we are not referencing this variable any further in our Flow, we can ignore filling out the “Assign the record ID” section of this Record Create element.
![]()
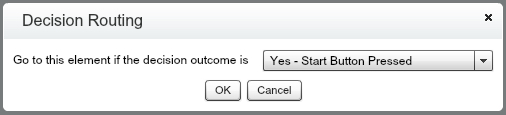
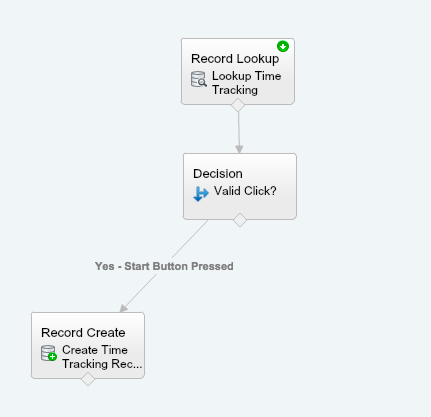
Now lets connect the Start Button Pressed Outcome to our Record Create.
Great job, lets now create our Record Update to add the End Time to the Time Tracking record if the End Button was pressed. For this, we will once again search for the Time Tracking Object, search for when the Id equals our “var_TimeTrackingId”. We then want to update the “End Time” field with the current Date/Time. We will do this again using the SYSTEM field “$Flow.CurrentDateTIme”.
![]()
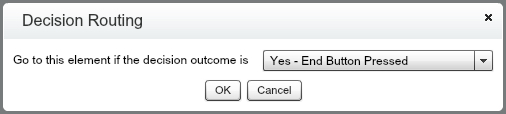
Now, to finish this off, lets map our Decision element to this Record Update for our End Button Outcome.
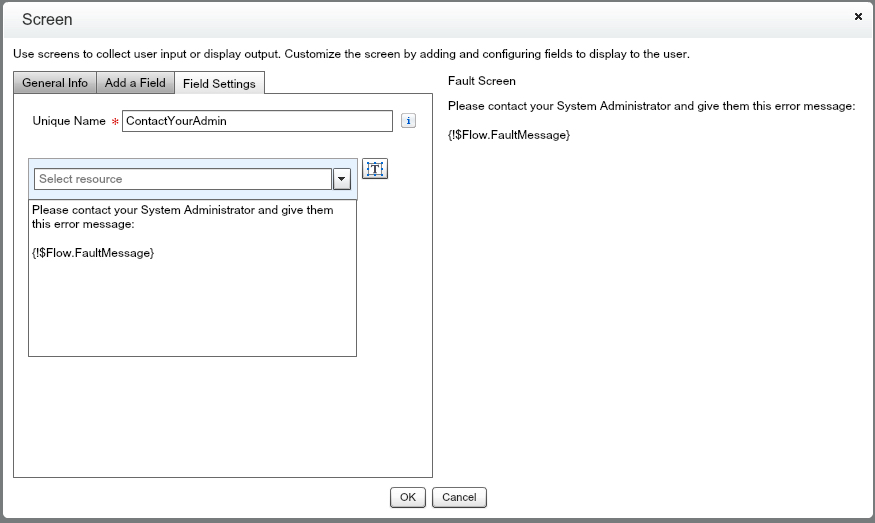
Now, the only thing left for us to do is create a FAULT Screen in case something errors. We don’t want to confuse our Users. To do this, we simply add a Display Text field to our Screen, and then type in our Fault Message. After you’ve created this Screen, connect your Faults on your Record Lookup/Create/Update to the Screen. Since this is not an Autolaunched Flow, we can keep this screen here as we Save.
Congrats! We are done with our Flow. Lets Save the Flow.
Now that we have our Flow saved, lets navigate back to our Flow Detail page and do two things. First, lets activate our Flow. Second, lets grab the Unique Name (or URL) and get ready to use it in our Buttons!
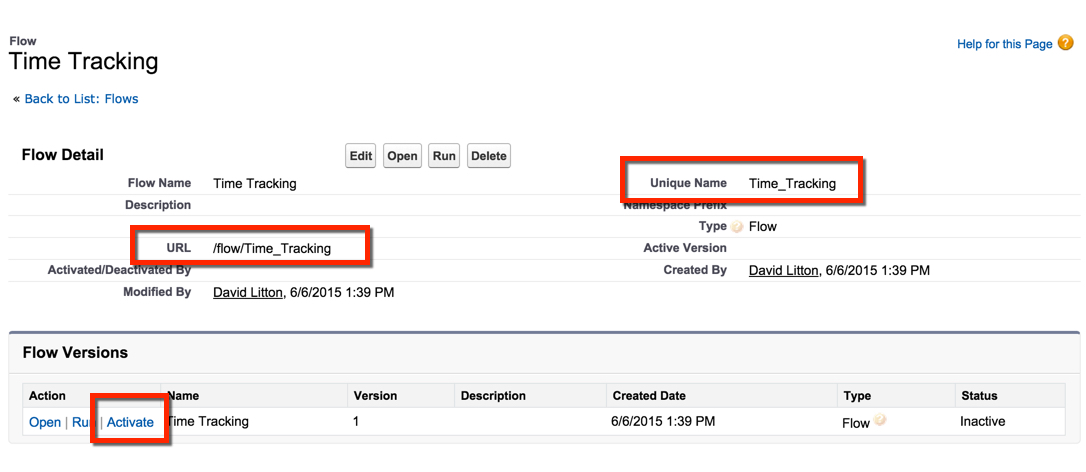
Now, we’ve Activated our Flow and know what our URL is going to be, lets build our our Buttons! Lets start with the Start Button since this will be the tricky one.
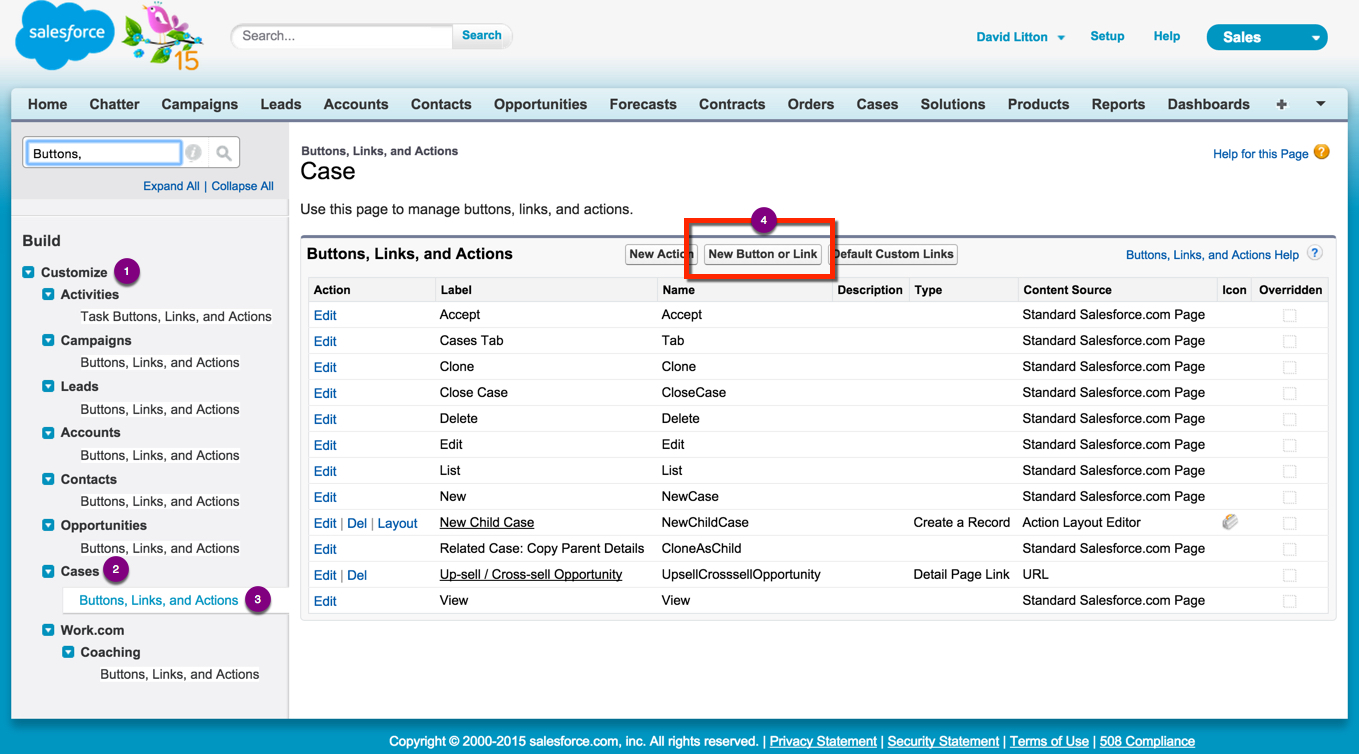
First, lets navigate to the Case’s Buttons, Links, and Actions page (Setup | Customize | Cases| Buttons, Links, and Actions). From here, we will select the New Button or Link. If you are new to Buttons, take a look at my previous posts, Choosing your Button and Writing a Button’s URL.
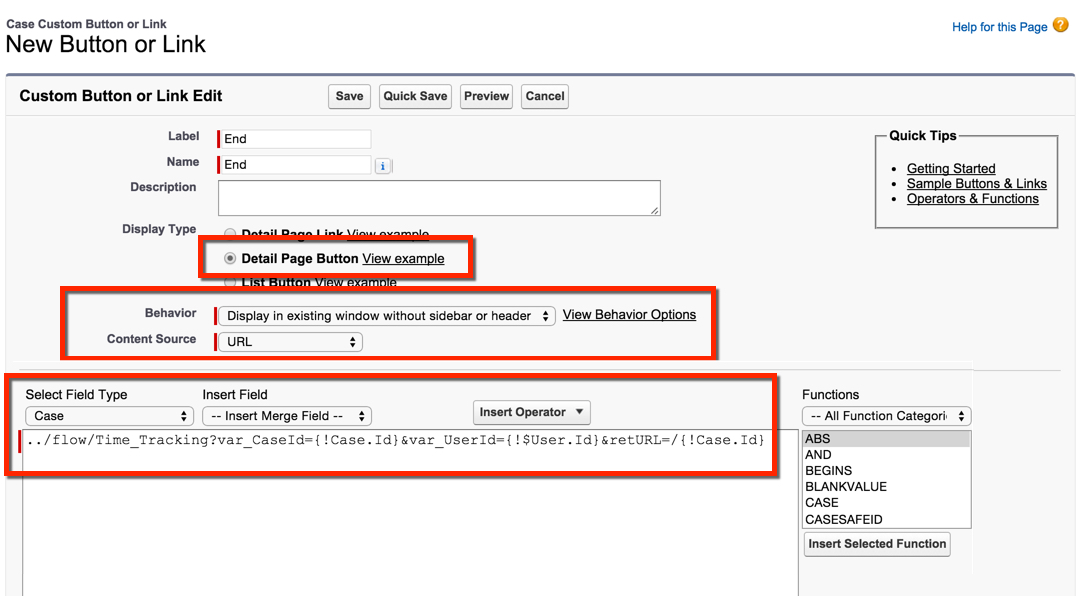
Awesome, now lets update our Button URL. We want to select Detail Page Button for the Display Type, Display in existing window without sidebar or header for our Behavior, and URL for our Content Source. In the URL, we want to pass in a value to the “var_Start” variable, so that we can know which Button is being clicked. In this situation, I am passing the value “1” into the variable.

../flow/Time_Tracking?var_CaseId={!Case.Id}&var_UserId={!$User.Id}&var_Start=1&retURL=/{!Case.Id}
Now that we got our Start Button finished, we are going to do the exact same thing but remove the “&var_Start=1” part of our URL.
../flow/Time_Tracking?var_CaseId={!Case.Id}&var_UserId={!$User.Id}&retURL=/{!Case.Id}
Click Save, and you are done! Now you can add the Buttons to your Page Layout and start tracking your time!

This is fantastic. We use the Toggl chrome extension to track time invested in a project, and then manually add the summary of the hours invested upon closing the record. I’m interested in your method, but our team would need to be able to start and end the time records within the Salesforce1 app. How would you suggest to make this process mobile friendly?
LikeLike
Chad, thanks! I’m in the process of playing around with some ideas for Salesforce1 & Flows, but for now the only options that come to mind would be embedding a Flow in a Visualforce Page instead of using this URL method. This isn’t a very smooth thing to do at the moment, until maybe Winter ’17 when the UI is improved and you could just have a finish button for them. I’m looking into some other options that I hope to be able to share soon!
LikeLike
David, is it feasible to track time without having to click on the track time button? For example, have the new custom filed simply accumulate time whenever an agent opens the case?
When I looked at your solution (which was quite cool) I got the impression it requires an agent to positively indicate they are working on the case vs having SF collect the time in the background..
Thanks for the effort and the time you took to build this posting.
LikeLike
Andy,
When I first developed this solution for my last company, that was what they wanted, a click. Yes, you can do it with a Visualforce Page that tracks that based on if the Case is open. I have seen something like that work though, and I’m sure there is probably an App by now that does it. I’ve got that in my queue of things to build and write about, but I just haven’t yet had the time to knock that one out. Hopefully in 2017!
Thanks,
David
LikeLike
Thanks for the reply. While I am not skilled enough to build the code you’re considering, I’m working with a team where they may be able to accomplish the capture without the “button”. It’s an issue where time capture is important but historically they’ve only focused on duration. I suspect your solution answers some of the details of “auto capture”. If I can get the team to build the rest of the solution without the button I’ll ask them to forward their solutions to you.
Thanks again.
LikeLike
So I’ve discussed various ways to do this with more capable developers. The solution that appears to make the most sense is to use native browsers functions to detect and time the amount of time a user is in an active screen. Chrome and Firefox both have functions that do this.
The next step is to capture the time from the function and pass this data to SF.
Finally the data gets matched to the case number and you build an accumulation filed (bucket or otherwise).
The initial skills to to the time capture in the browsers apparently relies on Java skills. Then it’s SF Visual force code.
Haven’t built this, but I’m trying to shepherd the Java and Visual Force dev’s to see if it can be built.
Does this approach make sense to you or would you have further ideas/suggestions?
Thanks again.
LikeLike
David, I found you post while looking for a solution to automatically track the amount of time that a rep had a case open. I am looking for an app that does the following:
• The times should automatically start when the rep opens the case tab for viewing.
• The timer itself should be hidden from sight; the rep should have no interaction with the app.
• The timer should continue to run if the browser is minimized to the taskbar. The only way to stop the timer is to close the tab.
• If the rep closes the tab, the record should be saved to a custom object.
• The custom object should be reportable.
o The following should be recorded:
Timestamp
Running User – Person that was viewing the case
Case number
Duration (seconds or minutes)
• The app should still accurately record times if the rep has multiple case tabs open at the same time.
I’ve come close with my coding efforts, however, my solution only works if the reps have one case tab open at a time.
Please advise.
LikeLike
Keith, I’ve looked into doing this, but I’ve not yet allocate the time for it. It’s in my list of stretch goals to build out, and will be a new blog post if I do get to it.
LikeLike
Dave – let’s say the work starts and stops multiple times on the same Case (multiple, independent steps, etc. I’m working on the case, pause for an hour or so to work on something else (or go to lunch!) and want to resume working on the case. Will this method create two records in the TimeTracking__c object? It looks like it will, as long as the prior record is not still “open”, just haven’t tried it yet.
LikeLike
Chris,
That is exactly what it will do. You can close and open the case multiple times, and it will just create a new record and track the time again.
LikeLike
This is great David – I have many client’s who keep asking for this. Now if they can get their users to remember to click the start and end button remains to be seen…..
LikeLike
David,
I am running into a type mismatch error when attempting this flow. It seems to be caused by the 18 digit user id instead of the 15 digit user id. Have you run into this.
Error:
An error occurred at element Create_Time_Tracking_Record (FlowRecordCreate).
INSERT — INSERT FAILED — ERRORS : (FIELD_INTEGRITY_EXCEPTION) User: id value of incorrect type: 00530000007NXBVAA4
The user id that is passed on the Start button click is 00530000007NXBV.
Can you provide any thoughts of how to get around this?
Thanks!
Mike
LikeLike
Please disregard, after reviewing my custom object the User was looking up to the wrong User object and that is why the field result was an invalid type. Thanks for your help as this will be a great option for a tracking need we currently have.
Have a great night!
LikeLike