For those of you that are still waiting to get struck by lightning, here’s another feature that you can marvel at until you make the move over (for those of you not using a console). For me, this is going to be something I will look to start implementing in all of the Org’s I’m working in that are using Lightning. I was excited about this feature, and already deployed it to my internal Org. Previously, the Utility Bar only available in a console app, but now it is available for everyone regardless of if you’re in a console app or not.
Here’s a quick look at our Utility Bar in action:

Now, let’s talk about how this works, and why this can maximize productivity for you and End Users. If you are in Lightning, you can go edit an existing App. If you’re just getting started with Lightning, you’ll need to navigate to the App Manager and create a new Lightning App. In the Lightning App wizard you’ll find the Utility Bar as the middle option.

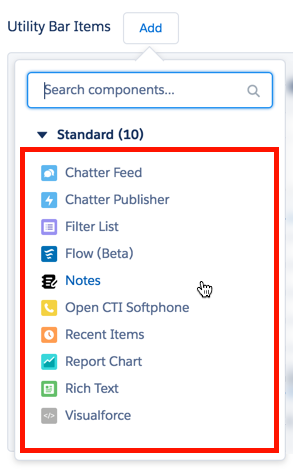
What can we do? Pretty much whatever we want! There are 10 standard items already in there for us, but you can also develop your own custom Lightning Components that can be used in the Utility Bar.

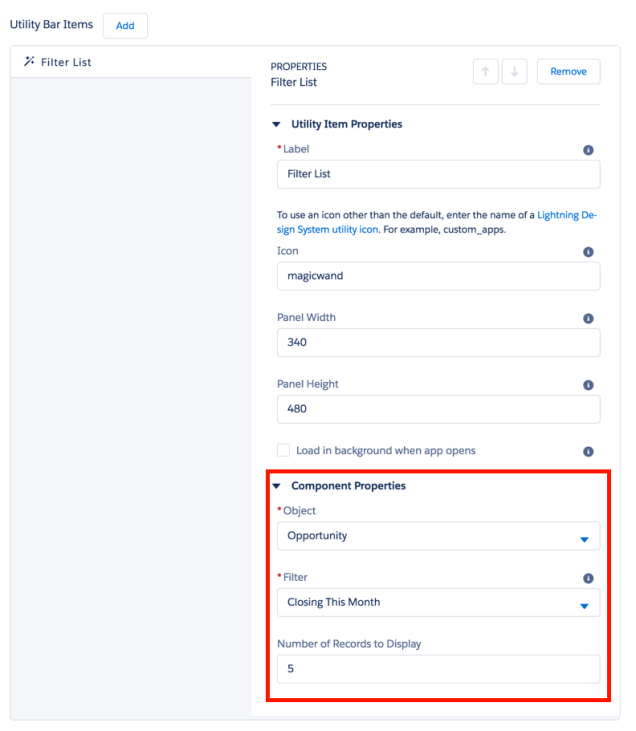
Let’s say we want to add a Filter List (List View) onto our Bar… say our Opportunities Closing This Month. Sure, that might be in the Recently Viewed List Views on the Opportunity Tab, but it isn’t guaranteed to be there.
Under the Utility Item Properties we’re able to customize the Icon, Width, & Height. You’ll see that we can also have it load when you open the App. This is is a feature you’ll typically want to run if your doing something like CTI.
Icon
Back when Lightning Experience just came out, you had to download the images from Lightning Design System. Not anymore, you can now reference the Utility Icons on their site with just the Icon’s name (https://www.lightningdesignsystem.com/icons/#utility). Be thoughtful in the Icon you select, make sure it makes sense for your Users.
Width & Height
This is one of those things you’ll want to adjust as you test and see the actual size of the component you’re using is on the screen.

Now that we set our size, let’s determine what Object, existing List View (filter), and how many records we want to return.

Simple as that, we’ve added our first Utility Bar Item!! Let’s do another and put in some of our Key Links that people want to see. All we need to do is select the Rich Text option and then paste in our Links for the End Users to access.

After you Save, your Utility Bar is ready for action!

This is one of those features that I’m super excited to play around with!
LikeLike
This is one of those features in the new release that I’m super excited to play around with!
LikeLiked by 1 person
Thanks for the walk through–one thing that confused me (even with my 4 certs) is that it is setup through the “App Manager” not the Lightning App Builder. You say that in the post, but I couldn’t get it through my thick head.
LikeLiked by 1 person
You are not alone in that confusion. They Setup Menu navigation in Lightning Experience needs some work… things aren’t where you think they’d be 🙂
LikeLike