Mastering Sharing Sets in Communities

Sharing Sets were added to Customer Community Plus and Partner Community Licenses in the Winter ’19 release.  With this update, enabling sharing inside those Community types has become much easier.

Sharing Sets let you take a Lookup (typically Account, Contact, or User) from the Community User, and match it to records in your Salesforce Org that also have that Lookup value. For instance, below we are sharing all Projects that have an Account that matches the Community User’s Account.

You might be thinking, “That was really cool, but I have a complex sharing scenario that isn’t an all-or-none scenario?”

You are able to expand this by adding some creativity with a “backend only” Lookup for the Object. You can conditionally fill this field out using the automation tool of your choice (typically, I use Process Builder). By then setting your Sharing Set up to use this conditional Lookup instead of the one you are using internally, you’re now sharing just the records you want to share!

Make sure you are very clear with the name of this backend field so that Admins and Users are not confused if they see it.

What if you have complex Account hierarchies?

Not to fear! Account Contact Relationship saves the day. If the Contact has a match with any of their Accounts you can grant access via the Account (if that is how you want to share the record). I always look to enable this to future proof an implementation, instead of having to adjust your sharing down the road. Another benefit of using Account Contact Relationships is that it allows you the ability to expand your sharing with one off scenarios outside of an Account’s hierarchy.

Let’s now go through the setup of sharing Projects conditionally in a Sharing Set using Related Accounts and a conditional Lookup for the Account.

In this example, we are assuming that your Lookup Field and the Automation to populate that are already setup.

Sharing Sets are something people often overlook, and can seem hidden if you are not experienced with Communities. To access your Sharing Sets, go to Setup –> Communities Settings –> Sharing Sets.

Once you have selected the Profile(s) you want this Sharing Set to apply to, you can select the Objects you want to grant sharing on.

NOTE – The list of available objects is based on an object’s Sharing Settings for External Users in your Org.

We first have to grant access to the User (Community User) based on what field. In this scenario, we are going to be using Contact.RelatedAccount to share records.

We want to now select the Lookup to match with the Contact.RelatedAccount (which is all of the Accounts they are associated to).

This is what the access mapping should look like before we hit Update. Note, these mappings are not saved until you hit Save in the Sharing Set.

After hitting Update, you will see that we have successfully configured the Project’s access for this Sharing Set. Repeat this for the

This expanded usage of Sharing Sets should solve most Community related sharing scenarios. If you have anything more complex there is always automated Manual Sharing via Apex or PB+Flow that you can fall back on, but try to utilize Sharing Sets when possible!

Redirecting Users with Flow, with no code!

Previous blog entries on my site (and many others) demonstrate the crazy workarounds that we had to utilize to redirect Users to a specific page after they complete a Visual Flow.  Now, we’ve got a few different options available to us through the Unofficial Flow site that Alex has been maintaining and adding to.  If for whatever reason you’re not yet following Alex and keeping up-to-date on all of the new items getting released on the site, this is a friendly PSA to do so.  Now, let’s get into the meat of this post… what our options are for redirecting Users.

The prerequisite for this, is you need to install the correct package (which is linked in each option).  I expect in either Spring ’19 or Summer ’19 that one or all of these will be natively available to us in Flow.  Currently, there are three main options for redirecting a User in Flow:

Load Web Page

This is my favorite of the three options currently available to us.  This one does take a bit more work compared to the others, as you need to use a Custom Setting or something similar to

loadwebpage

The way this was built, you’ll see an Output option that you are prompted to fill out.  You’ve just sent the End User to another page, so they’re not inside the Flow anymore.  However, the Flow will continue to go down it’s path without the User.  Assuming there are no errors, you can add in additional logic after the redirect takes place, and knowing where they were sent to can potentially be apart of your decision making of any updates to do post-redirect.  This also assumes that no Screens requiring Input are after the redirect.

If you’re looking to redirect someone to a non-Salesforce URL, keep in mind the browser settings can impact how this experience happens (some might have a prompt).

Navigate to Salesforce Record (SObject)

This is what we’ve been waiting for the longest.  The majority of the URL redirects have been to send someone to a newly created record, instead of having them redirected back to where they came from.  This action just asks for the record ID and then sends you there.  One of the best parts of this action is how simple it is.  You don’t have to worry about the rest of the URL, that is taken care of for you!  Simply throw the record ID in and you’re done.

NavigateToRecord

Navigate to Related List

The nice part of this, just like the Navigate to Salesforce Record component, is you don’t need to worry about the URL, just the API Name of the Related List and Record Id that you want to navigate to.

NavigateToRelatedList

You can find the API Name of the Related List through either the Lookup Field on that Child Object or through the URL (my preference)

RelatedList.jpg

Recap: We now have multiple ways to redirect a User inside a Flow.  This opens up the possibility for many cool solutions where we can guide Users in our Org to any record or page without any use of code.  Let the customization begin!

Best Practices around Screen Sharing

These Best Practices will help you look polished when presenting to Clients or Co-workers.  These tips don’t really require any skill, they just require being prepared and aware when you’re about to share your screen.   The underlining theme of this post is to minimize the distractions that can cause your audience to not focus on what you want them to focus on.  By following these best practices (if you didn’t already), hopefully you’ll be able to provide a better screen share experience for your audience.

I use a Mac, so some of these will be tailored towards Mac Users.

Enable Do Not Disturb

There are countless reasons why you want to always use Do Not Disturb when presenting.  Your Client/Coworkers do not need to see messages from your family and friends popping onto the screen.  Also, if there is a group chat (ex: Google Hangouts, Slack, or Discord), you don’t have any control over what might be talked about while you are sharing or after you had started sharing.

Turn on DND

Michael Welburn recommended using Muzzle App.  Muzzle App will silence your notifications automatically when you’re screen sharing.  This takes the chance of you forgetting to engage DND before you are sharing.

Use the Full Screen

Having your application window not take up the whole screen is painful.  How do my eyes not wander around the rest of your screen looking at your Folders or other visible Applications?

NotFullScreen

Hide your Dock

Even in the below screen shot where the Dock is small, it’s adding taking the focus off what I’m presenting on.  In addition, why does the person watching my screen need to see what Applications I have open.  With the Dock always showing, your Applications are unable to take up your whole screen, as they’ll stop at the top of your Dock.  You can still access your Dock briefly, but because it will hide itself after being used it won’t be a big distraction.  Keep an eye on what you keep in your Dock, it’s just like your Bookmark Bar and Chrome Extension (to be talked about soon).

Dock1

Don’t have unrelated Tabs visible

This one I used to be guilty of.  I would share my screen with 50 Tabs open.  Split out the Tabs that you need to use for your presentation, and hide or close the others.  Pay attention to what Tabs you do choose to keep open.  I’ve seen many questionable Tabs left open when someone shares their screen.  Tabs give a short summary of what you’re looking at, so don’t think people can’t tell.  Any non-related Tabs being visible really don’t help.

Avoid Email, Texts, and Chats

This is similar to the Do Not Disturb point, but it has to be said.  Nobody whose watching you demo Salesforce needs to see your Inbox or Chat screen.  If you must navigate to your Inbox or Chat, pause the Screen Share.  You have no idea what Emails might just have been sent to you, or messages your Team or other groups have sent.  There is no good that comes from showing Email or Chat on a screen share.

Whether you have 20,000 or 2 emails in your Inbox, don’t be showing it off.

Hide Bookmarks Bar

It was strange at first when I hide my Bookmarks Bar.  But, opening a new Tab or using the Bookmarks
Don’t keep this Docked for your presentation.  It takes up a decent amount of screen space, and the people watching your screen will be distracted from your presentation and read your Bookmarks.

Bookmarks2

You can access through the top bar.

Bookmarks1

Cleanup those Extensions

While you can technically access all of your extensions without having them visible, there are going to be some that you simply use too often to not have visible.  That’s fine.  Just work to keep this to a minimum.  You don’t want to have half of your address bar taken up by extensions.

Before

AllPlugins

After

Plugins

Does that remind you of a show on HGTV?  It’s amazing how much cleaner the Browser looks.  You’re not taking the viewer’s eye off of your presentation anymore.  And, you can still access less frequently used extensions quickly.

AllPlugins1

Use the Presentation Mode

If you’re doing something that has lots of distractions, like Lucid Chart, use the Presentation Mode.  Even if your browser is using the Full Screen, it’s going to be hard for your audience to Focus with all of the awesome shapes they have available.

Presentation Mode

Zoom to a reasonable level

This one I am guilty of forgetting about the most.  Be mindful of the size of your screen and your audience.  I tend to work zoomed out Salesforce, and have to zoom in when I am sharing my screen.  It’s extremely easy to do this, and if you’re unsure you can always ask your audience if they can see your screen clearly.

Zoom.jpg

Use multiple monitors

Using multiple monitors allows you to “cheat” and possibly have search Google, have Setup Menu of the Org open, take Notes, and communicate out sight of your audience.  The biggest trick here, is making sure you know which Monitor is being shared.  In some cases, you might be in a new screen share program and not sure what the defaults are.  Make sure both monitors don’t have anything listed in this post visible when you accept presentation, once you are sure the right monitor is being shared you can open other applications.

One of my favorite tricks with my second Monitor is to login to the Org(s) I am working in on my second monitor.  This allows me to drag in the prepared window into my other screen and the viewers do not see any of the Login process.  I find this very important if you’re a Consultant, because you don’t want your other Clients names visible through the saved Usernames that might be showing.  Also, the viewers do not have to see you navigate through multiple pages.  You look more prepared.

Mission Control & Hot Corners

Mission Control is something that saves me an awful lot of trouble.  I can easily see all my applications and select the correct one to go to.  While, keeping all my applications full screen!

Mission Control

I personally love to use Hot Corners, and use that in most scenarios.  The Hot Corners allow you to select one of the actions and have it happen when you move your mouse to that corner.

Hot Corners

Mission Control also can help you utilize the Multiple Desktop feature.  I don’t use it very often, but it does come in handy.  And, if you’re unable to use two monitors, this could come in handy.  It allows you to group your applications onto different Desktops.

Desktops

What’s your Road Map?

What are you demonstrating on your screen share?  If you’re showing off a new piece of functionality that you built to a stakeholder, be prepared to with a good story.  If you’re not able to make your  presentation follow a storyline, it can seem disjointed and take away from the awesomeness that you built.  You should do a dry run of your presentation, because running into an error (ex: Unhandled Fault) on a demonstration with a Client is not what you want to have happen.  And, it could throw you out of rhythm and derail the rest of your presentation.

You Don’t Have to Share

Did someone just ask you to present and you aren’t ready?  Or, did you get an email that you have to open, but you only have one monitor?  Don’t be afraid to pause/stop the screen share until you’re ready.  Tell your audience to hold on for one moment, and resume (or begin) the screen share when you are prepared.  Less can go wrong when you are not sharing your screen, than trying to fumble around while your screen is being shared.

The Lowdown on Uploading a File inside a Flow

One limitation that has always been really pesky with Visual Flow was the inability to easily add a File Upload into the Flow.  There have been some ways to tie it together through Visualforce, but it really wasn’t the smoothest experience.  Now, we get a big step forward with the out-of-the-box fileUpload Lightning Component (GA Spring ’18)!  I’m excited about what is possible with this in just the Spring ’18 release, but it goes to show you how much more is about to be possible in Flow.  So, let’s get into it!

Upload Files

Upload File Progress

Some things you’ll need to know … as there are some Input and Output options that don’t really work.  I am hopeful that Salesforce will clean this up when it goes GA though.  I’m going to be grouping these variables in that order, so that you don’t attempt to use a variable incorrectly.

Input Variables:

*File Upload Label – The text on the file upload button.

*Related Record ID – The ID of the record to associate the files with.  If no value is passed, the component is disabled.

Accepted Formats – The accepted file types.  Enter a comma-separated list of the file extensions (such as .jpg) that the user can Upload.   This is great, you can limit them to a specific type of file, to hopefully reduce the chance for incorrectly uploading the wrong file type.  While pictures of my dog are great, my company might only want me to be uploading a PDF inside this Flow.

Allow Multiple Files – Lets the user upload multiple files.

Disabled – Displays the component in a disabled state.  This allows you another way, besides not putting in a Record ID to disable the Upload ability without having to build two screens to dynamically hide it.

Hover Text – The tooltip to display when a user hovers over the component.

Output Variables:

Content Documentation IDs – The IDs of the uploaded files.  Store this value in a text collection variable.  Unless I am missing something, this really shouldn’t be an Input option, as it should be housing the Output IDs of the upload.

Uploaded File Name –  The names of the uploaded files.  Store this value in a text collection variable.  Unless I am missing something, this really shouldn’t be an Input option, as it should be housing the Output IDs of the upload.  I did attempt to rename the file I was uploading, and I was unsuccessful using a default value here.  

How do you get to the File Upload?  You’ve got to be inside a Screen Element.  Inside there, you’ll need to Look for the Extensions… which means you need to scroll down.

ScrollDown.png

Drag out the Lightning Component

Add Lightning Component.png

Now, you’ll want to select from the dropdown the uploadFile component.

SelectComponent.png

And, you’re all set to begin mapping your inputs and outputs.

ComponentReady.png

Note – the Unique Name is not going to be visible to the End User on a Lightning Component, it’s just what is rendered in your preview on the Right.

With that understanding, let’s talk about some considerations…

We have to have a Related Record ID for the File Upload component to be active, this means we already must have the Record Created.  In some scenarios, this means you’re going to have to have two Flow Screens, and break the process up.  But, with the “Progress Indicator” that is on the roadmap to also be coming out, hopefully that isn’t really a big deal… and we’ll have something like this to let the User know where they’re at:

FlowProgress

Another is that depending on what you’re doing, it might not make sense to use a Visual Flow with a Lightning Component embedded if you’re the one developing the Lightning Component.  In some scenarios I would find embedding a Lightning Component inside a Flow to be make things more complex (which is good not to do).  So, in some cases you’d be better off developing a Lightning Component that does what you wanted to do, and not use Visual Flow (gasp, I said it).  But, if you’re looking for a functional add-on solution like Uploading a File or showing a Process Bar, those are definitely value-add and make a ton of sense to pop into a Visual Flow.

Default Variables on Choices in Visual Flow

One of the pieces that can be a bit difficult in Visual Flow to work with is having the Default value in a dropdown.  There could be a number of different reasons you’d like to have a dropdown or other type of Choice field to reference existing values.  However, it’s not the most straightforward inside of Visual Flow.  Also, the User Experience isn’t perfect, but it is very functional.  This post is going to be more conceptual than walking through all of the parts of creating and connecting a Visual Flow.  With that in mind, I am making the assumption that we’ve already got our Record Lookup, Picklist Field Variable assigned, and the other basics setup.

First let’s drag on our Dropdown Field into our Screen Element.

DragDropdown

Now, let’s create our Choice that will be our “Default” value.

SelectNewChoice

As we create the Choice, notice the “T” on our Label so that we can use a Rich Text Editor on the Label.  Not something you typically think of with the Label of a Choice, but it’s there for you!

Label

When we’re in the Rich Text Editor for our Choice’s Label, we just need to drop in the Variable we used in our Lookup that has the Default value.  Note… you can get as creative as you want with the label here.

IndustryLabel

It might also be safe to put in a default value for the variable with something like “– Please Select –” in the scenario that the field is blank on the record.  Cause, if the Industry variable in the above example is empty, the API name of the Choice will be used instead.

Now, we need to set the Stored Value of this Choice to be the Variable as well.  This means, that if they don’t modify the selection in the Dropdown that the current value will be what is updated on the record … so don’t miss this and make the value get cleared out because the Stored Value is null.

StoredValue

Now, setup the other Choice value(s) that you want to use.  In this scenario, I’m just going to use the default Picklist field of Industry.

Choices

Now, when used in action, it looks like this:

DefaultValue1.jpg

DefaultValue2

And, just like that we’ve defaulted a Choice field in Visual Flow!  Simple to do, but easy to overlook.  This little trick came from the Salesforce Discord channel: https://discord.gg/D8YGZkN, so give that a look if you use Discord.


Finally, a Flow Component in Community Builder!

A peek inside my Winter ’18 pre-release Org and I found one awesome Flow improvement that I’ve been waiting for quite a while.  We now have a Flow Component inside our Community Builder!  There is nothing fancy about this component from the one we’ve got in our internal Lightning App Builder, but the fact that we can now display a Flow to our Customers and Partners without it being in Visualforce is fantastic.

Under the Process Automation Section in Components, you can now see the Flow Component visible for you to drag onto your page.

Flow Component.jpg

Use cases would include providing a guided experience for Case Entry, or a place for Customers to fill out a Survey.  You can make a Flow it’s own Page in your Community and set the page to be visible without a User Logging in by changing the Page Access.

Flow Component 2.jpg

Make Public Flow

Now, we do have some limitations (at this time) around what values we can “pass in”, so you’re not going to be able to pass in any parameters through the URL.  This does limit some of the creativity that we have, but for some of the basic use cases this will do just fine.  You’ll see below that it really is an exact copy of what we have in the Lightning App Builder.

Flow Inputs.jpg

As you can tell, I’m quite excited for this update.  I know that this will allow the use of Flows in Communities on a much larger scale, as now we don’t have to worry about the ugly Visualforce Page UI for the Flow being visible to customers or partners.

How to set the Flow Finish Behavior to a newly created Record WITHOUT an additional Screen

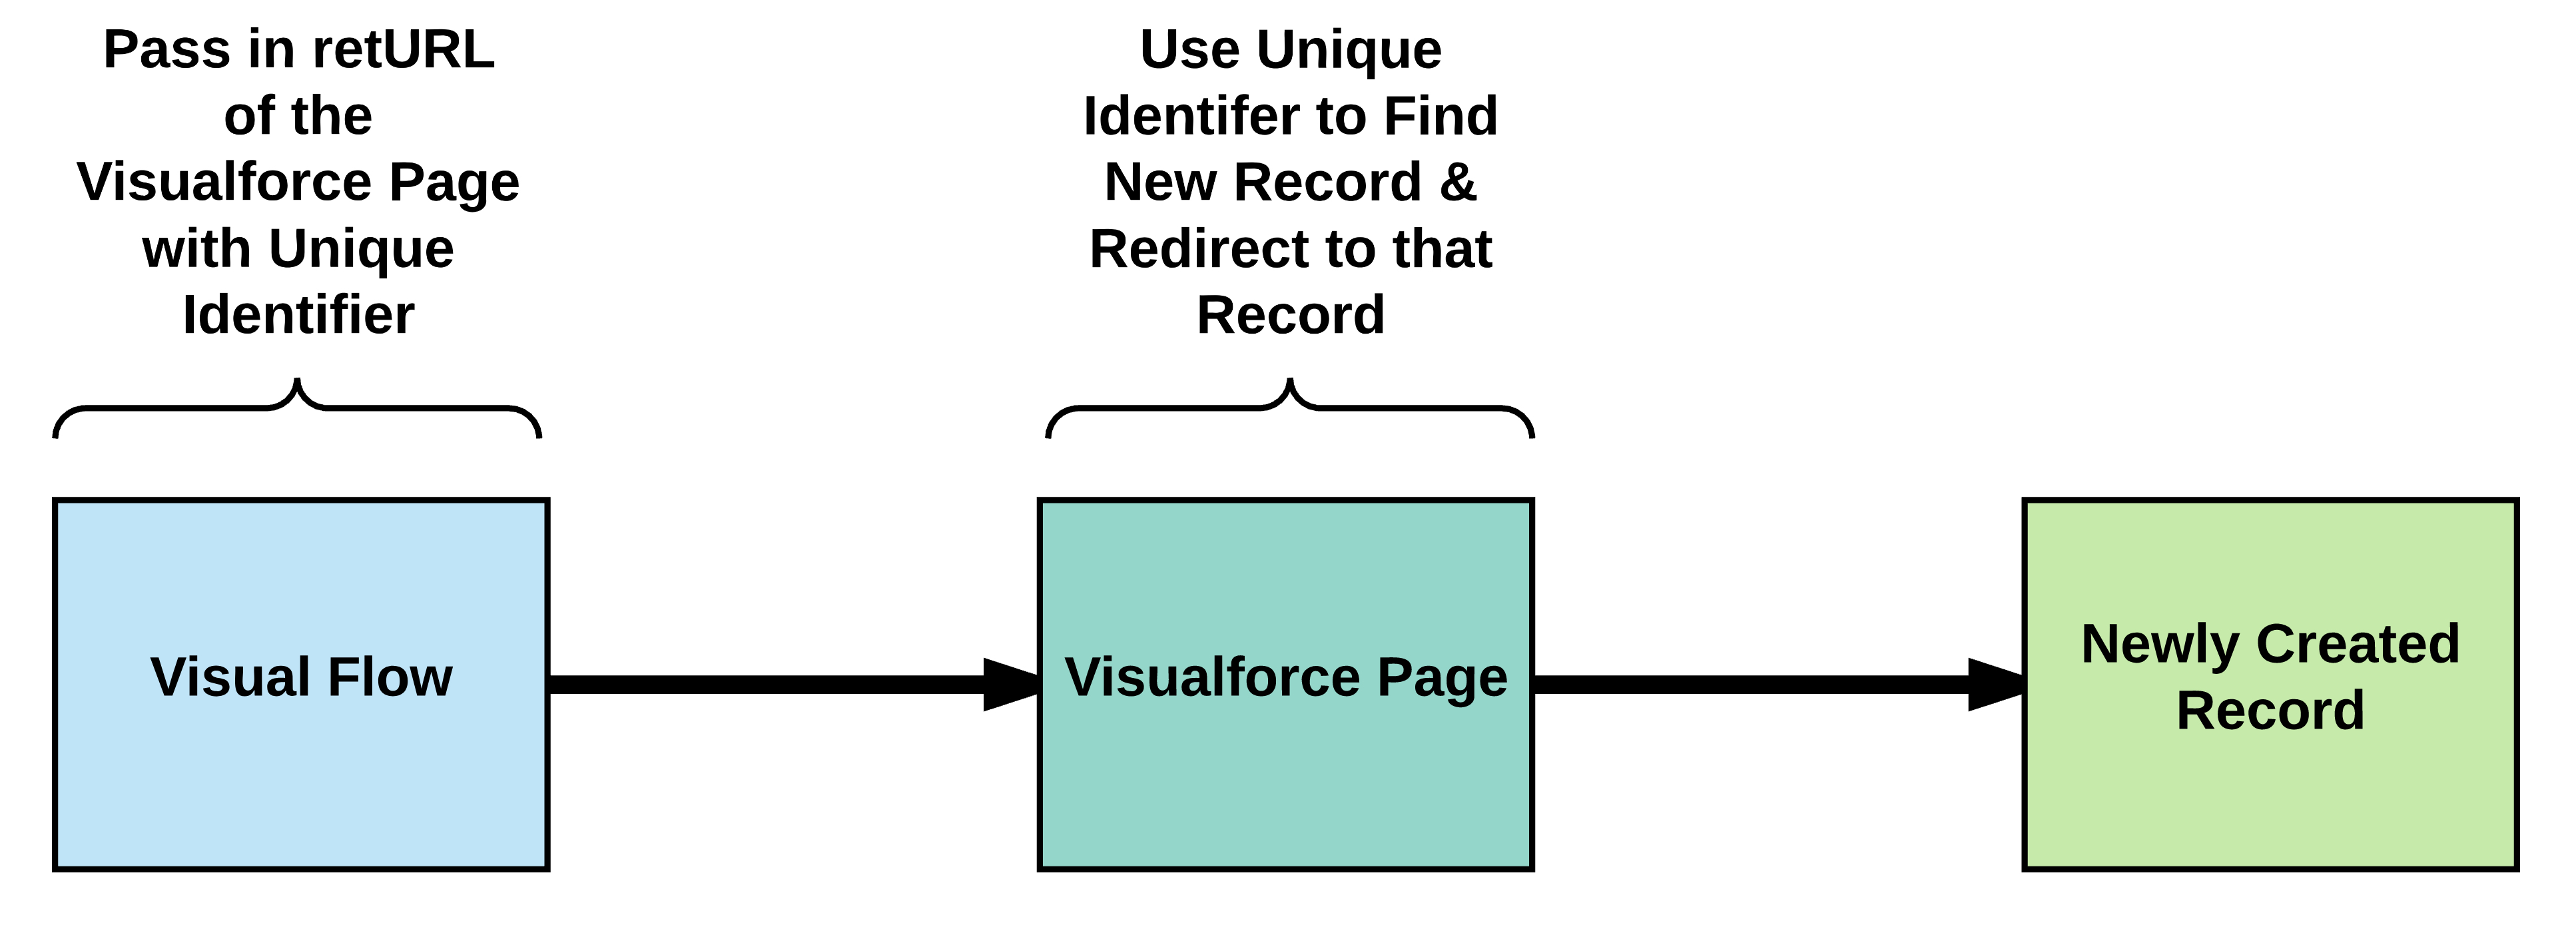
One of the biggest issues that many Flow Users have when they’re looking to build a Visual Flow, is that they can’t redirect the User to the newly created Record without having an intermediary Flow Screen confirmation page.  It adds one pointless click into the mix that we as Admins always try to reduce throughout our Orgs.   What if you didn’t have to use How to pass a new variable out of Flow post to do this?  There might just be another way!  Let’s breakdown the concept of the End Users’ process at a high level…

FlowVFRedirect.jpg

While we are still going to have to use Apex and Visualforce to make this happen, we’re now able to do it without the extra Screen.  This is because, by the time we Redirect our End User to the Visualforce Page, the newly created Record is in the system.  We can then use a really simple SOQL query to find the newly created Record and immediately send them to that record.

Let’s break this down further and talk about the first piece of this process… our Visual Flow and how it can be launched.

The Visual Flow can be launched with either a Visualforce Page or through the URL.  I would typically aim for the URL, if you’re in Classic, as you can take advantage of the new Flow Skin.  For this blog post, that’s the method we’ll be using, and we’ll be doing it through a Button.

In this scenario, to keep it simple, we’re going to have the Flow create a Contact and then redirect us to that Contact record.  So, we need to create a Text Field called Unique Flow Identifier on the Contact for us to pass in as a variable to the newly created Record.

Unique_Flow_Identifier.jpg

We’ll cover what goes into this Field shortly, but let’s take a look at our Flow first.

Create Contact Flow.jpg

We’ll need to create our AccountId and UniqueId Variables, and ensure they are listed as Input variables.

AccountId

Unique_Id

Notice how we are passing in our Unique Identifier into the Contact on creation.  This is how we will query to find it.

Record Create

Our Flow is all set, so we can Save and Activate it.

Now, we’ll get to the Visualforce Page and Apex in a moment, but first let’s assume that we’ve already created our Visualforce Page called FlowRedirect so we can talk about our Button’s URL.

/flow/Create_Contact?AccountId={!Account.Id}&UniqueId={!$System.OriginDateTime}{!Account.Id}
&retURL=/apex/FlowRedirect?Id={!$System.OriginDateTime}{!Account.Id}

In this, I am using the Account ID and System Origin Date Time to combine together and be my Unique Identifier.  You could take this a step further and also use the User ID or another parameter.  If you plan to re-use the same Visualforce Page for multiple Objects, you’ll want to pass in another parameter to let you know what Object you want to query.

Alright… let’s create our Apex Controller.

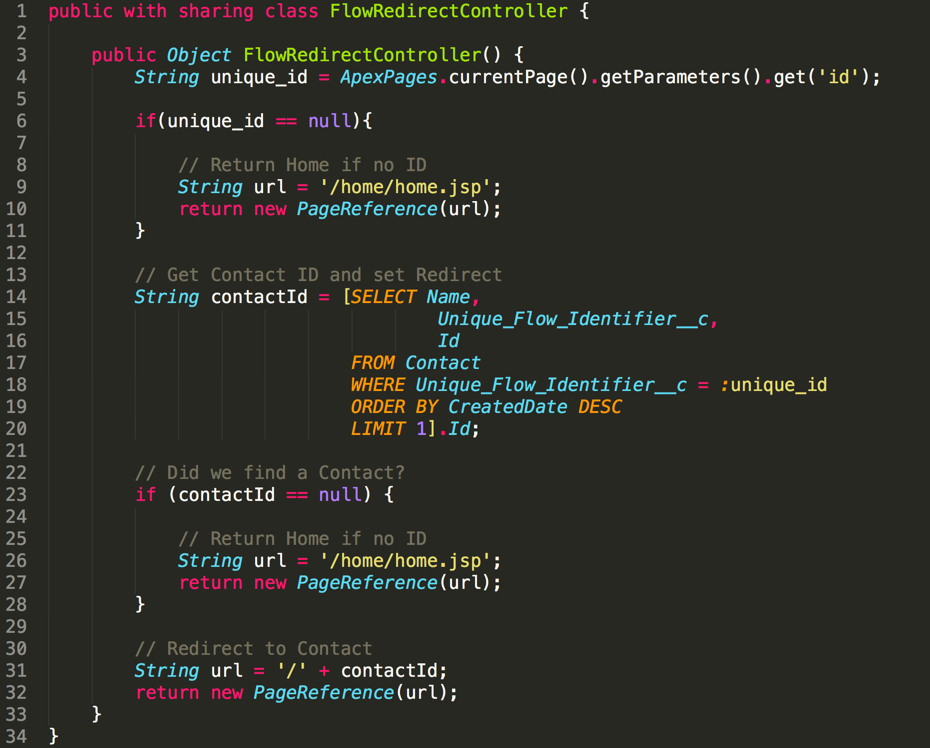
FlowRedirectController.jpg

public with sharing class FlowRedirectController {public with sharing class FlowRedirectController {
public Object FlowRedirectController() { String unique_id = ApexPages.currentPage().getParameters().get(‘id’);
if(unique_id == null){
// Return Home if no ID String url = ‘/home/home.jsp’; return new PageReference(url); } // Get Contact ID and set Redirect String contactId = [SELECT Name,  Unique_Flow_Identifier__c, Id  FROM Contact  WHERE Unique_Flow_Identifier__c = :unique_id ORDER BY CreatedDate DESC LIMIT 1].Id;
// Did we find a Contact? if (contactId == null) {
// Return Home if no ID String url = ‘/home/home.jsp’; return new PageReference(url); }
// Redirect to Contact String url = ‘/’ + contactId; return new PageReference(url); }}

Our Apex Controller is grabbing the id that we send in through our Button, and then doing a quick Query on the Contacts in our system to find the match.

Now for our Visualforce Page, which is going to be bear bones, because the End User shouldn’t hopefully ever seen it.

Visualforce Page.jpg

<apex:page controller=”FlowRedirectController” action=”{!FlowRedirectController}”>
</apex:page>

Our Visualforce Page is doing an Action of calling our FlowRedirectController on the opening of the page.  Resulting in an immediate redirect to the newly created record.

Let’s watch it in action!

2017-07-23_16-51-42-1

And just like that we have bypassed the “must have a screen” feature in Flow for a redirect.  I’ll be looking to get something on GitHub in the near future to clean this process up further, and provide some test coverage.


Get Latitude and Longitude on Custom Address Fields in Salesforce (US Addresses Only)

This is a fun little way to get Latitude and Longitude for US Addresses on any Object in Salesforce.  Not everyone has the skills or budget to do a Google API callout and get the Latitude and Longitude for any Object, but this is something that can be solved pretty easily for anyone not dealing with foreign addresses.

First, we need to turn on Workflow Rules for the Geocoding from Data.com.  Go to Setup, and type in Data Integration Rules

Data Integration Rules.jpg

Click on the Geocodes for Account Billing Address.  You don’t have to do this on the Account.  You can use Lead or Contact instead.  I would personally suggest that you use whichever of the Objects has the least amount of automation and/or usage volume around it.  If you don’t use Leads at your company, then I would substitute everything “Account” for “Lead”.

Account GeoCode

Select Edit Rule Settings.

Edit Rule Settings.jpg

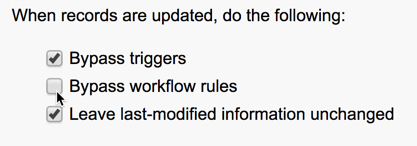
Uncheck the Bypass workflow rules.  Salesforce is doing an asynchronous callout to Data.com Geo to get the Latitude and Longitude, and that response from Data.com Geo is not going to happen in the transaction of your Save.  It happens quickly after, but it is in a different transaction.  You’ll want to ensure you don’t have any recursive issues that might arise where a Workflow fires twice, so test it thoroughly!

Uncheck bypass WF

Alright, so we’ve got Data.com Geo all set to go.  Now, we need to create a Lookup Field to our Custom Object on the Account.  Make it clear what this field is for, and write a description.  Keep the FLS minimal, as nobody will need to see this field but the Admin.

Lat Long.jpg

We also need to create a Geolocation field, if you haven’t already, on the Project Object.  This will be where you store the Latitude and Longitude values.

Geolocation Field.jpg

Let’s navigate to setup a new Process Builder.

Project PB.jpg

Set Project as the Object this Process Builder runs on.

Set on Project

Now, let’s set our Criteria.  You want to ensure that this fires when you want it to.  I’m accounting for an Address change in my criteria.

Criteria.jpg

Time to setup our Immediate Action of Record Creation (of an Account).

Set Field Values.jpg

Activate and we’re ready to move to the next item.  Creating a Flow that will delete the newly created Account and Update the Project.  Then we’re going to create a new Process Builder to launch a Flow.

The first element of our Flow will be a Record Delete, to Delete the Account.  Drag the Record Delete element out.

DragDelete.jpg

In the Record Delete we’re going to need the AccountId variable that we will pass from our Process Builder to be made as Input Only, allowing that to happen.

AccountId var

Ensure we the Record Delete is setup correctly and hit Save.

DeleteAccount

Now, let’s set our Record Delete as the Start Element of our Flow.

Delete as Start

We need to update our Project, so we will drag out the Record Update element.

Record Update drag

We’ve got a few more variables we need to create.  First, let’s create ProjectId and ensure it is marked as Input Only.

ProjectId

Second, we need to create Latitude and mark it as a Number with a Scale of 8 and Input Only.

Latitude

The last variable we need to create is Longitude and mark it as a Number with a Scale of 8 and Input Only.

Longitude

Let’s fill out the Record Update using these variables.

Record Update

Hit Save and connect the Elements together.

Connect the Dots

Save your Flow.

Save the Flow

Activate your Flow.

Activate Flow

Great, now we’re ready for the last step.  Creating our Process Builder to Launch the Flow.  Navigate back over to create a new Process Builder.

Account PB

Select Account as the Object.

Account PB 2

Now, let’s set our Criteria.  We’re going to ensure that this only fires when the Project field is filled out, so this doesn’t accidentally fire at random.

Account Criteria.jpg

Time to map our Fields inside our Flow Immediate Action.

Flowvars.jpg

Save the Immediate Action, and Activate your Process Builder.

Congrats!  You now have Latitude and Longitude being populated on your Custom Object for all US Addresses.


Introduction to Dynamic Record Choices in Flow

Dynamic Record Choices are one of the coolest features in Visual Flow that often gets overlooked.  In this post we’ll be going over a brief introduction of what and how Dynamic Record Choices might be used.  I’ll be following this post up with an in-depth dive of how you use these in different scenarios.  So, what is a Dynamic Record Choice?

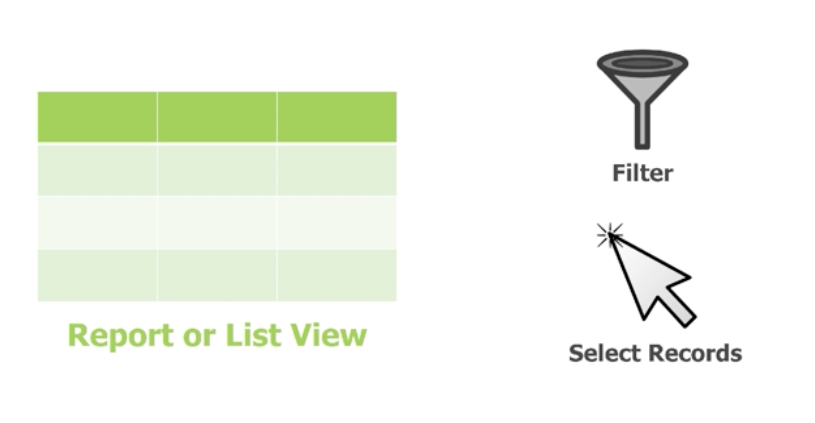
A Dynamic Record Choice is a query on an Object in Salesforce that you may add filters to, and have those results presented to your End User for selection.  The records that you return will be dynamic based on your filters, and the End User can select one or multiple records to perform an action on.

I like to think of it as a Report or a List View.  You select your Object, add your Filters, and then let the User select the record(s) they want to work.

DRC

Let’s say your Sales team that wants Tasks to be entered with minimal fields and effort.  Sales Users are annoyed because the Contact lookup on Tasks is not filtering to just Contacts on the Account record they’re on.  Dynamic Record Choice would come in with the Contact selection, as you can provide that list of Contacts and allow them to have a short-list of those Contacts.  Here is a visual comparison between Standard functionality and Dynamic Record Choice:

DRC compare.png

As you can tell, the End User Experience is going to be easier with the Dynamic Record Choice.  With Standard you’ve got to search, and with Dynamic Record Choice you’re able to present a dropdown (or multi-select picklist/checkboxes).  You can grab variables for filtering from anywhere in Salesforce very easily, since you’ll be using Flow.  It also allows you to be flexible and select multiple records at once and perform the same action on all of them.

Let’s talk about some negatives here… #1 is we have very Limited Labels.  Unfortunately, the only option we have is to concatenate a group of fields together to give more “information” about the results.  If many “columns” of information are needed, then Dynamic Record Choice might not be the right solution for you.

The second negative is something that is a Flow limitation.  Dynamic Record Choices have User Inputted Filters.  Some complicated filters simply aren’t possible in Flow.  To add, if you do want a filter from an End User, it needs to be on another screen.  Sometimes the clicks can make the End User experience negative.

Recap: Dynamic Record Choices rock and you should look at how they might streamline your End User’s lives.  They’re not like duck tape, because they can’t fix every problem, but they’re pretty awesome.  Dealing with a Dynamic Record Choice can be difficult the first few times, because there are a few moving parts to it, so be patient and make sure you’re testing thoroughly that the variables are all being passed through.

Tips for Successfully Deploying Wave Analytics

As much as I love Wave Analytics, it is not very fun to deploy from Sandbox (at this time).  There are many different things to keep in mind when moving Wave from one environment to another (even if it is just Sandbox to Sandbox).  Knowing these shortcomings ahead of your pending deployment will save you a big headache, as you can plan accordingly.  There is a good bit to discuss, so let’s jump right in!

Salesforce-Analytics-Cloud-cropped

Apps

These are nice and easy to deploy, but you have to be careful of the username naming convention you’re using, if you have any specific sharing to Users on your App.  This can be a problem if you’re a consultant and you’re setup in a Sandbox separately from the Production environment, and possibly the naming convention for your Username was switched up.  Or, it could be from you assigning the App to a specific Community User and that Community User was only created in your Source Org and not your Target Org.  Either scenario will cause an error.

WaveError.jpg

Dataflow

This is something that you need to be careful with.  The Dataflow that you build in your Source Org will overwrite the existing Dataflow in your Target Org.  This means, if you have anything in your Dataflow (if it already exists) in the Target Org, you need to make sure you still have it in the Source Org’s Dataflow, or it will be deleted.

The key with Dataflows is to immediately run them to get all of your Datasets populated as quickly as possible.  Make sure you’ve got all the fields in your Target Org that the Dataflow references, and that the Analytics Cloud Integration User has FLS.  You can deploy a Dataflow without meeting those requirements, and it will error when you run it if you forget.

Datasets

I’m going to go out and just say that you shouldn’t deploy any of your Datasets.  Let your Dataflow create them upon running the first time.  You run the risk of having the Dataset Name adjusted if you do anything out of sequence.  And, this can cause additional issues when you’re deploying complex Dashboards (as I’ll touch on in more detail shortly).

Dashboards & Lenses

Dashboards and Lenses are annoyingly close to complete.  These will show you an error when you first open them, because the datasets they’re targeting are empty.

Dashboard Error.jpg

What you have to do is make sure your Dataflow has successfully populated the new Datasets, and then go into the JSON of your Dashboard or Lens and make the adjustments.  Note on the above error, it will make you press Continue for every Dataset in your Dashboard… so don’t think it’s broke if you have 10 Datasets, you just have to click 10 times.

The first one, you’ve heard it a million times… don’t hard-code IDs in Salesforce!!  Well, in Wave, you’ve got no other choice.  When you deploy a new Dataset, your Target Org will have a new Dataset ID.  Your Dashboards and Lenses are going to be still referencing the older Dataset ID, and you need to go in and do a “Find and Replace” for the Dataset ID.  This can be pretty easy if you’ve got a simple Dashboard with one dataset, but once you get into double-digit, you run into potentially some of the other areas of trouble…

The Dataset Name also is used inside the Connector aka dataSourceLinks (how you link Datasets together so they dynamically filter) and in any PIGQL.  So, if you deployed a Dataset incorrectly and the name changes, you’re going to have to also update the Name in these spots similar to how you did with the ID.

Recipes

Recipes became GA in Spring ’17.  There extremely powerful and are getting even stronger with the Summer ’17 release.  In the Summer ’17 release they’re becoming accessible through the REST API.  What they allow you to do is to filter and transform an existing dataset extremely easily.  You can do joins to other datasets, bucketing of fields, adding of filters, and more.  The issue here is, they don’t live anywhere in the metadata (at this time).  So, whatever you create in a recipe, you’re going to have to manually re-create in your Target Org.  At the rate they’re improving all aspects of Wave, I am hopeful this becomes deployable with the Winter ’18 release.

Security Predicates

Unfortunately, Security Predicates don’t live anywhere (at this time) to where you can successfully deploy them.  Luckily these are typically straightforward, meaning that it’s typically a quick copy & paste to get your Security Predicate moved into the new environment.  When you’re adding a Security Predicate into your new environment, you need to make sure you meet these basic requirements:

  1. Analytics Security User has READ Access to all referenced Fields
  2. The Running User (you) has READ Access to all referenced Fields

In short, make sure you correctly deployed the FLS for the Fields that you had in your previous environment, or you’ll be running around in circles.

RECAP

Sometimes I wonder why I bother to deploy this at all.  It would be (at the time of this post) almost just as much effort to simply copy & paste the work over to the new environment.  Be careful of the known shortcomings and plan accordingly.  Because of these issues, depending on the size of your deployment, you need to be aware of the additional time it will take to deploy.